...
The architecture is based on a shared webapp connecting to separate databases or schemas. This allows for more cost-effective delivery of services, since many accounts can be hosted on a single app server. At the same time, each account has its own separate database and file upload directory to preserve data isolation.
...
Refer to the Knowledge Base for more detailed instructions at Installation using the Linux Bundle for more detailed instructions.
The basic Basic steps areto follow:
1. Create a new directory (e.g., /opt/joget) and extract the tar.gz bundle into that directory.
2. Install the Java Runtime Environment (JRE) or Java Development Kit (JDK) version 6 and above.
e.g. Example in Ubuntu: sudo apt-get install sun-java6-jdk
3. Install MySQL Server version 5 and above.
e.g. Example in Ubuntu: sudo apt-get install mysql-server
4. Create an empty database 'jwdb' in the MySQL server.
5. Execute the setup script to create the required database tables: ./setup.sh.
Alternatively, manually create the database tables as follows:
5.1 Populate the jwdb database with the SQL script in data/jwdb-empty.sql.
5.2 Edit wflow/app_datasource-default.properties to match your database settings.
6. Execute the bundled Apache Tomcat application server: ./cloud-tomcat.sh run.
7. Access the home page at http://localhost:8080.
8. Access the default Workflow Management Console at http://localhost:8080/jw.
Configuration
DNS Configuration
...
| Code Block |
|---|
*.example.com |
In this case, requests to all subdomains of example.com (e.g. account1.example.com, account2.example.com, account3.example.com) are directed to Joget.
For local testing purposes, it is possible to just modify the local hosts file http://en.wikipedia.org/wiki/Hosts_(file) . Please note that typically, hosts file configuration does not support wildcards so it would will be necessary to add separate entries for each subdomain (e.g., account1.example.com, account2.example.com, etc.).
Profile Configuration
Each account (tenant) is tied to a datasource profile. More info on profiles can be found at Custom Database Configuration.
In v3 Community or Enterprise Edition, only 1 profile is selected at a time. In the Cloud Edition, this is enhanced such that all accounts and profiles are enabled concurrently.
Open the file (joget.home)/wflow/app_datasource.properties. An Here's an example of the file content:
...
- The key to the left of the equals equal sign is the domain name, while the value to the right is the profile.
- Each profile has a corresponding file app_datasource-(profile).properties which contains the database settings.
- When a request is received, any matching domain name will use the associated profile.
- currentProfile is a special key to indicate the default profile to use if there are no matching domains.
- In terms of file uploads and system generated files, each profile stores its files in the subdirectory (joget.home)/wflow/app_profiles/(profile).
Account Provisioning
There are a few approaches to provision (create) an account.
...
- Create a new Joget Workflow database using the script provided in (joget.home)/data/jwdb-cloud.sql, or any other custom scripts.
- Create a new profile file (joget.home)/wflow/app_datasource-(profile).properties by copying from app_datasource-default.properties and changing the values accordingly.
- Add an entry into (joget.home)/wflow/app_datasource.properties. The entry would be (domain name)=(profile).
- The profile is active immediately, and no restart is necessary.
...
- Execute the file (joget.home)/cloud-provision-account.sh.
- At the prompt When prompted for Account Profile Name, enter the required account name (e.g., demo).
- The next prompt if is for the Main Domain Name, enter . Enter the main domain (e.g., example.com).
- Subsequent inputs will have default values that you can just Enter enter and accept, or change before submitting.
- Upon submission of all the inputs, the script will create the database and perform the necessary configuration for the account. The inputs are as follows:
Account Profile Name | Desired account name (e.g., demo) |
Main Domain | Main domain (e.g., example.com) |
Account Domain Name | Account domain (e.g., demo.example.com) |
Account Database Name | Database name for the account (e.g., jwc_demo) |
Account Database User | Database user for the account (e.g., jwc_demo) |
Account Database Password | Database password for the account (e.g., jwc_demo) |
Home Directory | Joget home directory, ; defaults to current directory . directory |
wflow Directory | Joget configuration directory, ; defaults to ./wflow |
MySQL host name | Database server host name |
MySQL port | Database port |
MySQL username | Database admin user (with permission to create database) |
MySQL password | Database admin password |
...
- Import the app in (joget.home)/lib/APP_cloud-xxxx.zip into Joget.
- Go to Properties & Export and set the “domain” to the appropriate value for the main domain (e.g., example.com).
- Publish the app.
- Access the app at http://localhost:8080/jw/web/userview/cloud/admin/.
- Login to view the Account List.
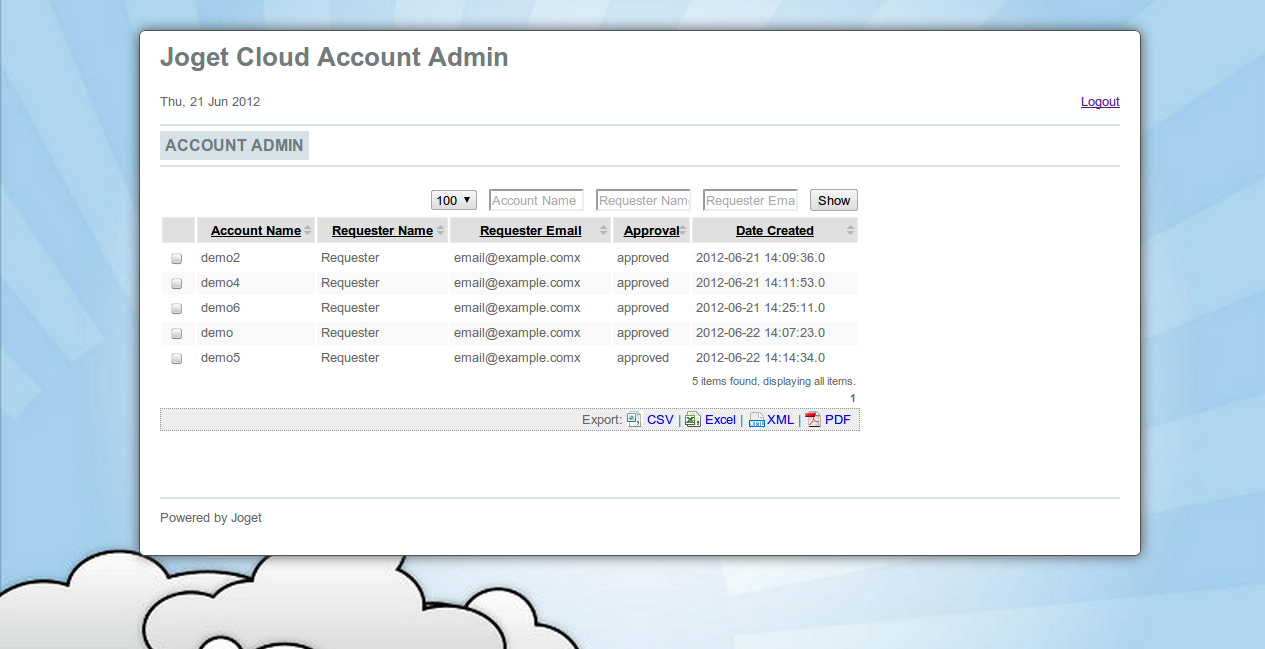
- Select New Account from the drop-down menu to request for a new account.

- When a request is submitted, it needs to be approved. Approve the request, and ; a BeanShell tool will be executed to provision the account.
- Verify that the account is created at the requested domain (e.g., demo.example.com).
- Modify the app where necessary:
- Go to Processes > Map Participants to Users to map the participants accordingly.
- Go to Processes > Map Tools to Plugins , and configure the Email Tools to key in the appropriate email settings and email messages.
- Edit Forms > Account Request Form to modify the form contents where necessary.
In a production environment, it is recommended for security purposes that this app be installed on a specific profile instead of the default profile.
...
- Remove the profile entry from (joget.home)/wflow/app_datasource.properties.
- Delete the profile properties file (joget.home)/wflow/app_datasource-(profile).properties.
- Delete the associated account database.
- Delete the associated account profile directory (joget.home)/wflow/app_profiles/(profile).
- If the Cloud Admin App is used, delete the record from the db table app_fd_cloud_account.
Maintenance
Logging
As with a standard Joget installation on Apache Tomcat, the log file is at (joget.home)/apache-tomcat-6.0.18/logs/catalina.out.
Updates
Updates are to WAR files are done as per a standard Joget Workflow installation.
Backup
Backups should be done on for all the MySQL databases , as well as the configuration and data files in (joget.home)/wflow.