Widget Connector width 650 url https://www.youtube.com/watch?v=8xdNVKtflxETable of Contents
Red Hat OpenShift is a container application platform that brings Docker and Kubernetes to the enterprise. As a cloud native computing platform, OpenShift allows teams to automate the build, deployment, and management of applications. They can focus on developing apps without worrying about the underlying infrastructure, whether on physical/virtual servers, or on public/ private/hybrid cloud environments.
...
As an open source no-code/low-code platform to visually build enterprise web apps for coders and non-coders, Joget is an ideal complement to OpenShift to fill the gap. The Joget platform is now available as a Red Hat Certified Container, so it is trusted, secure and commercially supported on OpenShift. This article describes the steps in deploying the certified Joget container image running with the MySQL database.
| Thai |
|---|
ในฐานะที่เป็นแพลตฟอร์มโอเพนซอร์ซไม่มีรหัส / รหัสต่ำเพื่อสร้างแอปพลิเคชันเว็บสำหรับองค์กรสำหรับผู้เขียนโค้ดและผู้ไม่ใช้โค้ดให้เห็นได้ Joget จึงเป็นส่วนประกอบที่สมบูรณ์แบบสำหรับ OpenShift เพื่อเติมเต็มช่องว่าง ขณะนี้แพลตฟอร์ม Joget มีให้บริการในฐานะ Red Hat Certified Container ดังนั้นจึงเชื่อถือได้ปลอดภัยและได้รับการสนับสนุนทางการค้าใน OpenShift บทความนี้อธิบายขั้นตอนในการปรับใช้อิมเมจคอนเทนเนอร์ Joget ที่ได้รับการรับรองซึ่งทำงานกับฐานข้อมูล MySQL |


Deploy Joget using the OpenShift Web Console
...
| Thai |
|---|
เข้าถึง OpenShift Web Console และเข้าสู่ระบบ |

Create a project using the Create Project button from the Projects dropdown and key in the desired Name, Display Name and Description.
| Thai |
|---|
สร้างโครงการโดยใช้ปุ่มสร้างโครงการและคีย์ในชื่อที่ต้องการชื่อที่แสดงและคำอธิบาย |


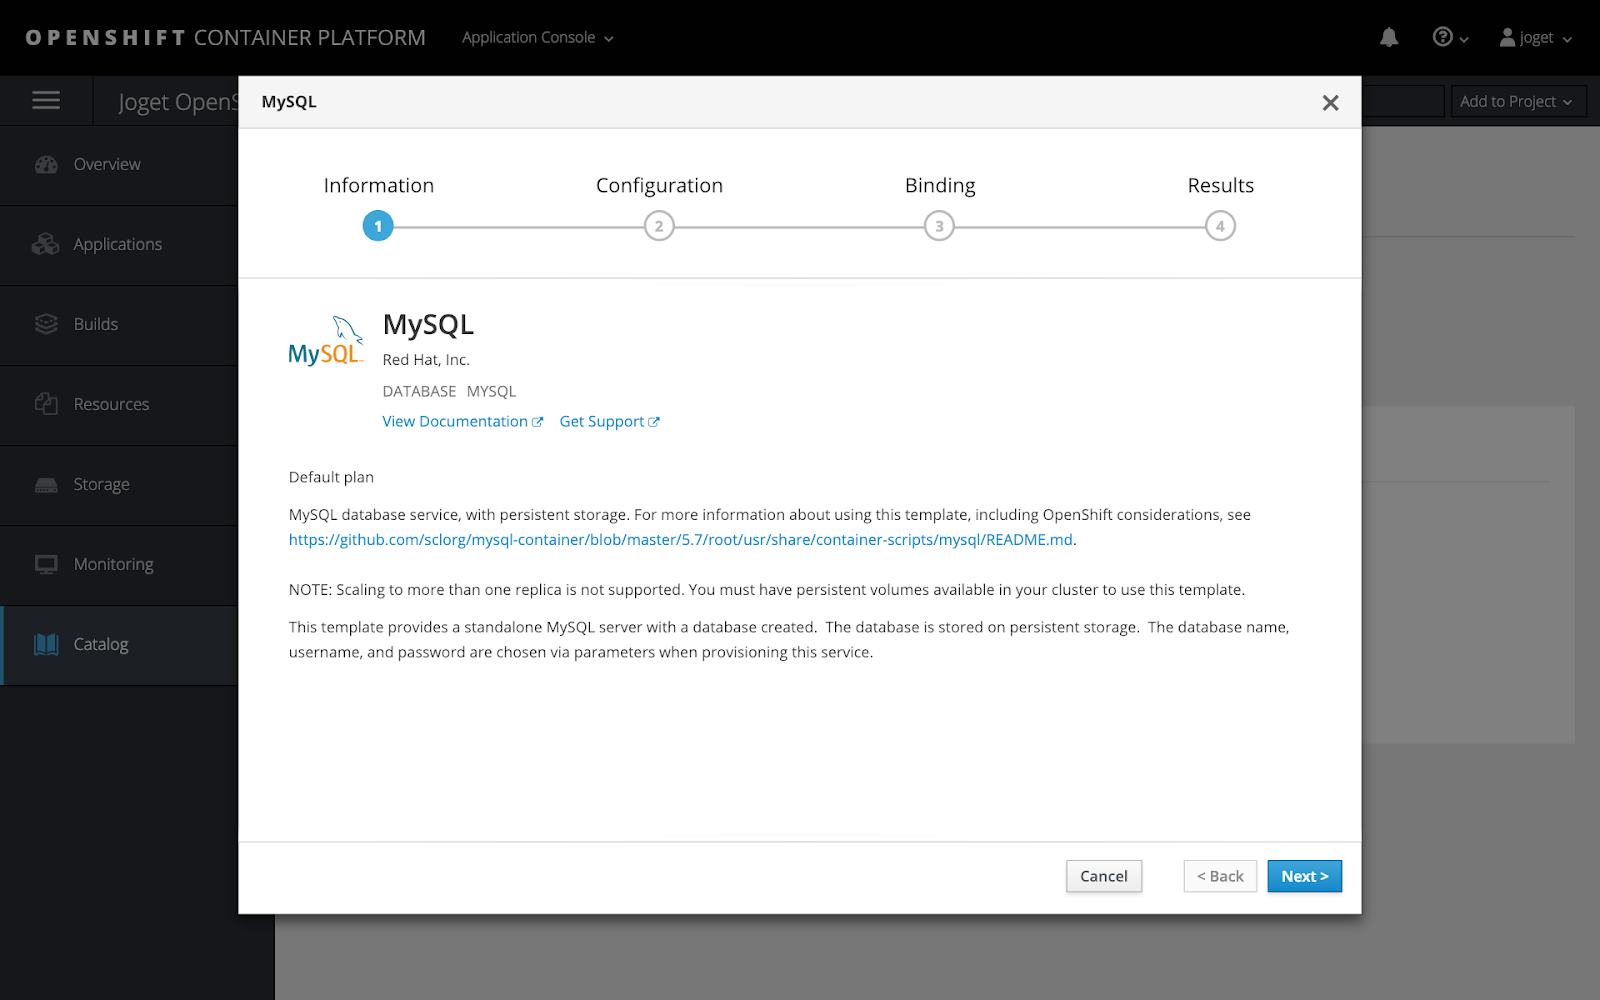
Step 2: Deploy MySQL Database
Under the selected project, select +Add to Project > Browse CatalogDatabase and select the MySQLimage, then Instantiate Template.
| Thai |
|---|
ขั้นตอนที่ 2: ปรับใช้ฐานข้อมูล MySQL
|

Key in the appropriate settings and click on Create e.g.
...
Namespace | openshift |
Database Service Name | jogetdb |
MySQL Connection Username | joget |
MySQL Connection Password | joget |
MySQL Database Name | jwdb |


Step 3: Deploy Joget
...
Certified Container Image
To access the Red Hat Container Catalog, a valid username and password that is used to log in to the Red Hat Customer Portal are required.
...
| Info | ||||||
|---|---|---|---|---|---|---|
If you do not have an account, you can acquire one by registering for one of the following options:
|
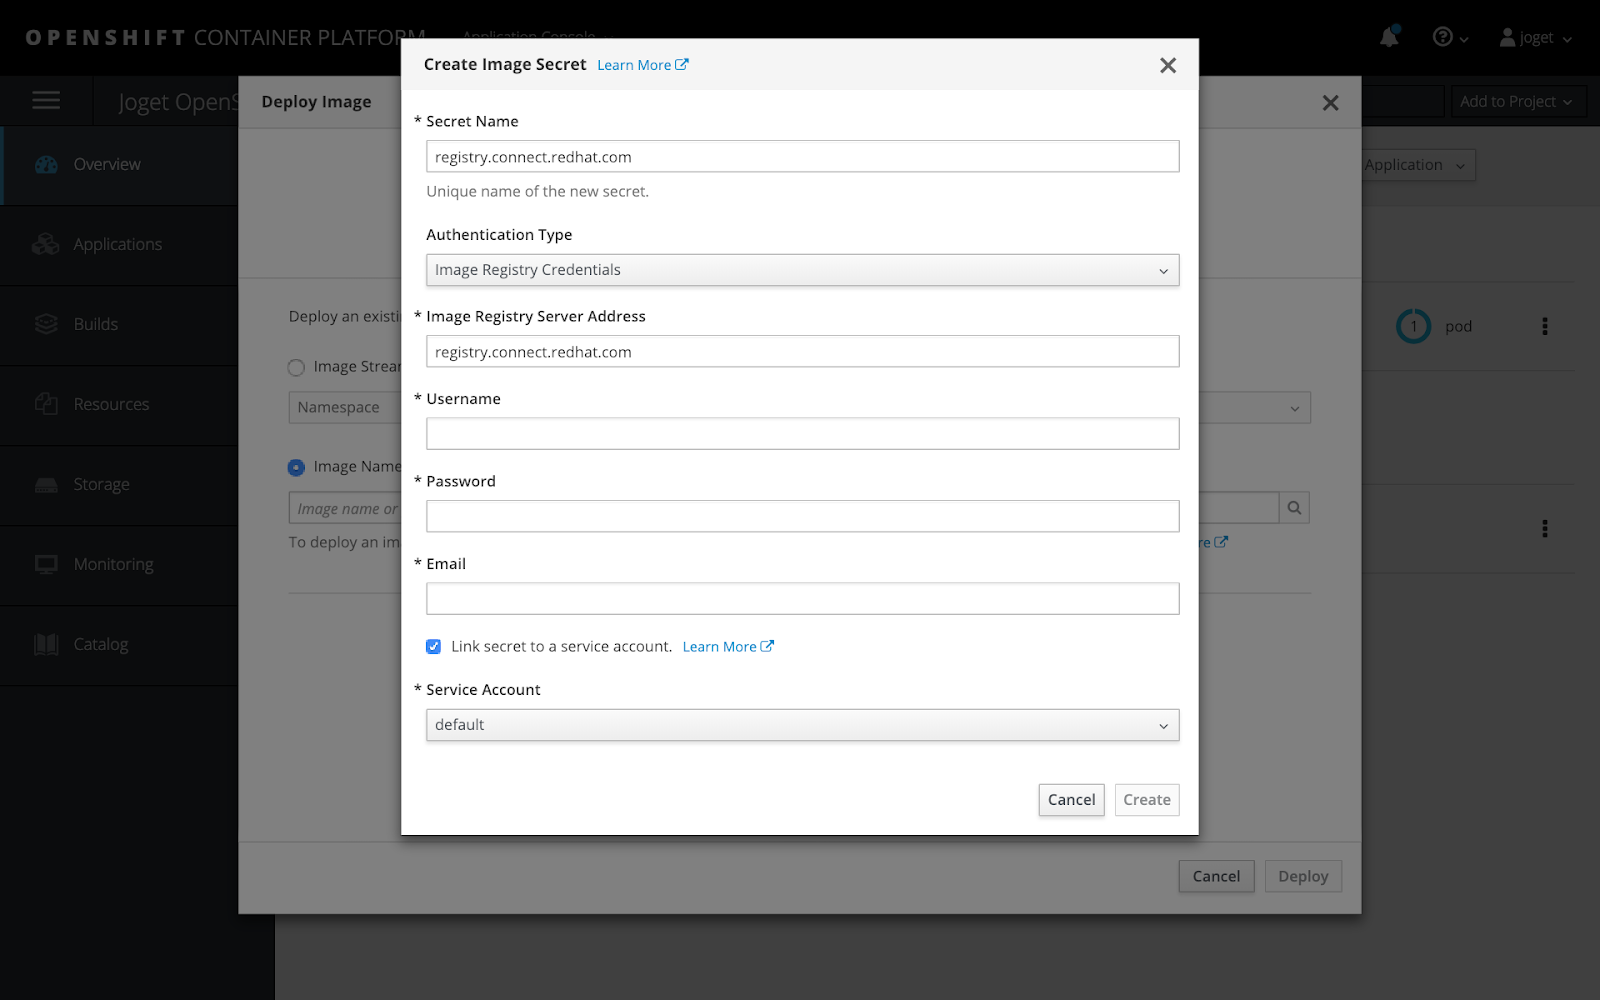
Under the selected project, select +Add to Project > Deploy Container Image and click on the create an image pull secret link. In the ensuing popup, key in the Red Hat login details for the registry.
| Thai |
|---|
ภายใต้โครงการที่เลือกเลือกเพิ่มในโครงการ> ปรับใช้รูปและคลิกที่ลิงค์สร้างภาพลับดึง ในป๊อปอัปที่ตามมาให้ป้อนรายละเอียดการลงชื่อเข้าใช้ Red Hat สำหรับรีจิสตรี |
Secret Name | registry.connect.redhat.com |
Authentication Type | Image Registry Credentials |
Image Registry Server Address | registry.connect.redhat.com |
Username | Red Hat account username |
Password | Red Hat account password |
Red Hat account email | |
Link secret to a service account | Yes |
Service Account | default |

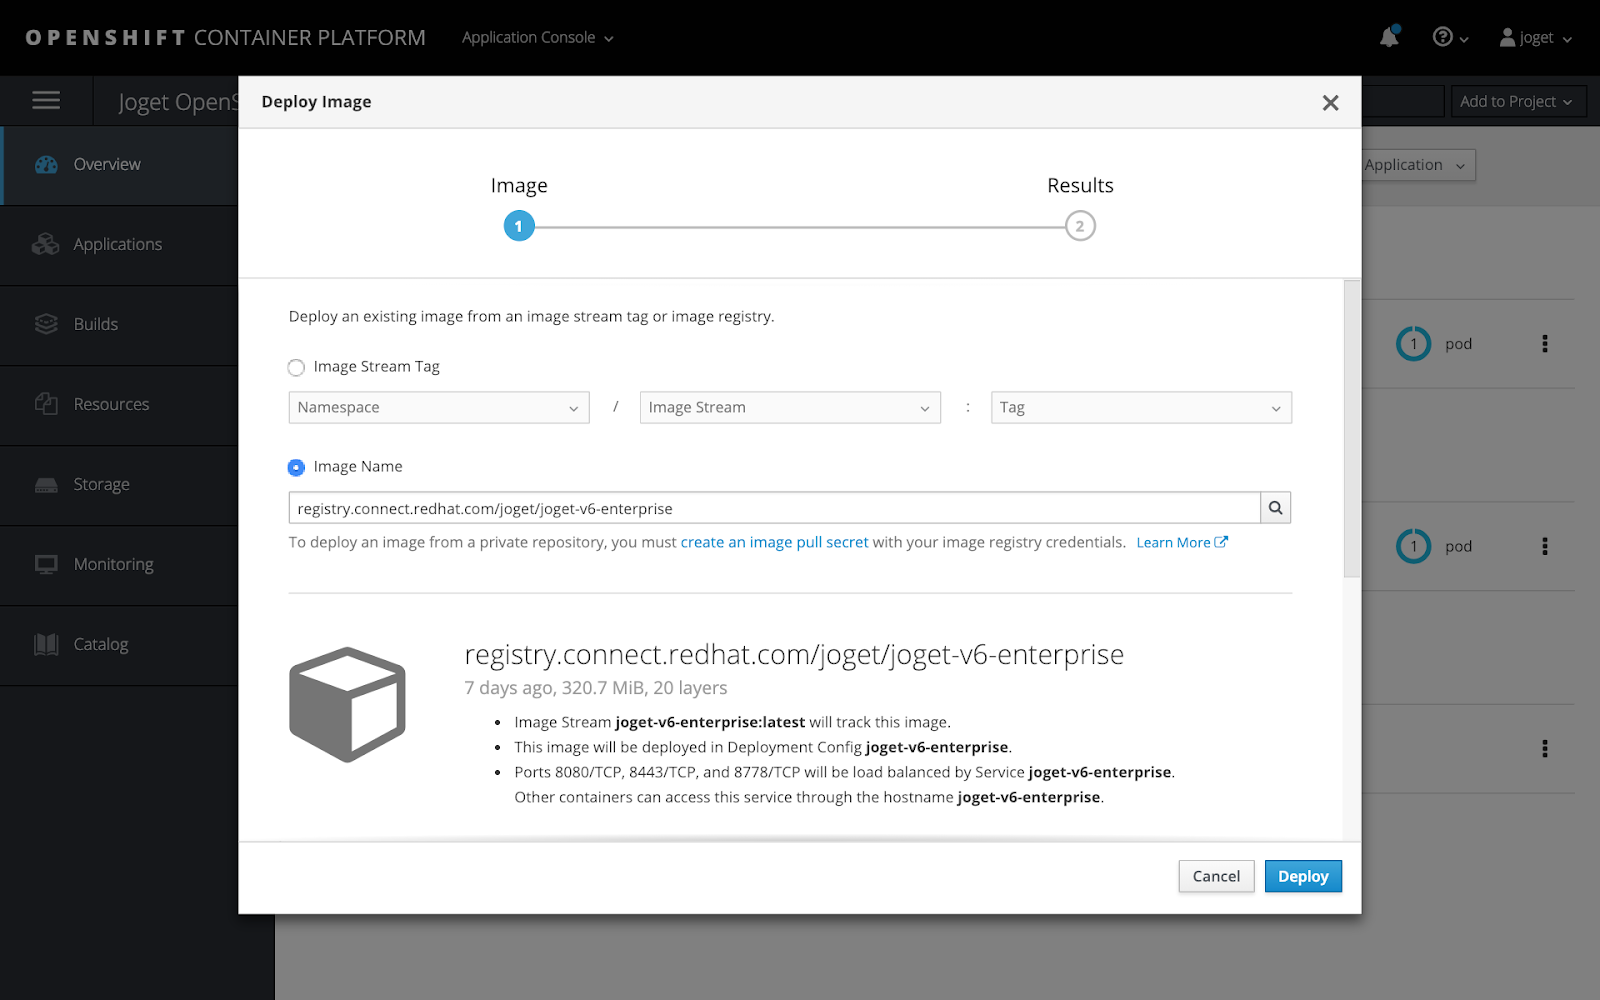
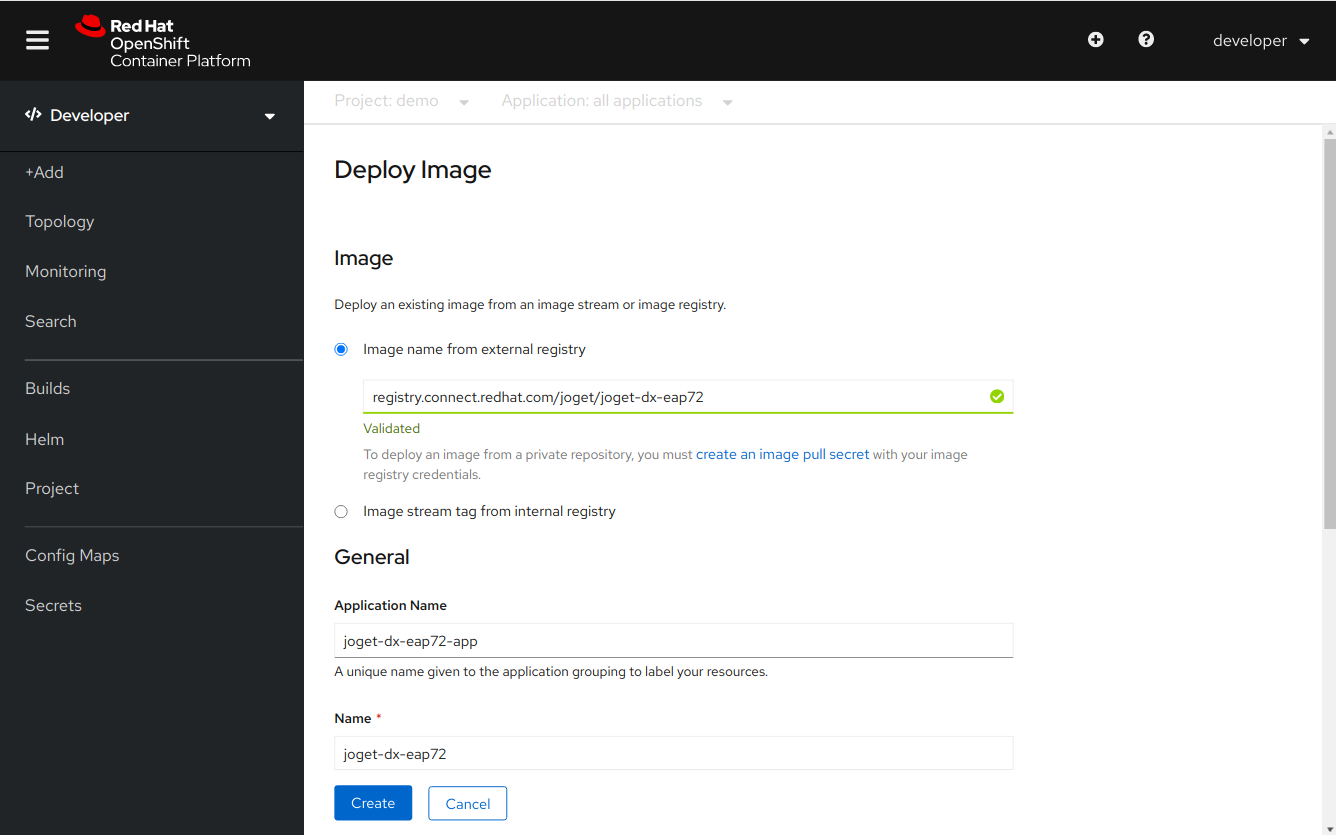
Once the secret has been created, select Add to Project > Deploy Image, select the Image Name option and key in registry.connect.redhat.com/joget/joget-v6dx-enterprise. Click on the small search icon to load the image details from the registry, key eap72. Key in the desired Application Name and Name then click Deploy.
| Thai |
|---|
เมื่อสร้างความลับแล้วให้เลือกเพิ่มในโครงการ> ปรับใช้รูปเลือกตัวเลือกชื่อภาพและพิมพ์ใน registry.connect.redhat.com/joget/joget-v6dx-enterpriseeap72 คลิกที่ไอคอนการค้นหาขนาดเล็กเพื่อโหลดรายละเอียดรูปภาพจากรีจิสตรีคีย์ในชื่อที่ต้องการจากนั้นคลิกปรับใช้ |
Image Name | registry.connect.redhat.com/joget/joget-v6dx-enterpriseeap72 |
Name | joget-v6dx-enterpriseeap72 |
Step 4:
...
Configure Persistent Storage
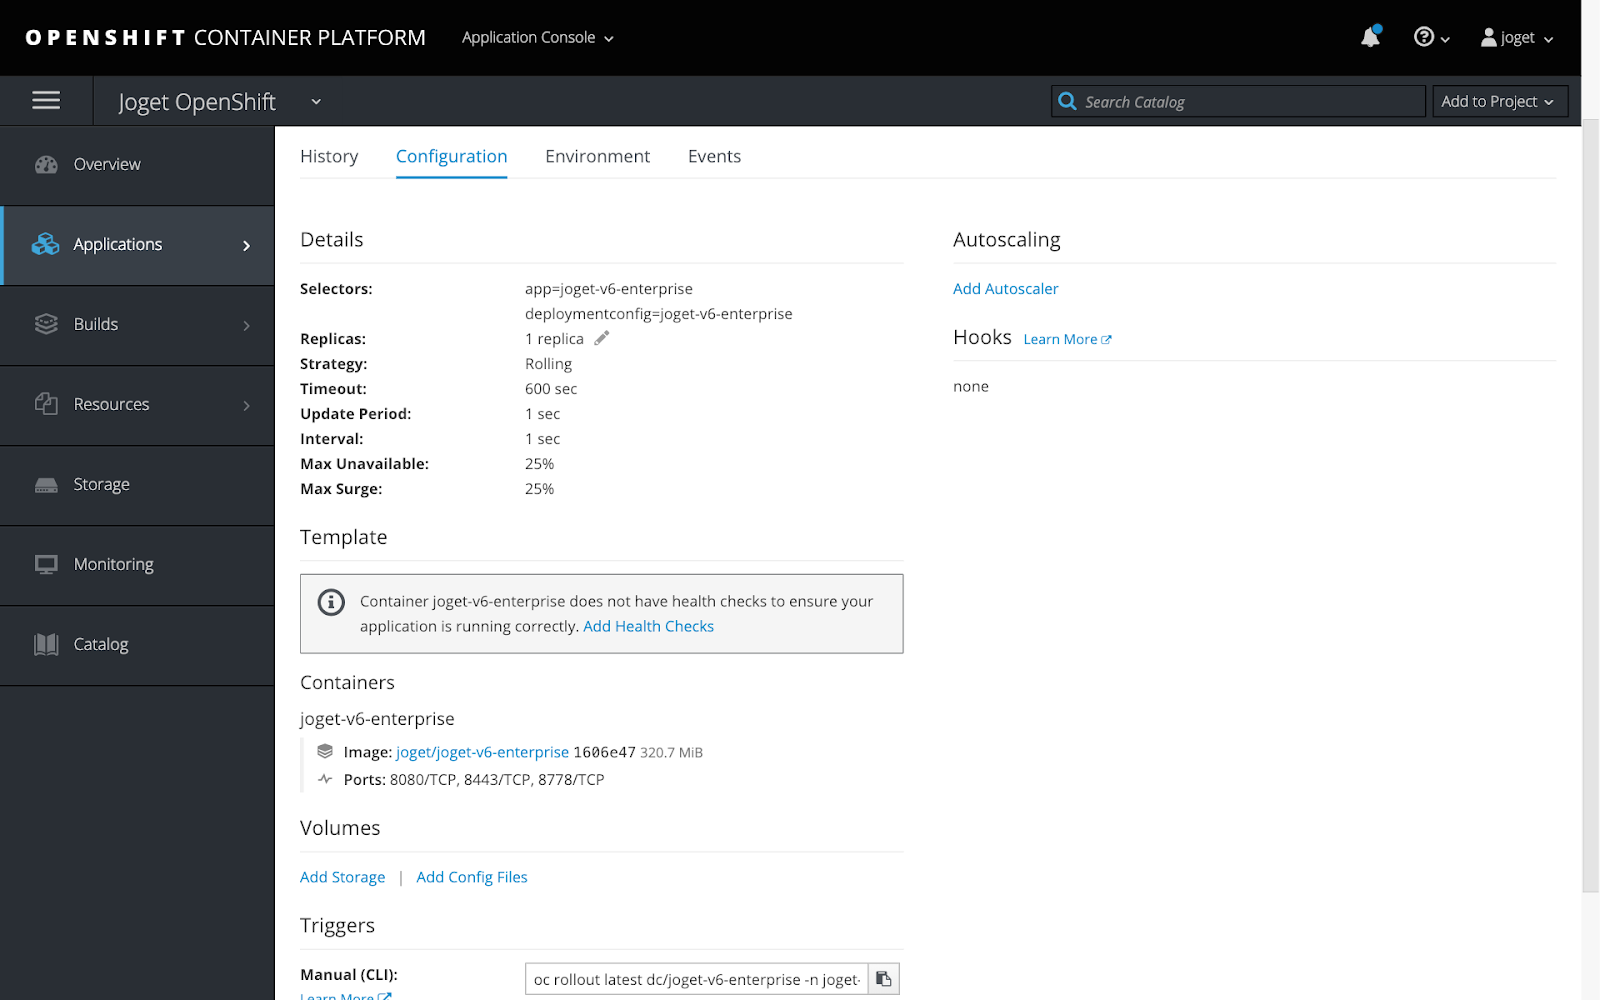
The next step is to add persistent storage to the container for storing configuration files and persistent file uploads. Under Applications > Deployments Under Topology, select the application, then the Configuration tab. Scroll down to the Volumes section and click on the Add Storage linkDeployment. Select Add Storage under the Actions menu.
| Thai |
|---|
ขั้นตอนที่ 4: เพิ่มที่เก็บข้อมูลถาวร
|

In the Add storageStorage page , click on the small create storage link. Create the new storage with the desired values e.g.under Persistent Volume Claim, select Create new claim and fill in desired values then Save.
| Thai |
|---|
ในหน้าเพิ่มที่เก็บข้อมูลคลิกที่ลิงค์สร้างที่เก็บข้อมูลขนาดเล็ก สร้างที่เก็บข้อมูลใหม่ด้วยค่าที่ต้องการเช่น |
Name | joget-datadx-eap72-claim |
Access Mode | Shared Access (RWX) |
Size | 1GB 10GB (or as required) |
...
...
| Mount Path |
...
...
| / |
...
| home/ |
...
| jboss/wflow |
...
Mount Path | /opt/joget/wflow |


Step 5:
...
At this point, the service is not accessible from an external web browser so you will need to create a route, which exposes a service at a host name.
Click on Applications > Services and select joget-v6-enterprise.
...
ขั้นตอนที่ 5: สร้างเส้นทางบริการสำหรับการเข้าถึงภายนอก
...
Configure for Clustering and Licensing
Using the OpenShift command line interface (CLI), run the following commands to enable clustering and licensing.
| Code Block |
|---|
export PROJECT_NAME=demo # modify this to suit your project name
export APP_NAME=joget-dx-eap72 # modify this to suit your app name

echo === configure jboss clustering ===
oc set env deployment/${APP_NAME} JGROUPS_PING_PROTOCOL=openshift.DNS_PING -e OPENSHIFT_DNS_PING_SERVICE_NAME=${APP_NAME}-ping -e OPENSHIFT_DNS_PING_SERVICE_PORT=8888 -e CACHE_NAME=http-session-cache
oc expose deployment/${APP_NAME} --port=8888 --name=${APP_NAME}-ping --cluster-ip=None

echo === assign cluster role view permission for the project service account (to read deployment info for licensing) ===
oc create clusterrolebinding default-view --clusterrole=view --serviceaccount=$PROJECT_NAME:default --namespace=$PROJECT_NAME |
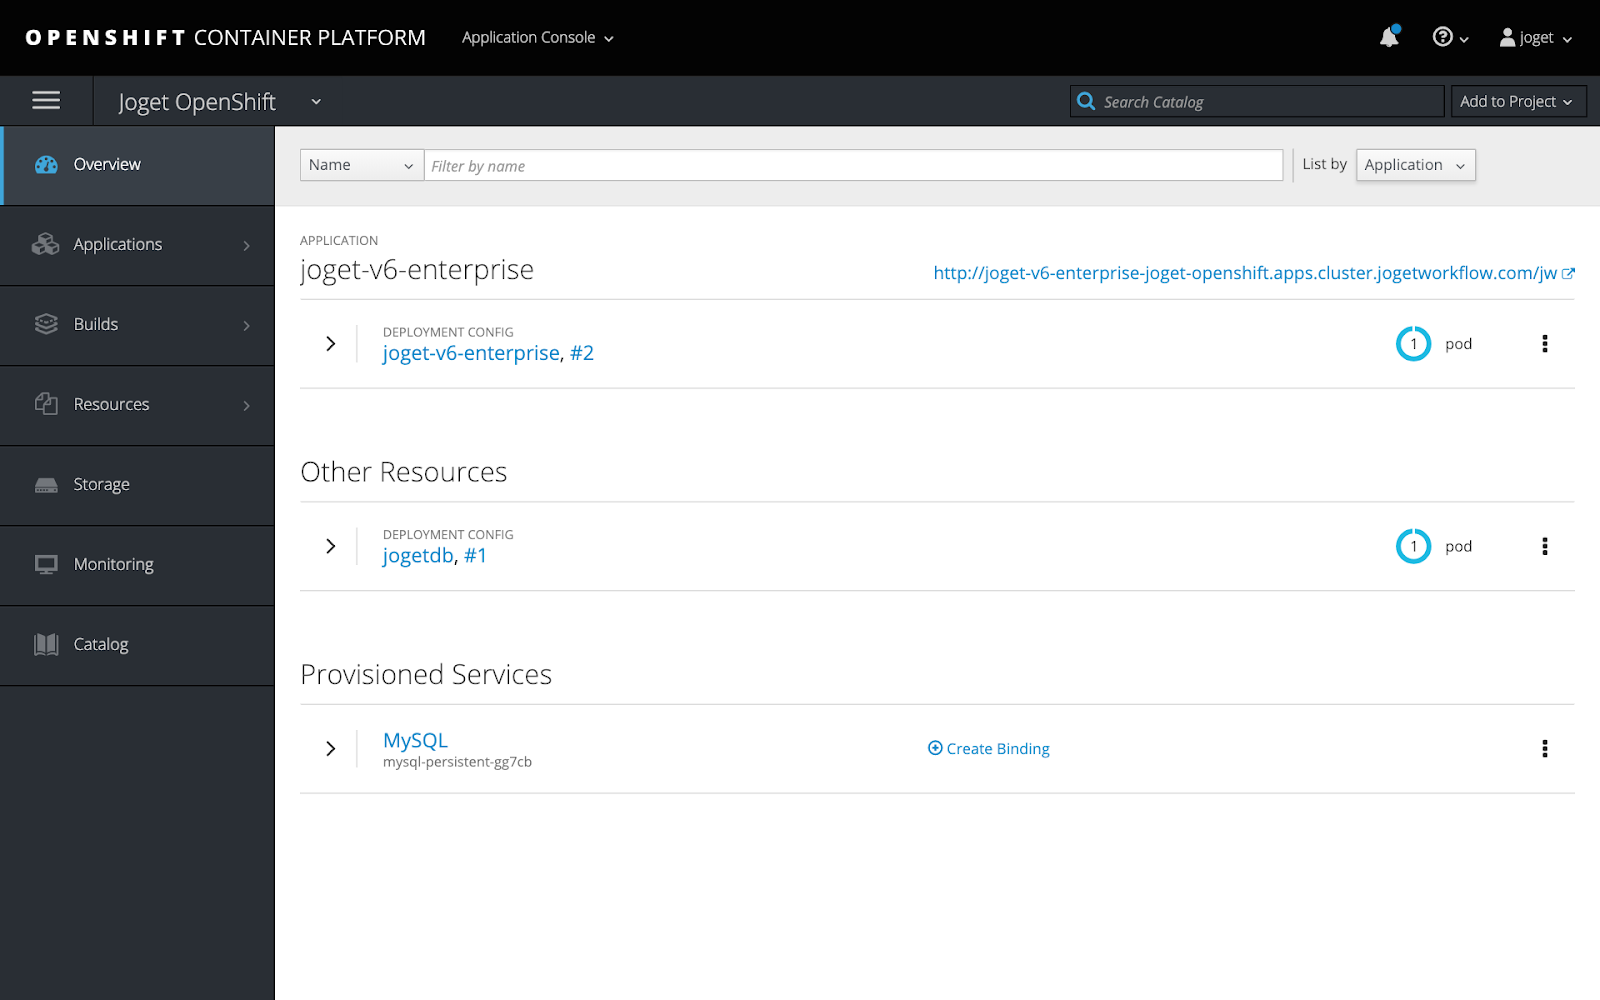
Once the pods in the deployment have finished starting up, access the Deployment under Topology to see the running pods. You will also see a Route created for it, so click on the Location URL to access Joget.

คลิกที่ Applications> Services และเลือก joget-v6-enterprise

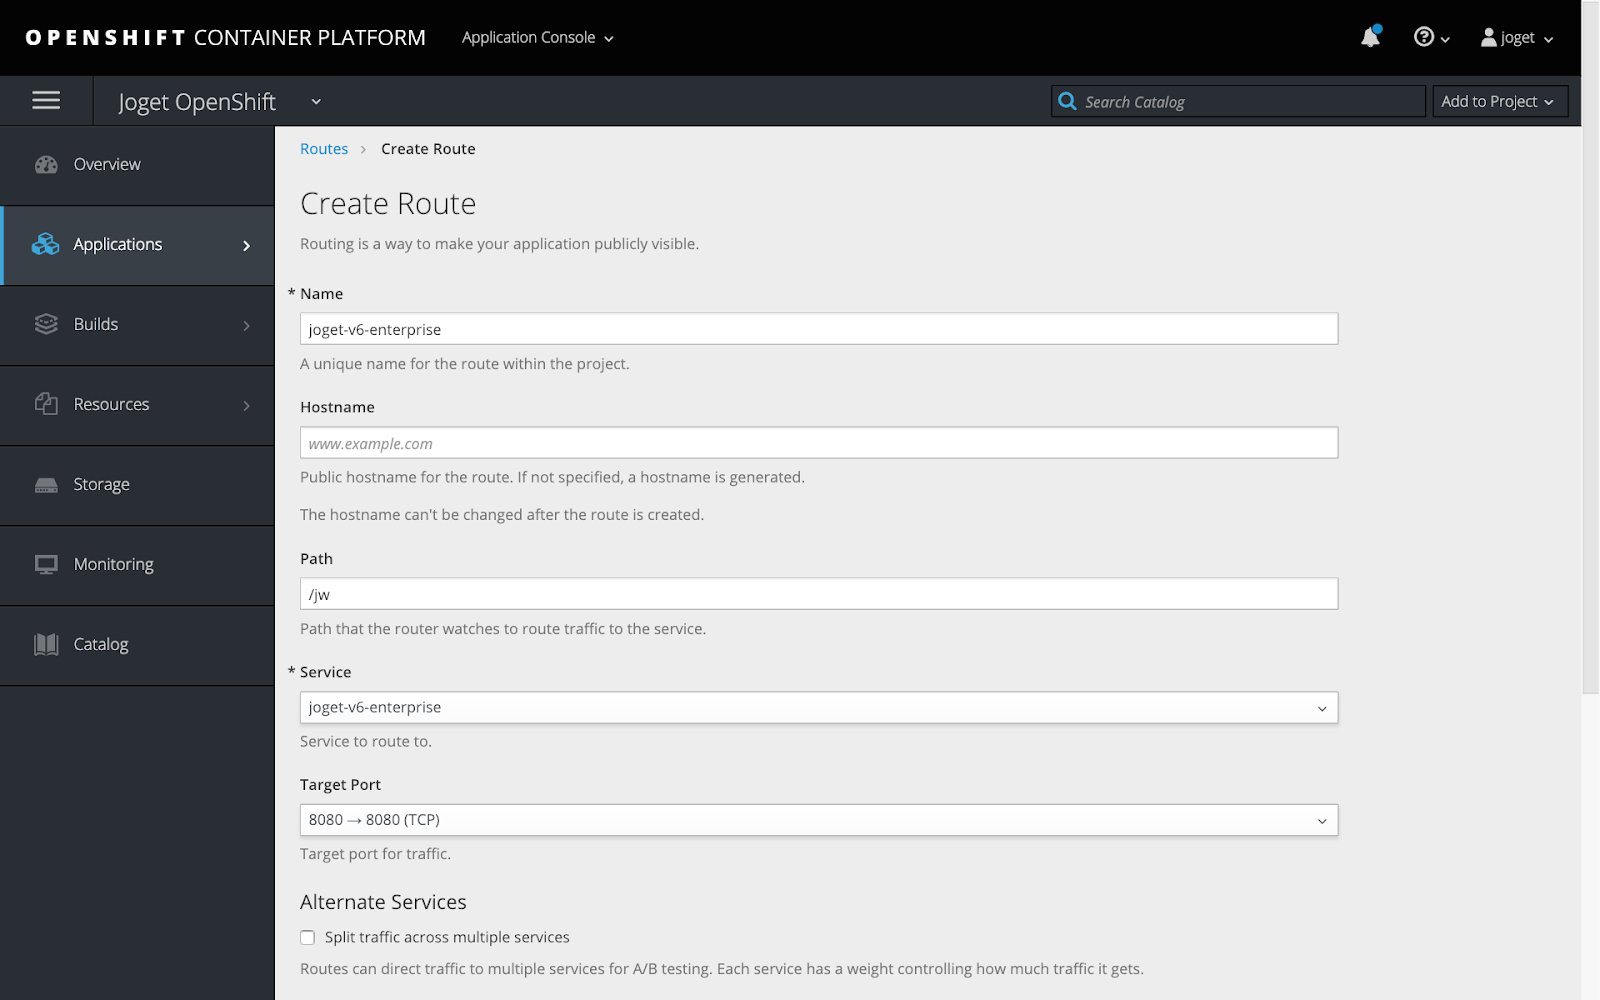
Select Actions > Create Route, set the Path to /jw and click on Create.
| Thai |
|---|
เลือกการกระทำ> สร้างเส้นทางตั้งค่าเส้นทางเป็น / jw และคลิกที่สร้าง |
...
Path
...
/jw
Return to the Overview and click on the URL next to the application name to launch the Joget platform.
| Thai |
|---|
กลับไปที่ภาพรวมและคลิกที่ URL ถัดจากชื่อแอปพลิเคชันเพื่อเปิดใช้งานแพลตฟอร์ม Joget |
Deploy Joget using the OpenShift CLI
For those more inclined to use a non-graphical command line interface, it is actually faster to use the OpenShift command line interface (CLI) to deploy the Joget platform.
The following is a Linux script to accomplish a similar Joget platform deployment . Before running this script, install the CLI and loginusing the OpenShift command line interface (CLI). Change the environment variables in the script accordingly, at least the four values below:
| Thai |
|---|
ปรับใช้ Joget โดยใช้ OpenShift CLI
ต่อไปนี้เป็นสคริปต์ Linux เพื่อให้การปรับใช้แพลตฟอร์ม Joget คล้ายกันสำเร็จ ก่อนรันสคริปต์นี้ให้ติดตั้ง install the CLI and login เปลี่ยนตัวแปรสภาพแวดล้อมในสคริปต์อย่างน้อยสี่ค่าด้านล่าง: |
...
| Code Block | ||
|---|---|---|
| ||
#!/bin/sh export PROJECT_NAME=joget-openshift export REGISTRY_USERNAME=email@domain export REGISTRY_PASSWORD=password export REGISTRY_EMAIL=email@domain export REGISTRY_SERVER=registry.connect.redhat.com export IMAGE_NAMESPACE=joget export IMAGE_NAME=joget-v6dx-enterpriseeap72 export IMAGE_TAG=latest export APP_NAME=joget-v6dx-enterpriseeap72 export DB_APP_NAME=joget-mysqljogetdb export STORAGE_NAME=joget-data export MYSQL_DATABASE=jwdb export MYSQL_USER=joget export MYSQL_PASSWORD=joget echo === deploy Joget on OpenShift === echo PROJECT_NAME: $PROJECT_NAME echo REGISTRY_SERVER: $REGISTRY_SERVER echo REGISTRY_USERNAME: $REGISTRY_USERNAME echo REGISTRY_EMAIL: $REGISTRY_EMAIL echo IMAGE_NAMESPACE: $IMAGE_NAMESPACE echo IMAGE_NAME: $IMAGE_NAME echo IMAGE_TAG $IMAGE_TAG echo IMAGE_NAME: $IMAGE_NAME echo APP_NAME: $APP_NAME echo DB_APP_NAME: $DB_APP_NAME echo STORAGE_NAME: $STORAGE_NAME echo MYSQL_DATABASE: $MYSQL_DATABASE echo MYSQL_USER: $MYSQL_USER echo MYSQL_PASSWORD: $MYSQL_PASSWORD echo === create project === oc new-project $PROJECT_NAME echo === deploy MySQL === oc new-app openshift/mysql:58.70 --name $DB_APP_NAME -e MYSQL_USER=$MYSQL_USER -e MYSQL_PASSWORD=$MYSQL_PASSWORD -e MYSQL_DATABASE=$MYSQL_DATABASE echo === create and bind secret to pull Joget image === oc create secret docker-registry $REGISTRY_SERVER --docker-server=$REGISTRY_SERVER --docker-username=$REGISTRY_USERNAME --docker-password=$REGISTRY_PASSWORD --docker-email=$REGISTRY_EMAIL oc secrets link default $REGISTRY_SERVER --for=pull echo === import Joget image create joget deployment, service and persistent volume claim === oc import-image $PROJECT_NAME/$IMAGE_NAME --from=$REGISTRY_SERVER/$IMAGE_NAMESPACE/$IMAGE_NAME --confirm #echo === grant pull permission if from different project === #oc policy add-role-to-user system:image-puller system:serviceaccount:$PROJECT_NAME:default -n $IMAGE_NAMESPACE echo === deploy Joget === oc new-app $PROJECT_NAME/$IMAGE_NAME:$IMAGE_TAG -e GC_MAX_METASPACE_SIZE=300 --name $APP_NAME echo === create persistent storage claim === cat <<EOF > pvc.yaml apiVersion: "v1" kind: "PersistentVolumeClaim" metadata: name: "$STORAGE_NAME" spec: accessModes: - "ReadWriteMany" resources: requests: storage: "1Gi" EOF oc create -f pvc.yaml rm pvc.yaml echo === mount storage === oc set volume dc/$APP_NAME --add --type=persistentVolumeClaim --claim-name=$STORAGE_NAME --mount-path=/opt/joget/wflow cat <<EOF > joget.yaml apiVersion: v1 kind: PersistentVolumeClaim metadata: name: $APP_NAME-pv-claim spec: accessModes: - ReadWriteOnce resources: requests: storage: 10Gi --- apiVersion: v1 kind: Service metadata: name: $APP_NAME labels: app: $APP_NAME spec: ports: - port: 8080 selector: app: $APP_NAME type: NodePort --- apiVersion: apps/v1 kind: Deployment metadata: name: $APP_NAME spec: selector: matchLabels: app: $APP_NAME strategy: type: Recreate template: metadata: labels: app: $APP_NAME spec: containers: - image: $REGISTRY_SERVER/$IMAGE_NAMESPACE/$IMAGE_NAME:$IMAGE_TAG name: $APP_NAME ports: - containerPort: 8080 name: $APP_NAME volumeMounts: - name: $APP_NAME-persistent-storage mountPath: /home/jboss/wflow volumes: - name: $APP_NAME-persistent-storage persistentVolumeClaim: claimName: $APP_NAME-pv-claim EOF oc apply -f joget.yaml echo === configure jboss clustering === #oc set env deployment/${APP_NAME} JGROUPS_PING_PROTOCOL=openshift.DNS_PING -e OPENSHIFT_DNS_PING_SERVICE_NAME=${APP_NAME}-ping -e OPENSHIFT_DNS_PING_SERVICE_PORT=8888 -e CACHE_NAME=http-session-cache oc expose deployment/${APP_NAME} --port=8888 --name=${APP_NAME}-ping --cluster-ip=None echo === assign cluster role view permission for the project service account (to read deployment info for licensing) === oc create clusterrolebinding default-view --clusterrole=view --serviceaccount=$PROJECT_NAME:default --namespace=$PROJECT_NAME echo === expose service route for external excess === oc expose svc $APP_NAME --path=/jw oc annotate route $APP_NAME --overwrite haproxy.router.openshift.io/timeout=60s oc get route600s echo URL: httphttps://$(oc get route $APP_NAME --template='{{ .spec.host }}')/jw |
...
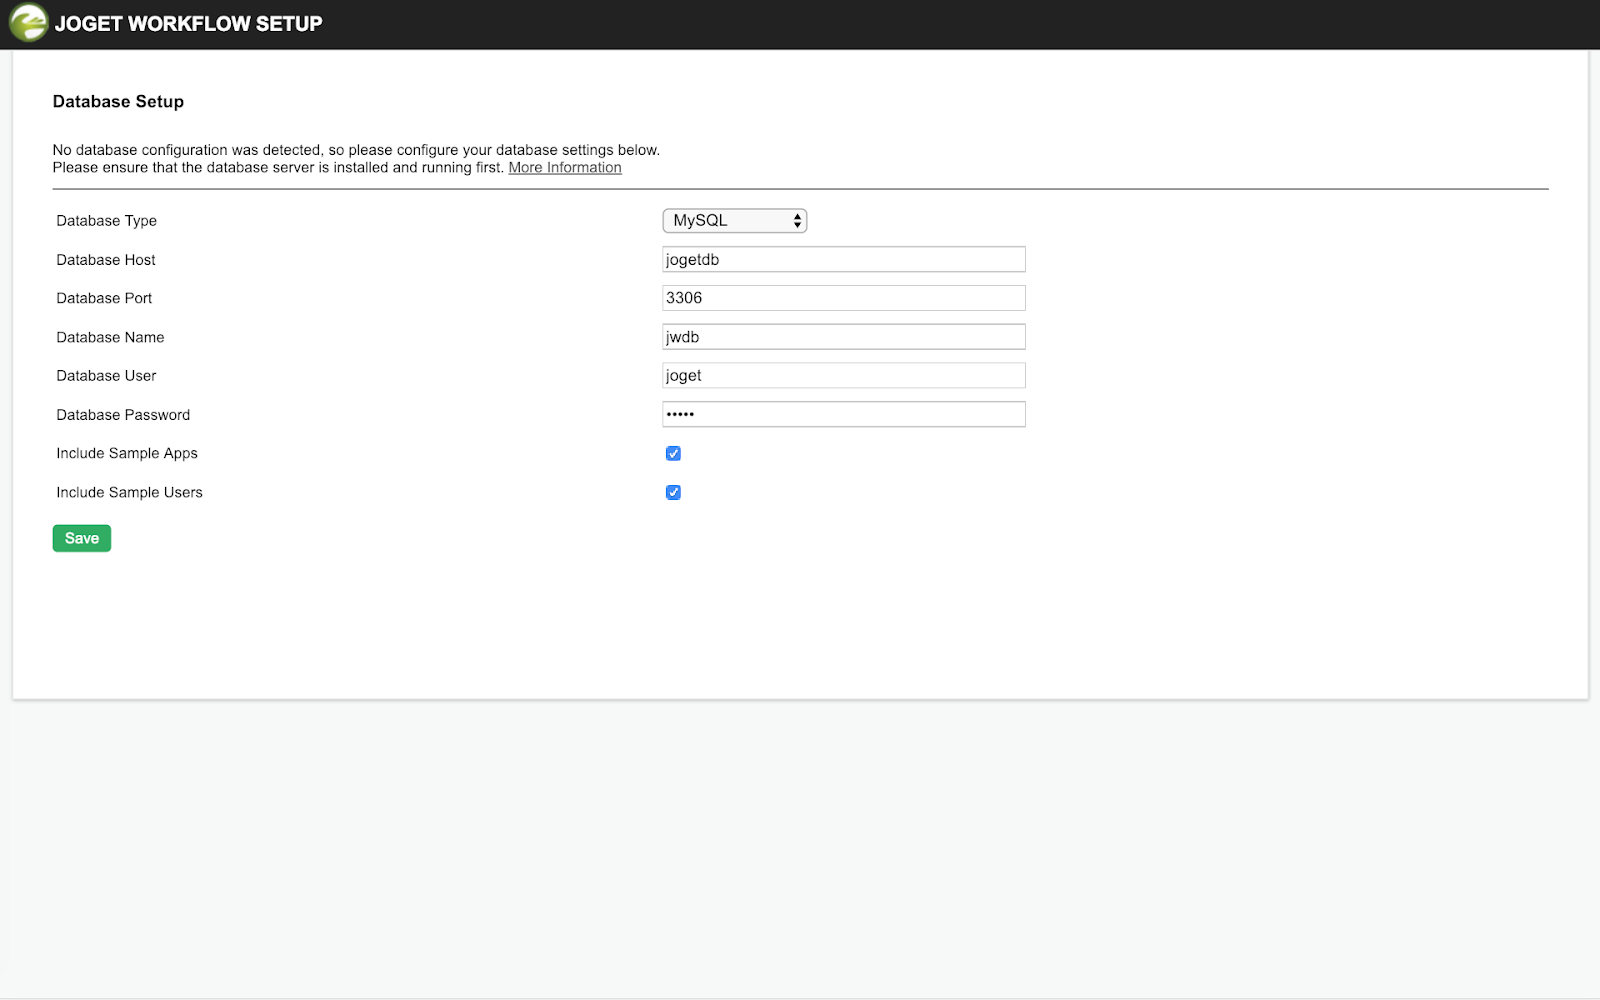
The first time the Joget platform is accessed, the Database Setup page will be displayed. Configure the database settings using the values defined when deploying the MySQL database previously e.g.
| Thai |
|---|
ตั้งค่าฐานข้อมูล
|
Database Host | jogetdb |
Database Port | 3306 |
Database Name | jwdb |
Database User | joget |
Database Password | joget |

Upon successful configuration, the Joget App Center will be loaded.
| Thai |
|---|
เมื่อกำหนดค่าสำเร็จแล้ว Joget App Center จะถูกโหลด |


| Warning | ||
|---|---|---|
NOTE: If you encounter a 504 Gateway Timeout during the database setup, it is caused by the database initialization taking longer than the default OpenShift Route timeout. You can actually ignore the error and wait a couple of minutes before accessing the Application URL from the Overview page again. You can also increase the route timeout using the OpenShift CLI i.e. oc annotate route $APP_NAME --overwrite haproxy.router.openshift.io/timeout=60s
|
...