Kubernetes is the leading open source container orchestration platform. Originally created by Google based on their need to support massive scale, Kubernetes is now under the purview of Cloud Native Computing Foundation (CNCF), a vendor-neutral foundation managing popular open source projects.
Get Started with Kubernetes
There are several basic and essential concepts that need to be understood:
A Kubernetes cluster consists of one or more nodes. Nodes are machines (VMs, physical servers, etc) that run the applications.
A Pod is the smallest Kubernetes object that contains one or more containers, storage resources, network IP and other configuration.
A Service defines a set of Pods and how they are accessed.
A Volume is a shared storage for containers, and many different types are supported.
These Kubernetes objects are defined in YAML format in .yaml files
A command line interface tool, kubectl, is used to manage these objects via the Kubernetes API.
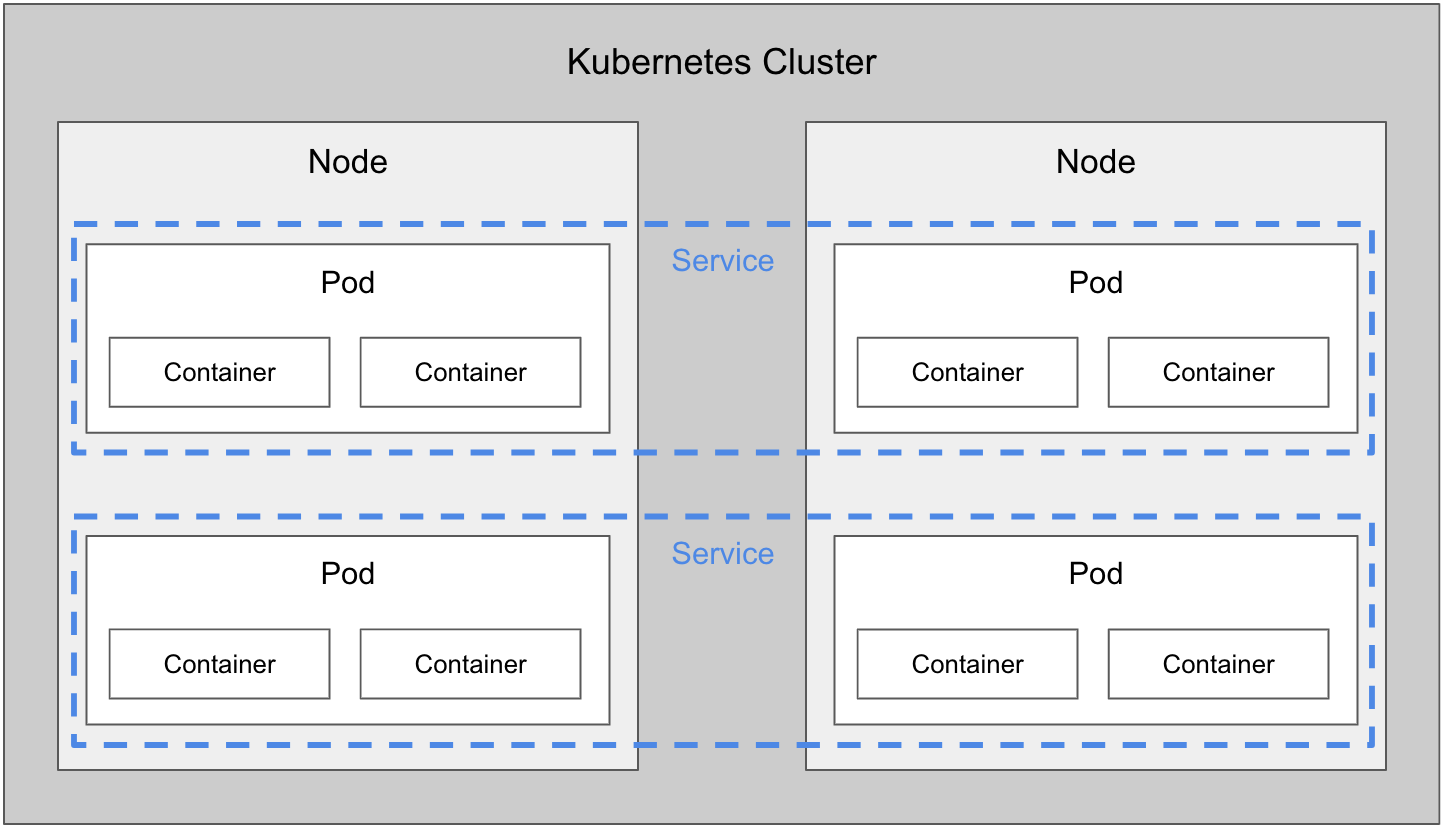
Simplified view of Kubernetes objects
There are many more concepts in Kubernetes, but the basic ones above should suffice to get started with Kubernetes.
There are many Kubernetes solutions available for different requirements from different providers, ranging from community tools for local testing, to production environments from cloud providers and enterprise vendors.
For the purpose of this tutorial we’ll use Minikube, a tool that runs a single-node Kubernetes cluster in a virtual machine for local development and testing. We’ll be using a Mac running macOS, but you can adapt the instructions for your OS.
Install VirtualBox
The first step is to install a VM platform. We’ll use the open source VirtualBox as the VM platform. Follow the download and installation instructions at https://www.virtualbox.org/wiki/Downloads
Install kubectl
The next step is to install the Kubernetes command-line tool, kubectl, which allows you to run commands against Kubernetes clusters e.g. deploy applications, inspect resources, view logs, etc.
1. Download and set executable:
| Code Block |
|---|
curl -LO https://storage.googleapis.com/kubernetes-release/release/$(curl -s https://storage.googleapis.com/kubernetes-release/release/stable.txt)/bin/darwin/amd64/kubectl \
&& chmod +x ./kubectl |
2. Move the binary to your PATH:
| Code Block |
|---|
sudo mv ./kubectl /usr/local/bin/kubectl |
3. Test to ensure the version you installed is up-to-date:
| Code Block |
|---|
kubectl version |
Full instructions are at https://kubernetes.io/docs/tasks/tools/install-kubectl/
Install Minikube
Now let’s install Minikube, a tool that runs a single-node Kubernetes cluster in a virtual machine on your laptop.
1. Download and set executable:
| Code Block |
|---|
curl -Lo minikube https://storage.googleapis.com/minikube/releases/latest/minikube-darwin-amd64 \
 && chmod +x minikube
|
2. Move the binary to your PATH:
| Code Block |
|---|
sudo mv minikube /usr/local/bin |
Full instructions are available at https://kubernetes.io/docs/tasks/tools/install-minikube/
Start Minikube
1. Start Minikube and create a cluster:
| Code Block |
|---|
minikube start
|
The output will be similar to this:
| Code Block |
|---|
minikube v1.1.0 on darwin (amd64)
Downloading Minikube ISO ...
131.28 MB / 131.28 MB [============================================] 100.00% 0s
Creating virtualbox VM (CPUs=2, Memory=2048MB, Disk=20000MB) ...
Configuring environment for Kubernetes v1.14.2 on Docker 18.09.6
Downloading kubeadm v1.14.2
Downloading kubelet v1.14.2
Pulling images ...
Launching Kubernetes ...
Verifying: apiserver proxy etcd scheduler controller dns
Done! kubectl is now configured to use "minikube" |
Test Minikube Installation
1. Run a sample HTTP application
| Code Block |
|---|
kubectl run hello-minikube --image=gcr.io/google_containers/echoserver:1.4 --port=8080
|
2. Expose the service so that external connections can be made
| Code Block |
|---|
kubectl expose deployment hello-minikube --type=NodePort |
3. Inspect the pod
| Code Block |
|---|
kubectl get pod |
4. Once the STATUS is Running, test the service using curl
| Code Block |
|---|
curl $(minikube service hello-minikube --url) |
5. Delete the service and deployment
| Code Block |
|---|
kubectl delete services hello-minikube
kubectl delete deployment hello-minikube |
Full instructions are available at https://kubernetes.io/docs/setup/minikube/#quickstart
Deploy MySQL on Kubernetes
To deploy a MySQL database image, we’ll use an example YAML file provided in the kubernetes website k8s.io.
1. Create persistent storage using PersistentVolume and PersistentVolumeClaim
| Code Block |
|---|
kubectl apply -f https://k8s.io/examples/application/mysql/mysql-pv.yaml |
2. Deploy the MySQL image
| Code Block |
|---|
kubectl apply -f https://k8s.io/examples/application/mysql/mysql-deployment.yaml |
3. Inspect the deployment
| Code Block |
|---|
kubectl describe deployment mysql
kubectl get pods -l app=mysql
kubectl describe pvc mysql-pv-claim |
4. Run MySQL client to test
| Code Block |
|---|
kubectl run -it --rm --image=mysql:5.6 --restart=Never mysql-client -- mysql -h mysql -ppassword |
Full instructions are available at https://kubernetes.io/docs/tasks/run-application/run-single-instance-stateful-application/
Deploy Joget on Kubernetes
Once the MySQL database is running, let’s run a Docker image for Joget Workflow Enterprise that connects to that MySQL service.
1. Deploy joget image using an example YAML file. Download the contents of joget-deployment.yaml into a file with the same name and run kubectl.
| View file | ||||
|---|---|---|---|---|
|
| Code Block |
|---|
kubectl apply -f joget-deployment.yaml |
2. Inspect the deployment
| Code Block |
|---|
kubectl describe deployment joget
kubectl get pods -l app=joget |
3. Once the STATUS is Running, get the URL for the service
| Code Block |
|---|
minikube service joget --url |
4. Access the URL in a browser with an additional /jw in the path to access the Joget App Center e.g. http://192.168.99.100:32496/jw
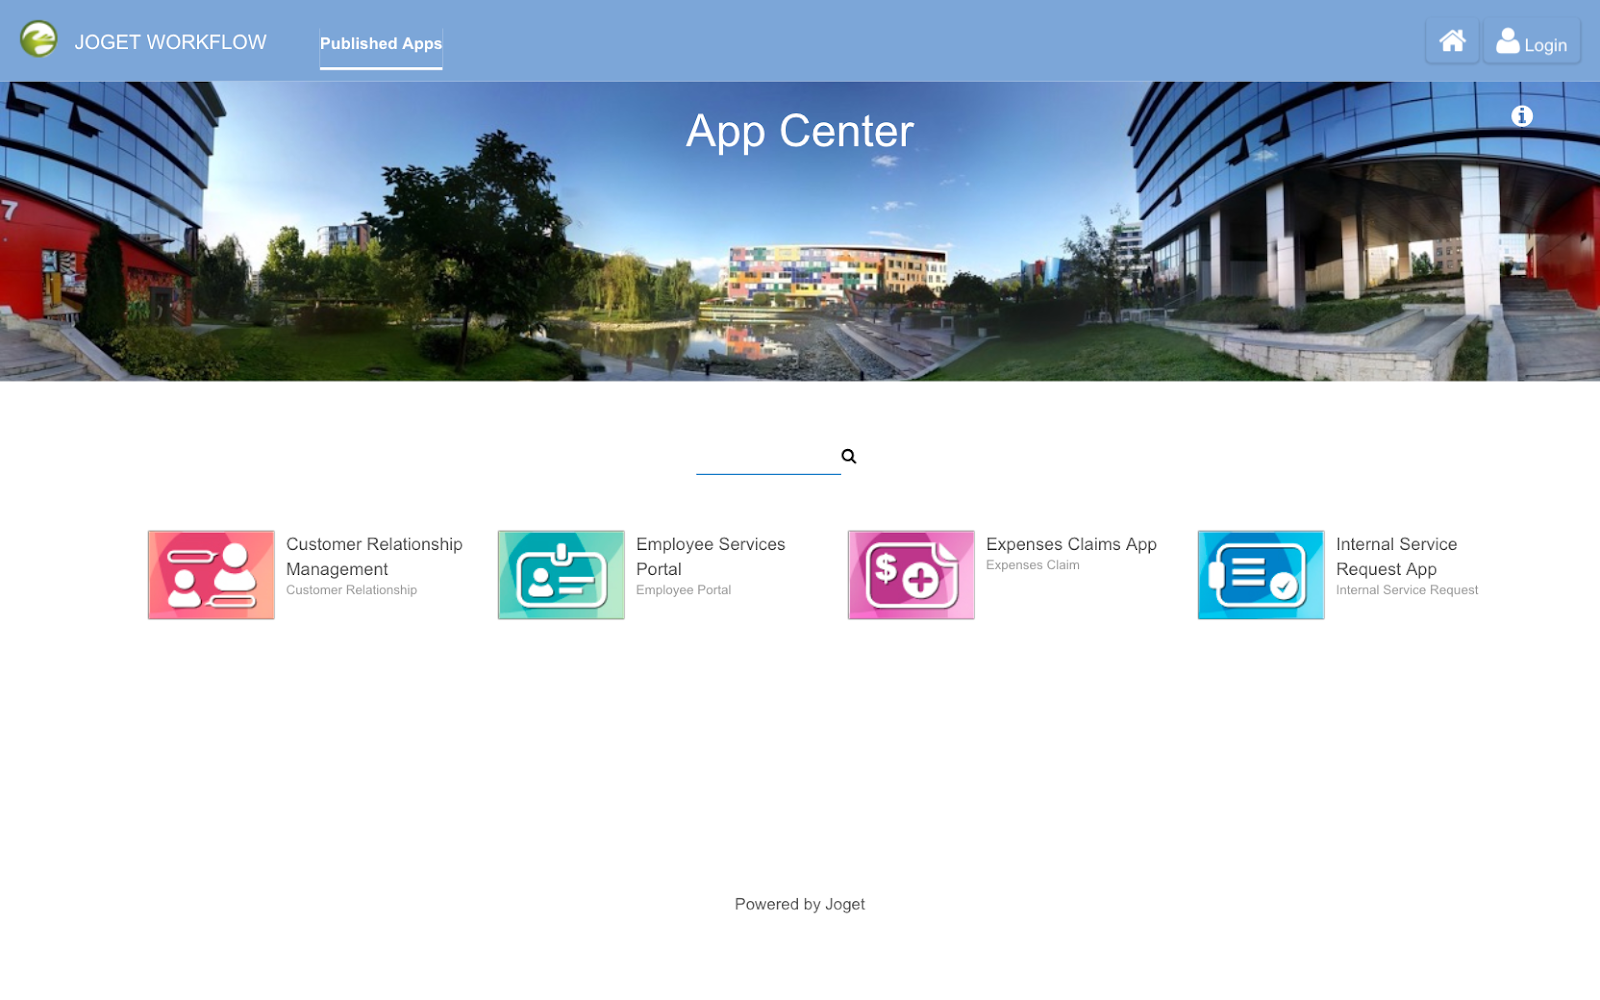
You now have a running installation of Joget Workflow, and you’ll be able to visually build a full app in 30 minutes without coding.
Scale Joget Deployment
Now we can demonstrate how Kubernetes can be used to manually increase and decrease the number of Pods running.
1. Scale the deployment to 2 pods (called replicas)
| Code Block |
|---|
kubectl scale --replicas=2 deployment joget |
2. Examine the running pods, and you should see 2 pods running Joget
| Code Block |
|---|
kubectl get pods
NAME                     READY STATUS RESTARTS   AGE
joget-7d879db895-c9sbb   1/1 Running 0    27s
joget-7d879db895-wpnsf   1/1 Running 0    37m
mysql-7b9b7999d8-lk9gq 1/1 Running 0 65m |
3. Scale the deployment down to 1 pod
| Code Block |
|---|
kubectl scale --replicas=1 deployment joget |
4. Examine the running pods, and you should now see 1 pod running Joget.
| Code Block |
|---|
kubectl get pods |