Table of Contents
Introduction to UiPath
| Thai |
|---|
รู้เบื้องต้นเกี่ยวกับ UiPath |
UiPath Overview
| Thai |
|---|
ภาพรวม UiPath |
UiPath is one of the leading Robotic Process Automation (RPA) vendors. UiPath consists of 3 main components:
| Thai |
|---|
UiPath เป็นหนึ่งในผู้จำหน่าย Robotic Process Automation (RPA) ชั้นนำ UiPath ประกอบด้วย 3 องค์ประกอบหลัก: |
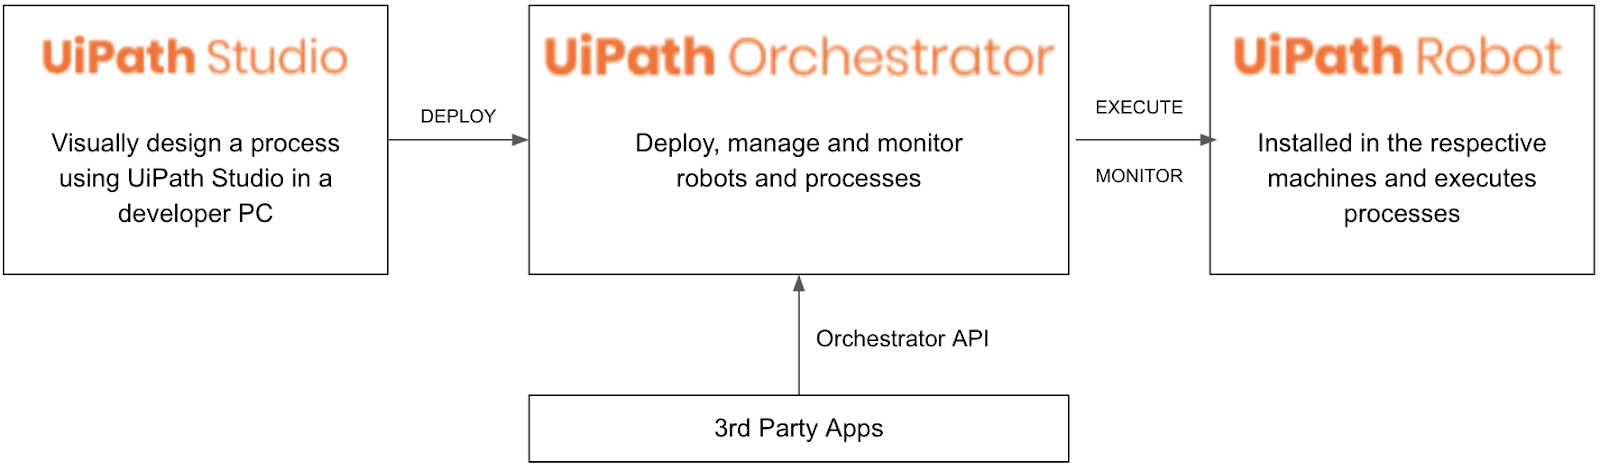
UiPath Component Architecture
| Thai |
|---|
สถาปัตยกรรมคอมโพเนนต์ UiPath |
UiPath Studio: UI tool to visually design the process to automate
Thai UiPath Studio: เครื่องมือ UI เพื่อออกแบบกระบวนการให้เป็นแบบอัตโนมัติ
UiPath Orchestrator: Web application that manages the creation, monitoring, and deployment of all robots and processes
Thai UiPath Orchestrator: เว็บแอปพลิเคชันที่จัดการการสร้างการตรวจสอบและการปรับใช้หุ่นยนต์และกระบวนการทั้งหมด
UiPath Robot: Runs processes that were built in UiPath Studio. Execution agent that is installed and executed in the actual machine.
Thai UiPath Robot: รันกระบวนการที่สร้างขึ้นใน UiPath Studio ตัวแทนการดำเนินการที่ติดตั้งและดำเนินการในเครื่องจริง
UiPath Concepts and Terms
| Thai |
|---|
แนวคิดและข้อกำหนดของ UiPath |
Here are some of the basic concepts and terms in UiPath that you should get familiar with for the tutorial later:
| Thai |
|---|
นี่คือแนวคิดและคำศัพท์พื้นฐานบางอย่างใน UiPath ที่คุณควรทำความคุ้นเคยกับบทช่วยสอนในภายหลัง: |
Machine: Represents the actual machine the robot executes in
Thai Machine: แสดงถึงเครื่องจริงที่หุ่นยนต์ทำงาน
Environment: An environment is a grouping of Robots, that is used to deploy processes
Thai Environment: สภาพแวดล้อมคือการจัดกลุ่มของ Robots ที่ใช้ในการปรับใช้กระบวนการ
Package: A UiPath Studio project that is published
Thai Package: โครงการ UiPath Studio ที่เผยแพร่
Process: A process represents the association between a package and an environment. Each time a package is deployed to an environment, it is automatically distributed to all machines that belong to that environment.
Thai Process: กระบวนการแสดงถึงการเชื่อมโยงระหว่างแพ็คเกจและสภาพแวดล้อม แต่ละครั้งที่มีการนำแพคเกจไปใช้กับสภาพแวดล้อมแพคเกจจะถูกแจกจ่ายโดยอัตโนมัติไปยังเครื่องทั้งหมดที่เป็นของสภาพแวดล้อมนั้น
Job: A job is the execution of a process on one or multiple Robots.
Thai Job: งานคือการประมวลผลของหนึ่งหรือหลายหุ่นยนต์
There are other concepts for more advanced usage that will not be used in the tutorial, such as:
| Thai |
|---|
มีแนวคิดอื่นสำหรับการใช้งานขั้นสูงเพิ่มเติมที่จะไม่ใช้ในบทช่วยสอนเช่น: |
Library: A process library describes a system of activities that are reusable for sharing
Thai Library: ไลบรารีกระบวนการอธิบายถึงระบบของกิจกรรมที่นำมาใช้ซ้ำเพื่อการแบ่งปัน
Schedule: Enables jobs to be executed in a preplanned manner
Thai Schedule: ช่วยให้งานที่จะดำเนินการในลักษณะที่วางแผนไว้ล่วงหน้า
Asset: Usually represent shared variables or credentials that can be used in different projects.
Thai Asset: โดยปกติจะแสดงถึงตัวแปรที่ใช้ร่วมกันหรือข้อมูลรับรองที่สามารถใช้ในโครงการต่างๆ
Queue: A place to store multiple types of data, such as invoice information or customer details.
Thai Queue: สถานที่สำหรับเก็บข้อมูลหลายประเภทเช่นข้อมูลใบแจ้งหนี้หรือรายละเอียดลูกค้า
Get Started with UiPath
| Thai |
|---|
เริ่มต้นกับ UiPath |
Step 1: Sign Up for UiPath Cloud Platform
| Thai |
|---|
ขั้นตอนที่ 1: สมัครใช้งานแพลตฟอร์ม UiPath Cloud |
Let’s sign up for an account at https://www.uipath.com/platform-trial. There is a Community plan to get started for free, so we’ll Choose Community to register.
| Thai |
|---|
ลงทะเบียนบัญชีที่ https://www.uipath.com/platform-trial มีแผนชุมชนในการเริ่มต้นฟรีเราจึงเลือกชุมชนเพื่อลงทะเบียน |

Sign up using a social account or an email, and upon registration you will be taken to a dashboard at https://platform.uipath.com.
| Thai |
|---|
ลงทะเบียนโดยใช้บัญชีโซเชียลหรืออีเมลและเมื่อลงทะเบียนคุณจะถูกนำไปที่แดชบอร์ดที่ https://platform.uipath.com |
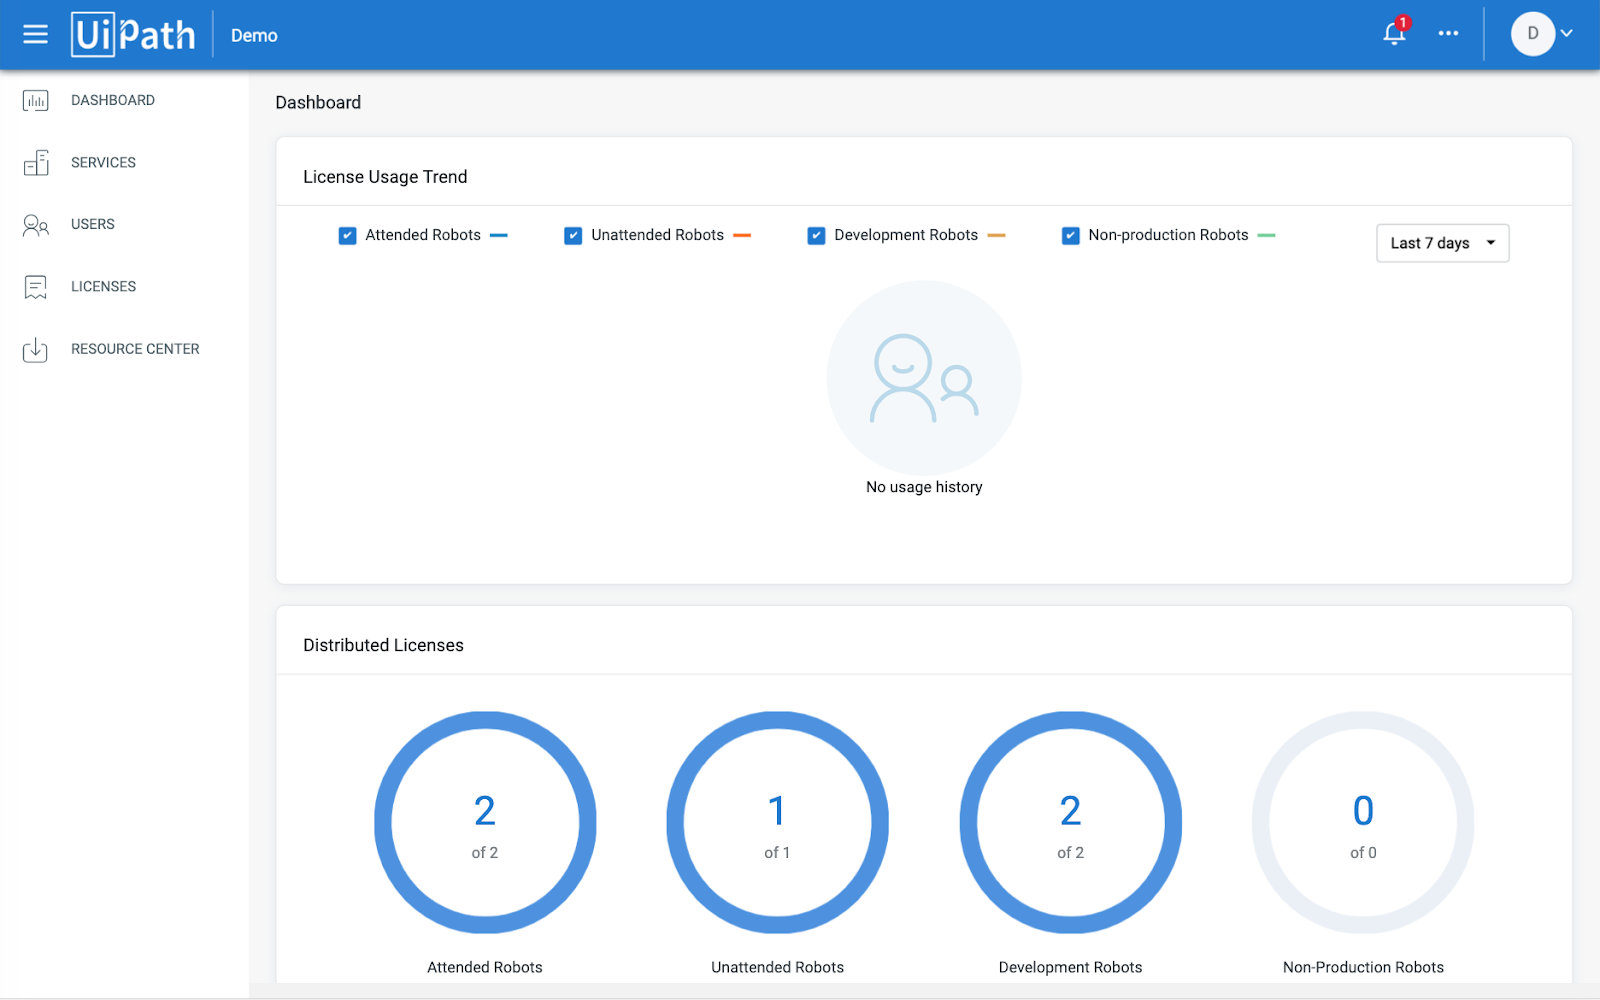
A service represents a deployment in the company. A default service is already created e.g. DemoDefault.
| Thai |
|---|
บริการแสดงถึงการปรับใช้ใน บริษัท บริการเริ่มต้นถูกสร้างขึ้นแล้วเช่น DemoDefault |
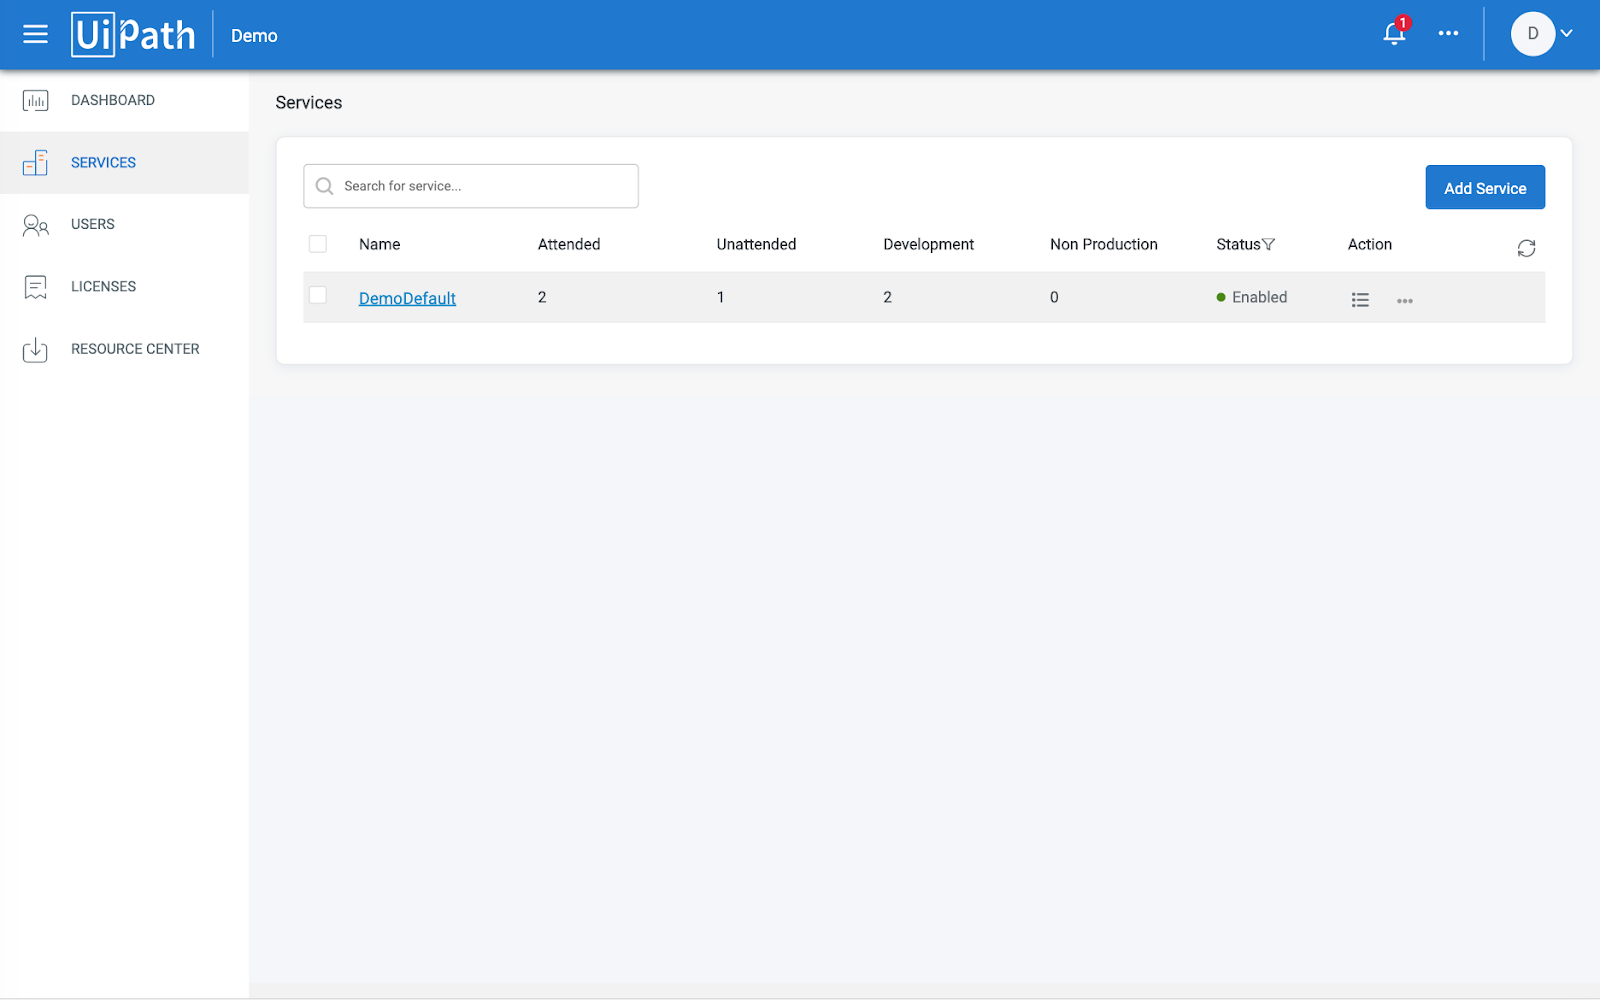
Select the service name to open the UiPath Orchestrator web application.
| Thai |
|---|
เลือกชื่อบริการเพื่อเปิดเว็บแอปพลิเคชัน UiPath Orchestrator |

Step 2: Install UiPath Studio and UiPath Robot
| Thai |
|---|
ขั้นตอนที่ 2: ติดตั้ง UiPath Studio และ UiPath Robot |
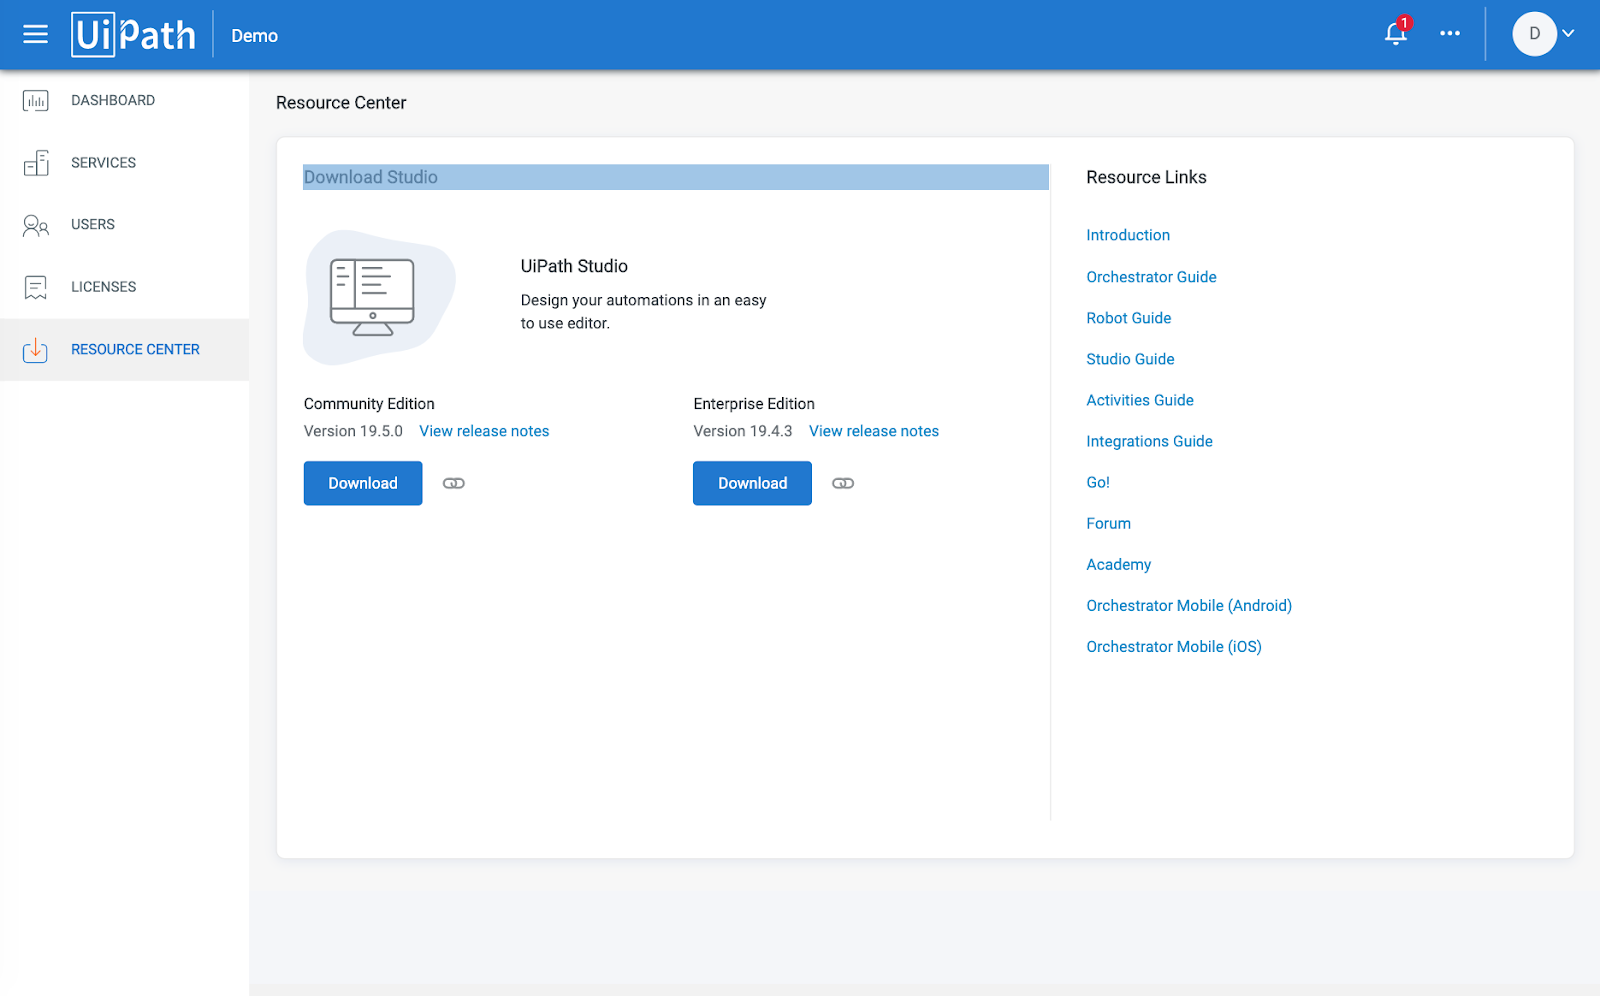
Download the UiPath Studio installer (UiPathStudioSetup.exe) from the Resource Center, and install it on the target computer. More information on UiPath Studio is available at the UiPath Studio Guide.
| Thai |
|---|
ดาวน์โหลดตัวติดตั้ง UiPath Studio (UiPathStudioSetup.exe) จาก Resource Center และติดตั้งบนคอมพิวเตอร์เป้าหมาย ข้อมูลเพิ่มเติมเกี่ยวกับ UiPath Studio สามารถดูได้ที่ UiPath Studio Guide |
After installing UiPathStudioSetup.exe, start UiPath Studio from the Windows Start menu and activate it. You can start free by activating the Community Edition.
| Thai |
|---|
หลังจากติดตั้ง UiPathStudioSetup.exe ให้เริ่ม UiPath Studio จากเมนู Windows Start และเปิดใช้งาน คุณสามารถเริ่มต้นได้ฟรีโดยเปิดใช้งาน Community Edition |

Step 3: Launch UiPath Robot and Obtain Machine Name
| Thai |
|---|
ขั้นตอนที่ 3: เรียกใช้ UiPath Robot และรับชื่อเครื่อง |
In the Windows Start menu, search for for UiPath Robot and start it
| Thai |
|---|
ในเมนู Windows Start ให้ค้นหา UiPath Robot |
...
และเริ่มต้น |
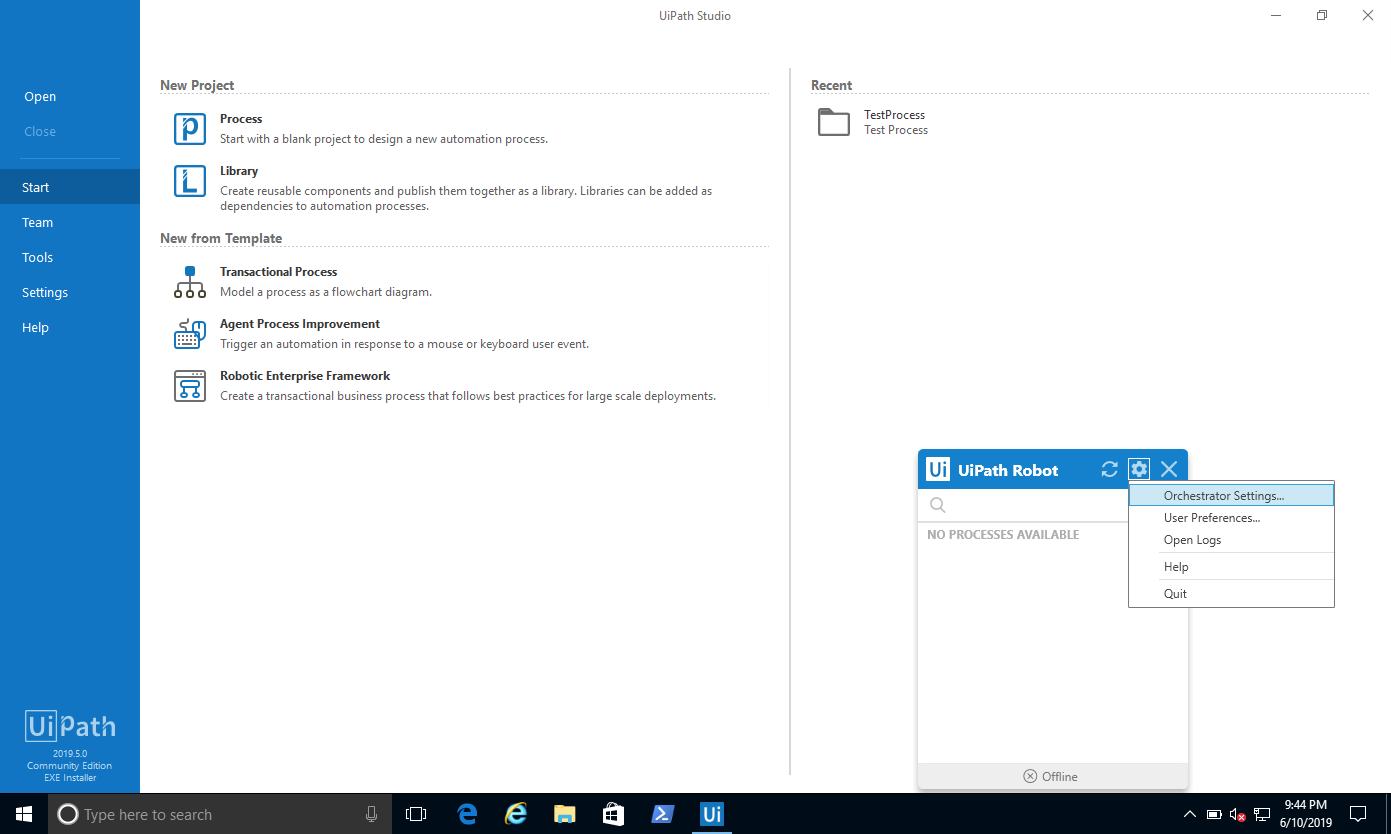
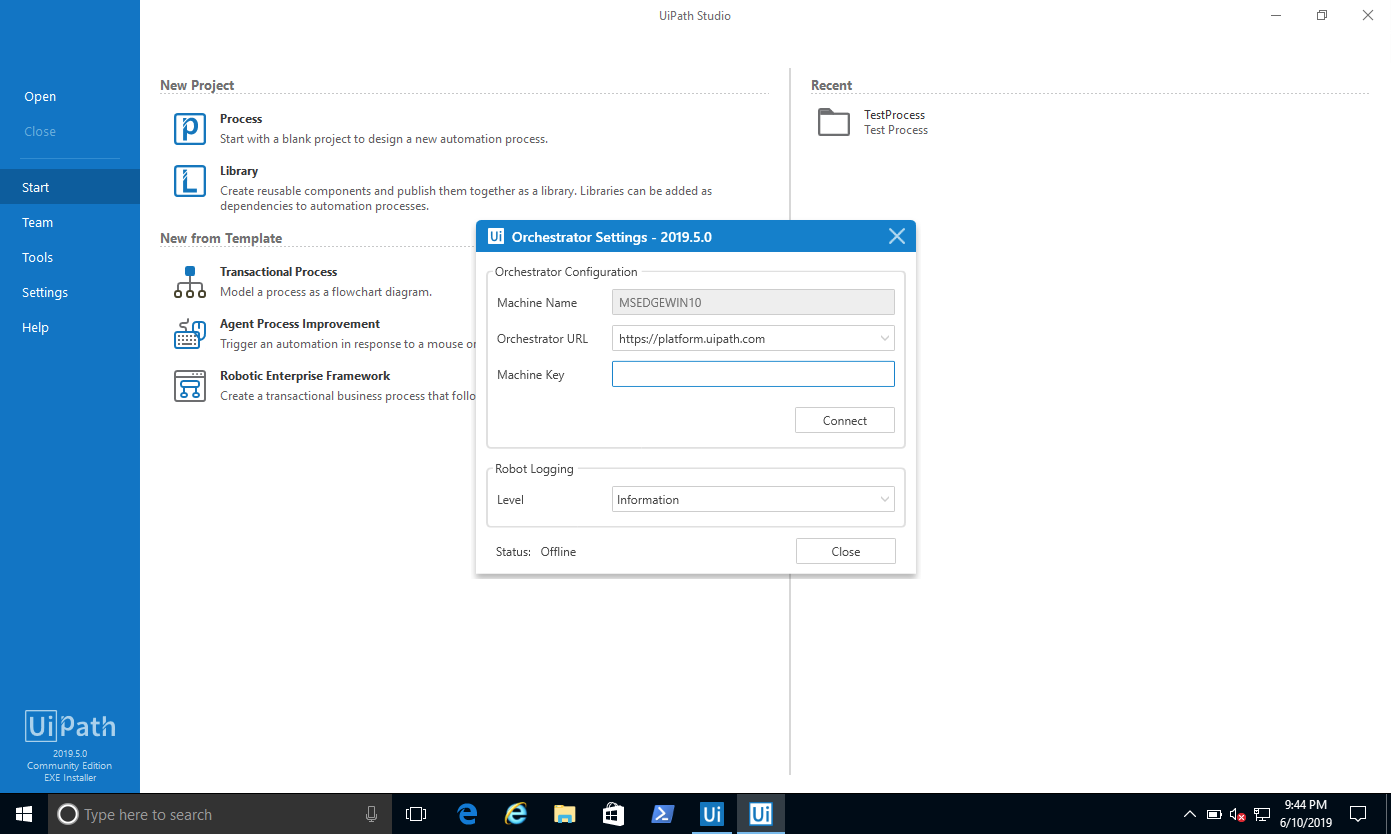
Click on the Gear icon to open the Orchestrator Settings window, and copy the Machine Name.
| Thai |
|---|
คลิกที่ไอคอนเกียร์เพื่อเปิดหน้าต่างการตั้งค่า Orchestrator และคัดลอกชื่อเครื่อง |
Step 4: Obtain Machine Key
| Thai |
|---|
ขั้นตอนที่ 4: รับรหัสเครื่อง |
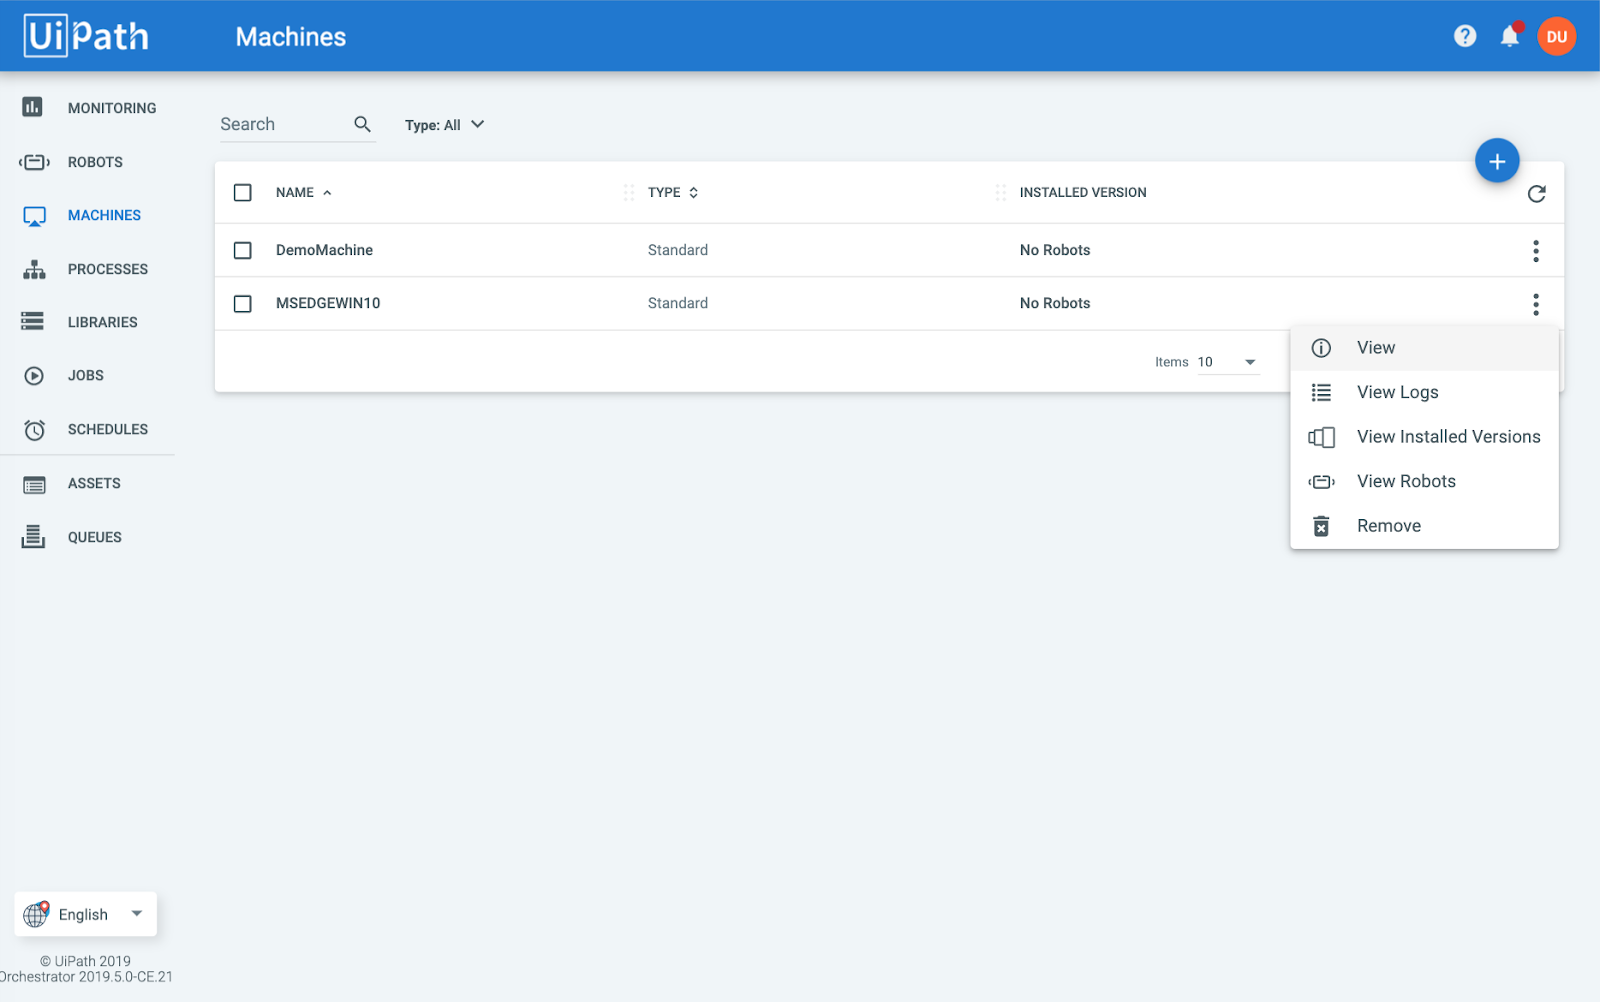
Back in the UiPath Orchestrator, create a new Machine under the Machines menu.
| Thai |
|---|
ย้อนกลับไปใน UiPath Orchestrator สร้างเครื่องใหม่ภายใต้เมนู Machines |
| Info | ||
|---|---|---|
IMPORTANT: Make sure that the name matches the Machine Name shown in the UiPath Orchestrator Settings earlier.
|

View the selected Machine and copy the Machine Key.
| Thai |
|---|
ดูเครื่องที่เลือกและคัดลอกหมายเลขเครื่อง |

Step 5: Connect UiPath Robot to the Machine
| Thai |
|---|
ขั้นตอนที่ 5: เชื่อมต่อหุ่นยนต์ UiPath เข้ากับเครื่อง |
In the UiPath Robot, click on the Gear icon to open the Orchestrator Settings window.
Fill in the Orchestrator URL (https://platform.uipath.com for the UiPath Cloud Platform) and the Machine Key copied in the previous step, then click on Connect.on Connect.
| Thai |
|---|
ใน UiPath Robot คลิกที่ไอคอนเกียร์เพื่อเปิดหน้าต่างการตั้งค่า Orchestrator กรอก URL ของ Orchestrator (https://platform.uipath.com สำหรับแพลตฟอร์ม UiPath Cloud) และรหัสเครื่องที่คัดลอกในขั้นตอนก่อนหน้าจากนั้นคลิกที่เชื่อมต่อ |
| Info | ||
|---|---|---|
Once connected, you should see “Status: Robot unavailable” at the bottom of the window. Hover over that message, and you should see the reason “Robot is not available.” This message means that the machine connection is valid, so now it’s time to create a robot. If you see a different reason then there might be an error in your configuration so you will want to double check your settings.
|

Step 6: Create a Robot
| Thai |
|---|
ขั้นตอนที่ 6: สร้างหุ่นยนต์ |
In the UiPath Orchestrator under the Robots menu, click on the Plus icon on the top right.
...
Assign the robot to the machine created previously.
Set a “Name”, and fill in the actual Windows login for the target machine (where the UiPath Robot is installed) under Domain\Username and Password.fill in the actual Windows login for the target machine (where the UiPath Robot is installed) under Domain\Username and Password.
| Thai |
|---|
ใน UiPath Orchestrator ใต้เมนู Robots คลิกที่ไอคอนเครื่องหมายบวกที่ด้านบนขวา เลือก“ หุ่นยนต์มาตรฐานที่ทำงานกับเครื่องมาตรฐานเดียว” กำหนดหุ่นยนต์ให้กับเครื่องที่สร้างไว้ก่อนหน้านี้ ตั้งค่า“ ชื่อ” และกรอกข้อมูลล็อกอิน Windows จริงสำหรับเครื่องเป้าหมาย (ที่ติดตั้ง UiPath Robot) ภายใต้โดเมน \ ชื่อผู้ใช้และรหัสผ่าน |

Step 7: Add Robot to Environment
| Thai |
|---|
ขั้นตอนที่ 7: เพิ่มหุ่นยนต์ในสภาพแวดล้อม |
Next, we’ll need to add the created Robot to the Environment. Select the Environments tab at the top of the Robots menu and select the Manage option.
| Thai |
|---|
ต่อไปเราจะต้องเพิ่มหุ่นยนต์ที่สร้างขึ้นเพื่อสิ่งแวดล้อม เลือกแท็บสภาพแวดล้อมที่ด้านบนของเมนู Robots และเลือกตัวเลือกจัดการ |
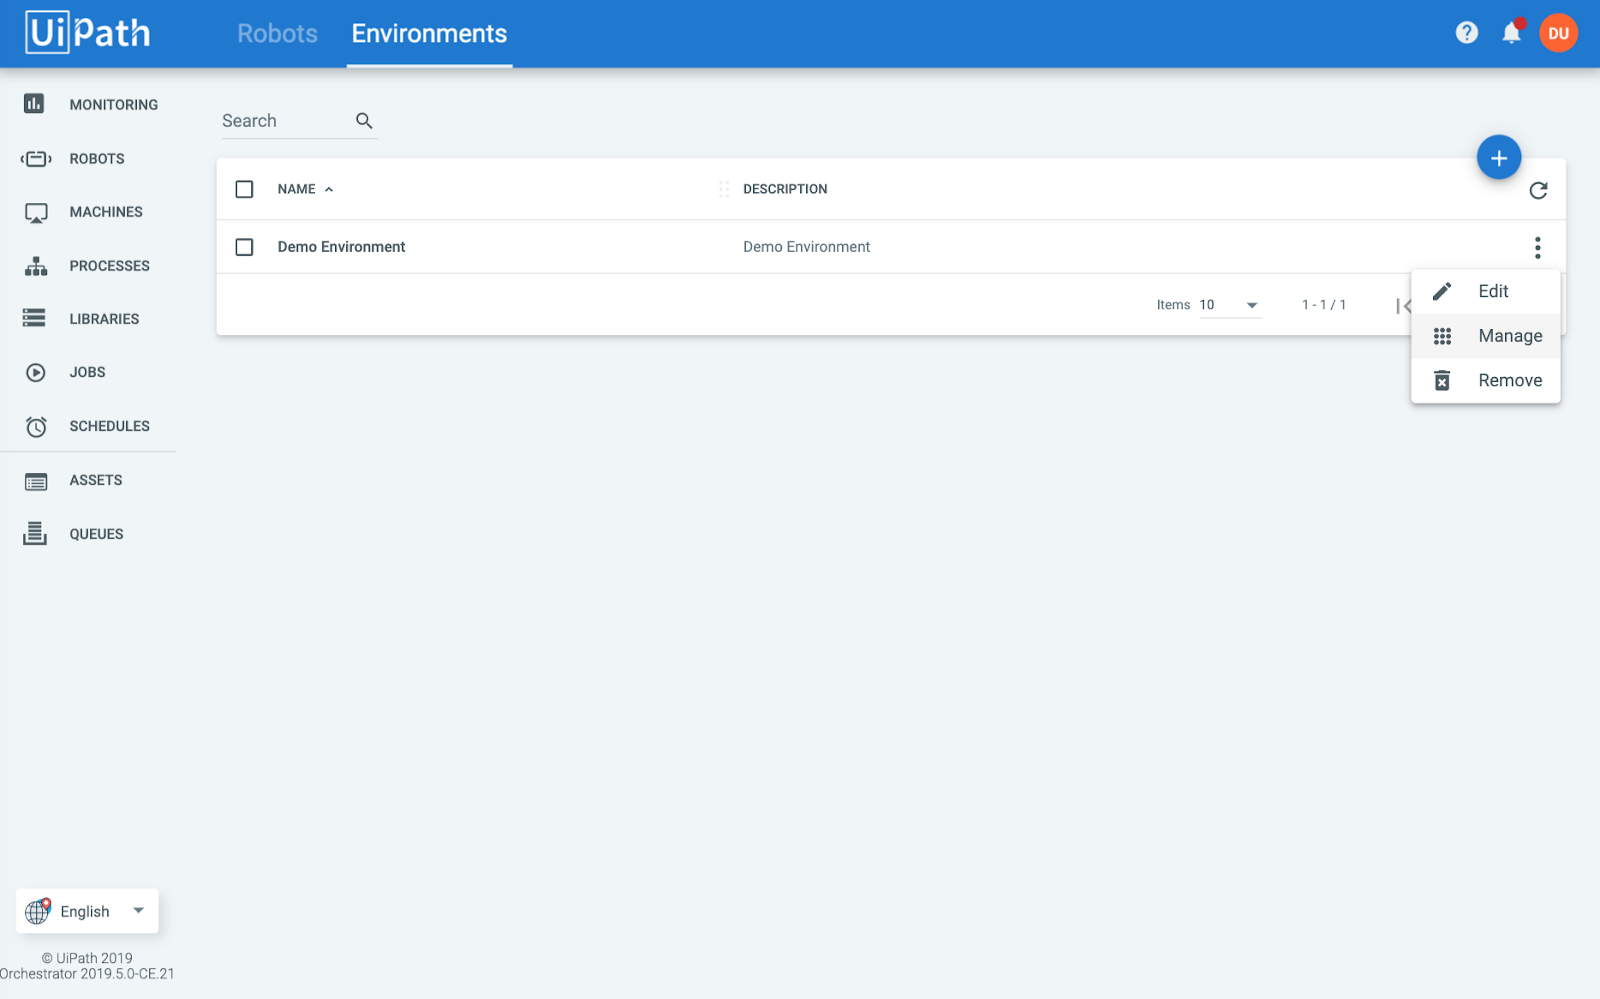
Select the previously created robot and click UPDATE.
| Thai |
|---|
เลือกหุ่นยนต์ที่สร้างขึ้นก่อนหน้านี้และคลิกอัปเดต |

At this point, the robot should be successfully connected to the machine. Check the UiPath Robot Orchestrator Settings and the status should show “Connected, licensed”
| Thai |
|---|
ณ จุดนี้หุ่นยนต์ควรจะเชื่อมต่อกับเครื่องได้สำเร็จ ตรวจสอบการตั้งค่า UiPath Robot Orchestrator และสถานะควรแสดง“ เชื่อมต่อได้รับอนุญาต” |

Step 8: Start a Job
| Thai |
|---|
ขั้นตอนที่ 8: เริ่มงาน |
Now that the robot is deployed, it’s time to start a job to test it.
...
Select the pre-existing Demo Process and the previously robot, then click on Start.on Start.
| Thai |
|---|
ตอนนี้ได้รับการปรับใช้แล้วก็ถึงเวลาที่จะเริ่มงานเพื่อทดสอบ ภายใต้งานให้คลิกที่ไอคอนเล่นที่ด้านบนขวา เลือกกระบวนการสาธิตที่มีอยู่แล้วและหุ่นยนต์ก่อนหน้านี้จากนั้นคลิกที่เริ่ม |

In the UiPath Robot, it will show “Installing package…”. Once the package has been installed, it will show “Job started processing” which means the process has started. In this demo process, a Hello popup dialog will appear.
| Thai |
|---|

The robot has successfully started the job. You can monitor the robots and jobs in the Monitoring menu in the UiPath Orchestrator.
| Thai |
|---|

Step 9: Prepare for UiPath Integration
| Thai |
|---|
In June 2019, UiPath introduced a new mechanism for consuming its Cloud APIs. There are a number of steps required to retrieve some required information for integration:
| Thai |
|---|
1. Get Access and ID Tokens
| Thai |
|---|
1.1 Generate Code Challenge and Code Verifier
| Thai |
|---|
In a web browser, visit https://repl.it/languages/nodejs and run the following code:
| Thai |
|---|
| Code Block |
|---|
function base64URLEncode(str) {
  return str.toString('base64')
    .replace(/\+/g, '-')
    .replace(/\//g, '_')
    .replace(/=/g, '');
}

function sha256(buffer) {
  return crypto.createHash('sha256').update(buffer).digest();
}

console.log("Generating challenge and Verifier");
var cryptoResult = crypto.randomBytes(32);
var verifier = base64URLEncode(cryptoResult);
var challenge = base64URLEncode(sha256(verifier));
console.log("Code challenge: " + challenge)
console.log("Code verifier: " + verifier); |
Take note of the code challenge and code verifier values in the output e.g.
| Thai |
|---|
| Code Block |
|---|
Generating challenge and Verifier Code challenge: RzYlHiiGzPGgOLaRQJYftZ1mmc3sCbeicZVRftTmC-A Code verifier: YVMnLczXQgJ9dwzV7MlMWEjGyAia4nXvTZzU4UVrAPE |
...
1.2 Get Authorization Code
| Thai |
|---|
Replace the code challenge into the URL below, and visit the updated URL in a browser.
| Thai |
|---|
https://account.uipath.com/authorize?response_type=code&nonce=b0f368cbc59c6b99ccc8e9b66a30b4a6&state=47441df4d0f0a89da08d43b6dfdc4be2&code_challenge=[code_challenge]&code_challenge_method=S256&scope=openid+profile+offline_access+email &audience=https%3A%2F%2Forchestrator.cloud.uipath.com&client_id=5v7PmPJL6FOGu6RB8I1Y4adLBhIwovQN&redirect_uri=https%3A%2F%2Faccount.uipath.com%2Fmobile
The browser should redirect to:
| Thai |
|---|
https://account.uipath.com/mobile?code=[authorization_code]&state=47441df4d0f0a89da08d43b6dfdc4be2
Copy the authorization_code in the URL.
| Thai |
|---|
1.3 Get Refresh Token
| Thai |
|---|
Using any API testing tool (e.g. Postman), submit a POST request to
https://account.uipath.com/oauth/token with the body below, replacing the values for [authorization_code] and [code_verifier] accordingly.
| Thai |
|---|
| Code Block |
|---|
{
   "grant_type": "authorization_code",
   "code": "[authorization_code]",
   "redirect_uri": "https://account.uipath.com/mobile",
   "code_verifier": "[code verifier]",
   "client_id": "5v7PmPJL6FOGu6RB8I1Y4adLBhIwovQN"
} |
Copy the value of the refresh_token from the response:
| Thai |
|---|
| Code Block |
|---|
{
   "access_token": "eyJ0eX...",
   "refresh_token": "CBZcOD6vrP2FQ9qa8fuqDdfoEwnVPuR2Kpz-hitbTAIzG",
   "id_token": "eyJ0eX...",
   "scope": "openid profile email offline_access",
   "expires_in": 86400,
   "token_type": "Bearer"
} |
...
1.4 Get Access Token and ID using the Refresh Token
| Thai |
|---|
Using any API testing tool, submit a POST request to
https://account.uipath.com/oauth/token with the body below, replacing the values for [refresh_token] accordingly.
| Thai |
|---|
| Code Block |
|---|
{
   "grant_type": "refresh_token",
   "client_id": "5v7PmPJL6FOGu6RB8I1Y4adLBhIwovQN",
   "refresh_token": "[refresh_token]"
} |
Copy the values for access_token and id_token from the response.
| Thai |
|---|
| Code Block |
|---|
{
   "access_token": "eyJ0eX...",
   "id_token": "eyJ0eX...",
   "scope": "openid profile email offline_access",
   "expires_in": 86400,
   "token_type": "Bearer"
} |
...
2. Get UiPath Account, Service and Process Identifiers
| Thai |
|---|
2.1 Get the Account Logical Name
| Thai |
|---|
Using any API testing tool, submit a GET request to
https://platform.uipath.com/cloudrpa/api/getAccountsForUser with a request header
| Thai |
|---|
| Code Block |
|---|
Authorization: Bearer [id_token] |
Copy the value for accountLogicalName from the response:
| Thai |
|---|
| Code Block |
|---|
{
   "userEmail": "demo@domain.com",
   "accounts": [
       {
           "accountName": "Demo",
           "accountLogicalName": "Demo"
       }
   ]
} |
...
2.2 Get Service Instance Logical Name
| Thai |
|---|
Using any API testing tool, submit a GET request to
https://platform.uipath.com/cloudrpa/api/account/[accountLogicalName]/getAllServiceInstances with a request header
| Thai |
|---|
| Code Block |
|---|
Authorization: Bearer [id_token] |
Copy the value for serviceInstanceLogicalName from the response:
| Thai |
|---|
| Code Block |
|---|
[
   {
       "serviceInstanceName": "DemoDefault",
       "serviceInstanceLogicalName": "DemoDefaultzous50676",
       "serviceType": "ORCHESTRATOR",
       "serviceUrl": "https://platform-community.azurewebsites.net"
   }
] |
...
2.3 Get Release Key for the Desired Process
| Thai |
|---|
We will now need to retrieve the Release Key, a unique identifier for a desired process. Using any API testing tool, submit a GET request to
https://platform.uipath.com/odata/Releases with request headers
| Thai |
|---|
| Code Block |
|---|
Authorization: Bearer [access_token] X-UIPATH-TenantName: [serviceInstanceLogicalName] |
Copy the value for Key from the response:
| Thai |
|---|
| Code Block |
|---|
{
   "@odata.context": "https://platform.uipath.com/odata/$metadata#Releases",
   "@odata.count": 1,
   "value": [
       {
           "Key": "b27c7363-459c-4520-bae5-660d4a1d3813",
           "ProcessKey": "Demo_Process",
           "ProcessVersion": "1.0.21",
           "IsLatestVersion": false,
           "IsProcessDeleted": false,
           "Description": "Demo Process",
           "Name": "Demo Process",
           "EnvironmentId": 98069,
           "EnvironmentName": "Demo Environment",
           "InputArguments": null,
           "QueueDefinitionId": null,
           "QueueDefinitionName": null,
           "Id": 120897,
           "Arguments": {
               "Input": null,
               "Output": null
           },
           "ProcessSettings": null
       }
   ]
} |
...
2.4 Test Orchestrator API Call to Start a Job
| Thai |
|---|
At this point, make sure you have the following critical information at hand:
| Thai |
|---|
refresh_token (Refresh Token)
access_token (Access Token)
serviceInstanceLogicalName (Service Instance Logical Name)
Key (Release Key)
...
https://platform.uipath.com/odata/Jobs/UiPath.Server.Configuration.OData.StartJobs with 2 request headers
| Thai |
|---|
| Code Block |
|---|
Authorization: Bearer [access_token] X-UIPATH-TenantName: [serviceInstanceLogicalName] |
and the body::
| Thai |
|---|
| Code Block |
|---|
{ "startInfo":
  { "ReleaseKey": "[Key]",
    "Strategy": "All",
    "RobotIds": [ ],
    "JobsCount": 0,
    "Source": "Manual"
  }
} |
If successful, the response will be as follows, with the status of the Job shown in the State attribute:
| Thai |
|---|
| Code Block |
|---|
{
   "@odata.context": "https://platform.uipath.com/odata/$metadata#Jobs",
   "value": [
       {
           "Key": "e811bd29-26fb-4cc3-af91-7fd6308ca643",
           "StartTime": null,
           "EndTime": null,
           "State": "Pending",
           "Source": "Manual",
           "SourceType": "Manual",
           "BatchExecutionKey": "382e7a96-a5b9-4343-b258-26a80cf87f80",
           "Info": null,
           "CreationTime": "2019-06-12T08:02:03.2595408Z",
           "StartingScheduleId": null,
           "ReleaseName": "Demo Process",
           "Type": "Unattended",
           "InputArguments": null,
           "OutputArguments": null,
           "HostMachineName": null,
           "HasMediaRecorded": false,
           "Id": 10169582
       }
   ]
} |
...
Integrate UiPath with Joget
| Thai |
|---|
How to Integrate with UiPath
| Thai |
|---|
UiPath provides the Orchestrator API for integration.
The most commonly used function is Starting a Job, which should satisfy a majority of use cases. We will use this function in the following integration tutorial.
| Thai |
|---|
Design a Process to Start a UiPath Job
| Thai |
|---|
Since the UiPath Orchestrator API is a REST API with data in JSON format, we can use the Joget JSON Tool to invoke the API.
Before we start, ensure that you have the following critical UiPath information at hand (obtained from the previous Prepare for UiPath Integration tutorial):
| Thai |
|---|
refresh_token (Refresh Token)
serviceInstanceLogicalName (Service Instance Logical Name)
Key (Release Key)
Step 1. Design New App
| Thai |
|---|
First, let’s design a new app by clicking on Design New App in the Joget App Center.
| Thai |
|---|
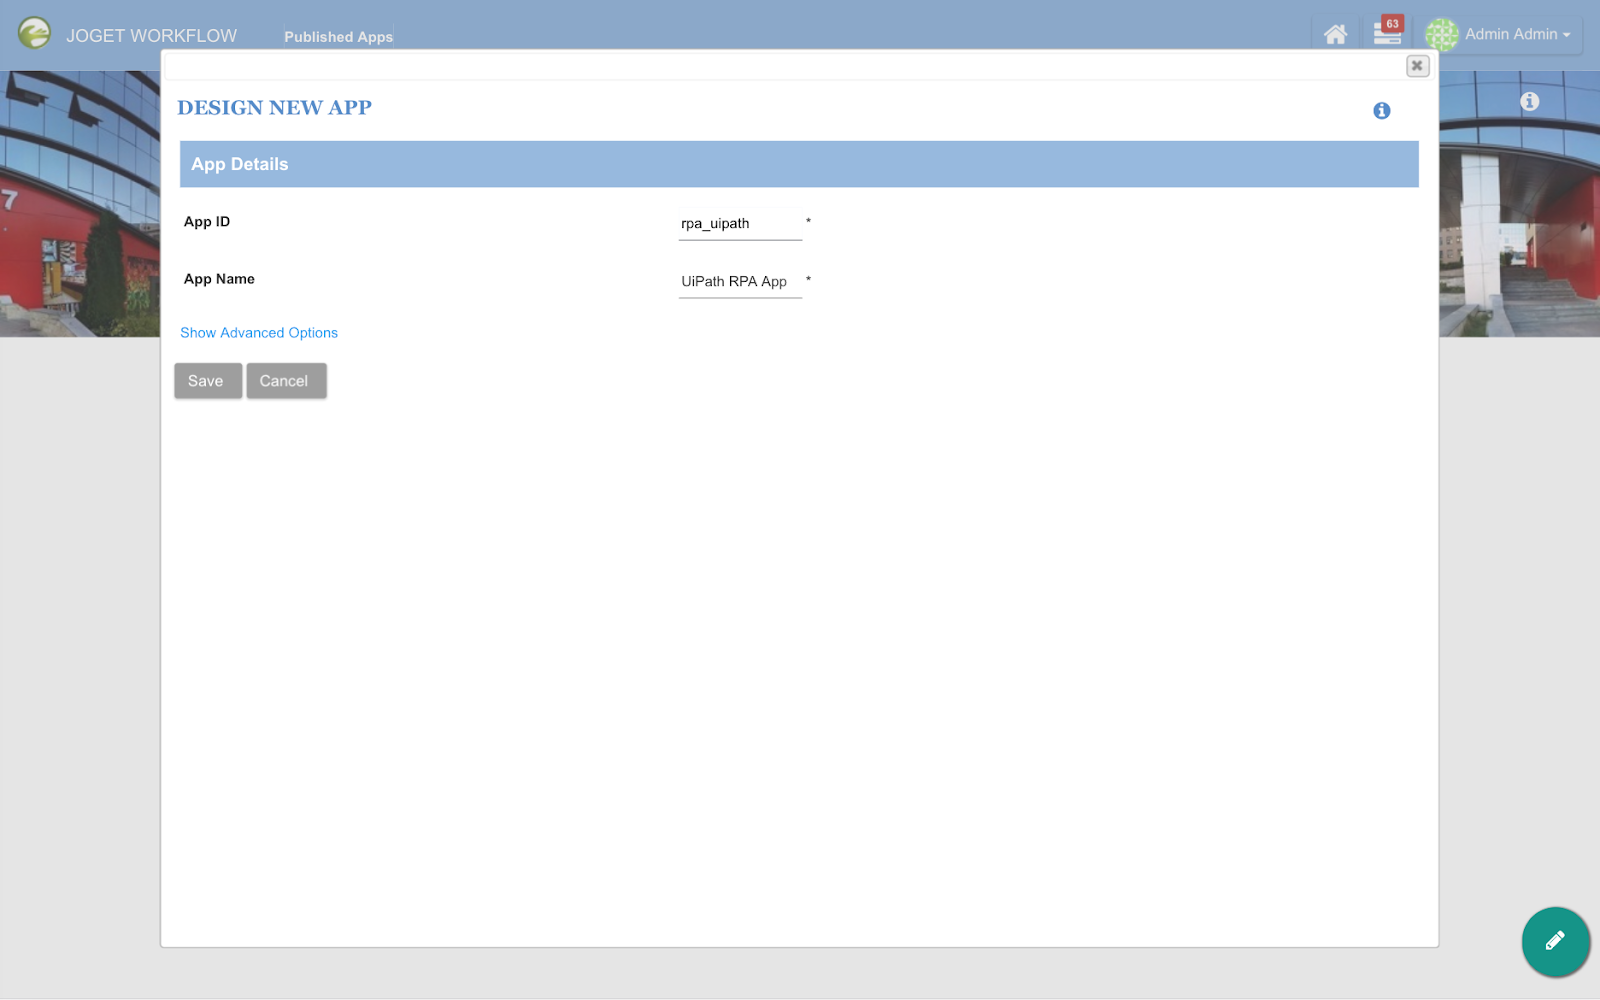
Fill in desired values for the App ID and App Name, and click Save.
| Thai |
|---|
Step 2. Design New Process
| Thai |
|---|
Click on the Processes menu, then on the Design Process button to launch the Process Builder.
Design a simple process containing 2 tools, as shown below.
| Thai |
|---|

Click on the edit pencil icon after hovering over the process name along the top. Enter a suitable process name and create 3 workflow variables to store the response values from UiPath API call:
| Thai |
|---|
status
Id_token
access_token

Click on Deploy.
| Thai |
|---|
Step 3. Configure First Tool to Get UiPath Access Token
| Thai |
|---|
Once the process has been deployed, close the Process Builder. In the process view page, select the Map Tools to Plugins tab.
| Thai |
|---|

Click on Configure Plugin for the first tool and select JSON Tool, then key in the following configuration:
...
| Thai |
|---|
JSON URL | |
Call Type | POST |
POST Method | Custom JSON Payload |
Custom JSON Payload | { "grant_type": "refresh_token", "client_id": "5v7PmPJL6FOGu6RB8I1Y4adLBhIwovQN", "refresh_token": "[refresh_token]" } |

Under Store to Workflow Variable, map the variables to store the tokens in the matching workflow variables i.e.
...
| Thai |
|---|
access_token | access_token |
id_token | id_token |

Click on Submit to save.
| Thai |
|---|
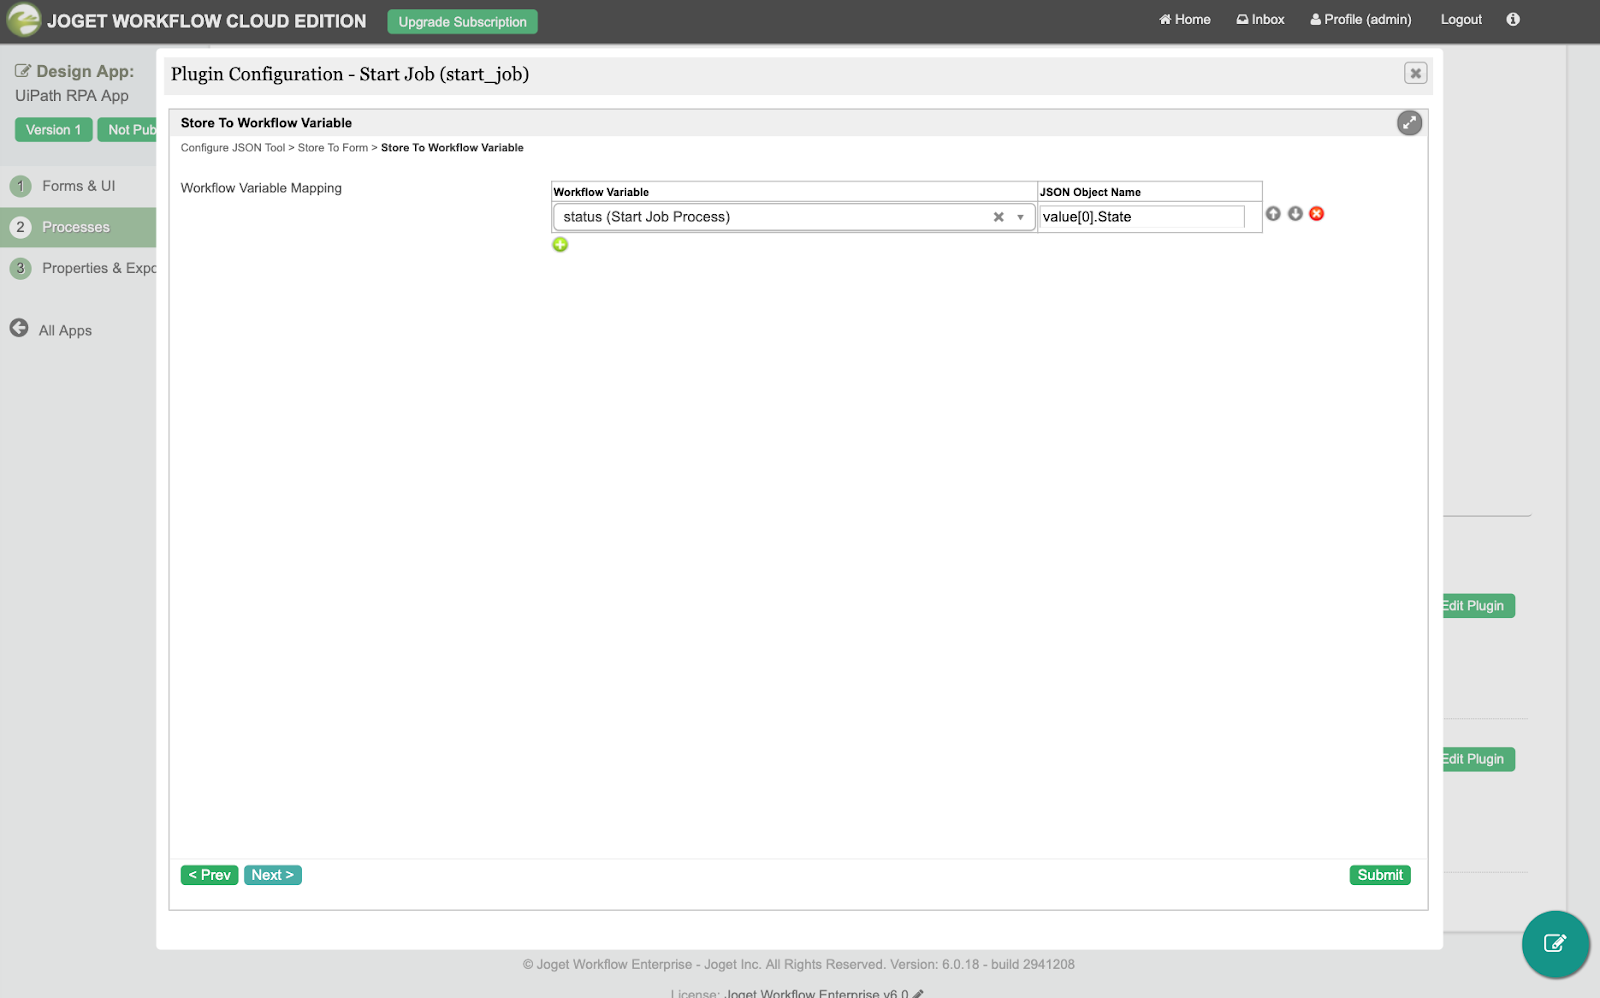
Step 4. Configure Second Tool to Start Job Using the Access Token
| Thai |
|---|
Click on Configure Plugin for the second tool and select JSON Tool, then key in the following configuration:
...
| Thai |
|---|
JSON URL | https://platform.uipath.com/odata/Jobs/UiPath.Server.Configuration.OData.StartJobs |
Call Type | POST |
POST Method | Custom JSON Payload |
Custom JSON Payload (Replace [Key] with the actual Release Key) | { "startInfo": { "ReleaseKey": "[Key]", "Strategy": "All", "RobotIds": [ ], "JobsCount": 0, "Source": "Manual" } } |
Request Headers (Replace [serviceInstanceLogicalName] with the actual Service Instance Logical Name | Authorization: Bearer #variable.access_token# X-UIPATH-TenantName: [serviceInstanceLogicalName] |

Under Store to Workflow Variable, map the status variable to the State attribute in the response JSON i.e.
...
| Thai |
|---|
status | value[0].State |
That’s it. The Joget process has been configured to invoke the UiPath Orchestrator API to start a job.
| Thai |
|---|
Step 5. Run the Process
| Thai |
|---|
Now, let’s test the process. Click on the Run Process button at the top, then Run Process again in the confirmation dialog.
| Thai |
|---|

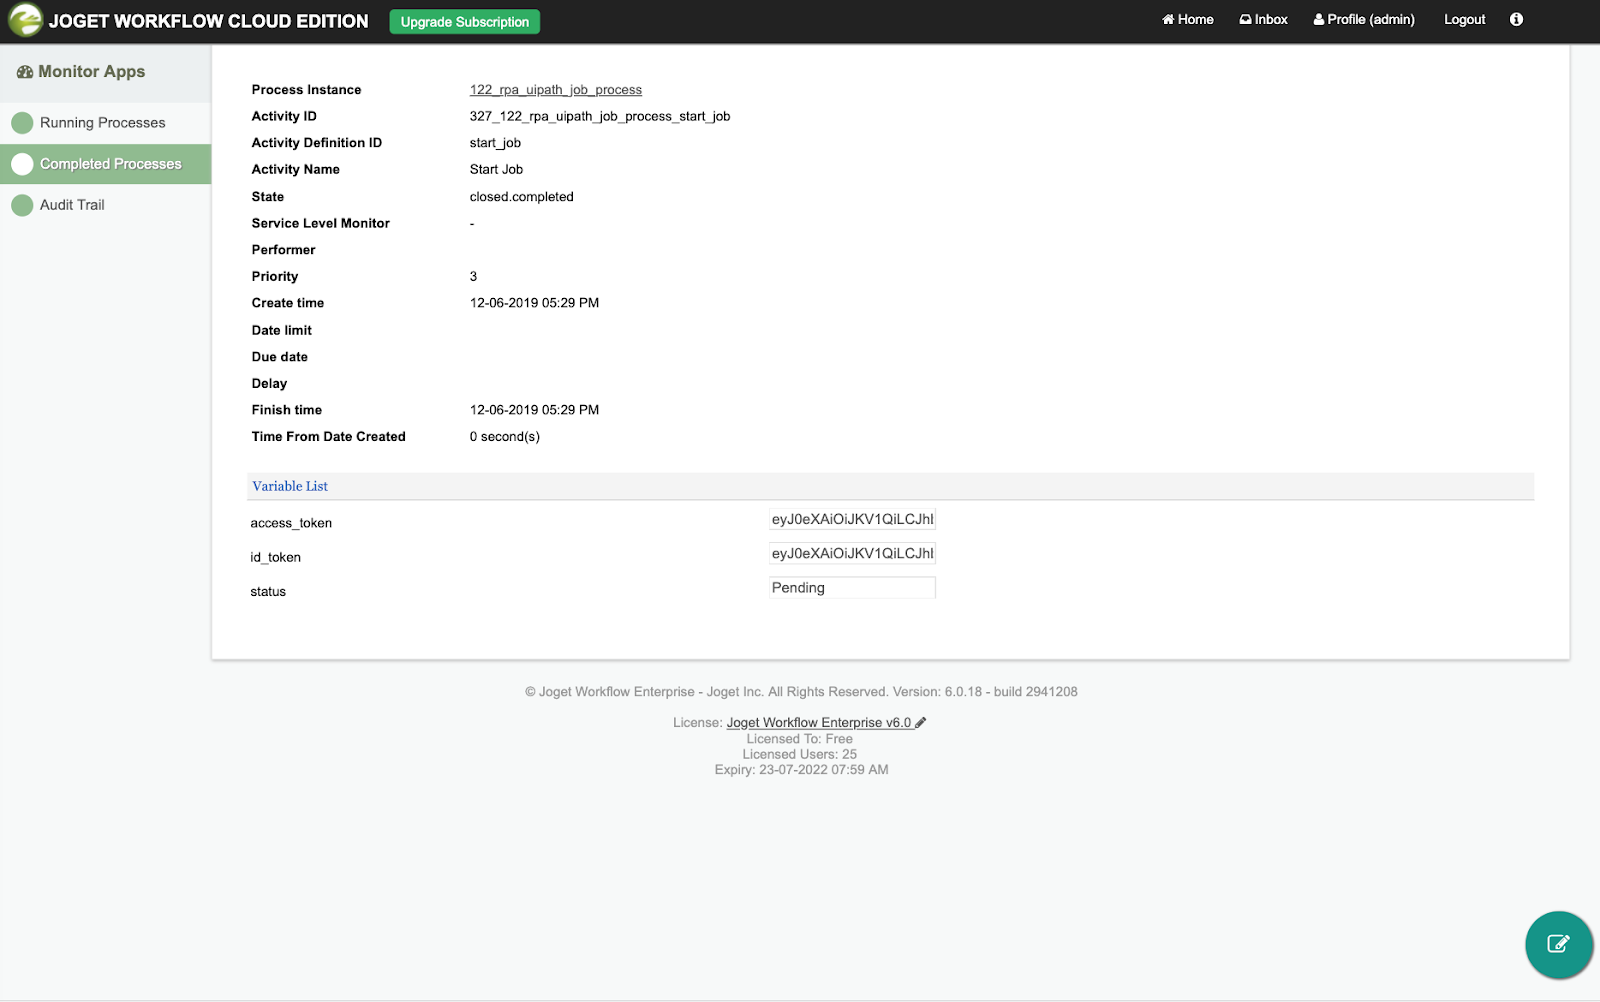
Once the process has started, the 2 tools will execute as configured. To view the results of the process, navigate to Monitor -> Completed Processes.
Select the process instance and you will see the 2 tools executed.
| Thai |
|---|

Click on each activity to view the values of the workflow variables which obtained the results of the Orchestrator API calls.
| Thai |
|---|
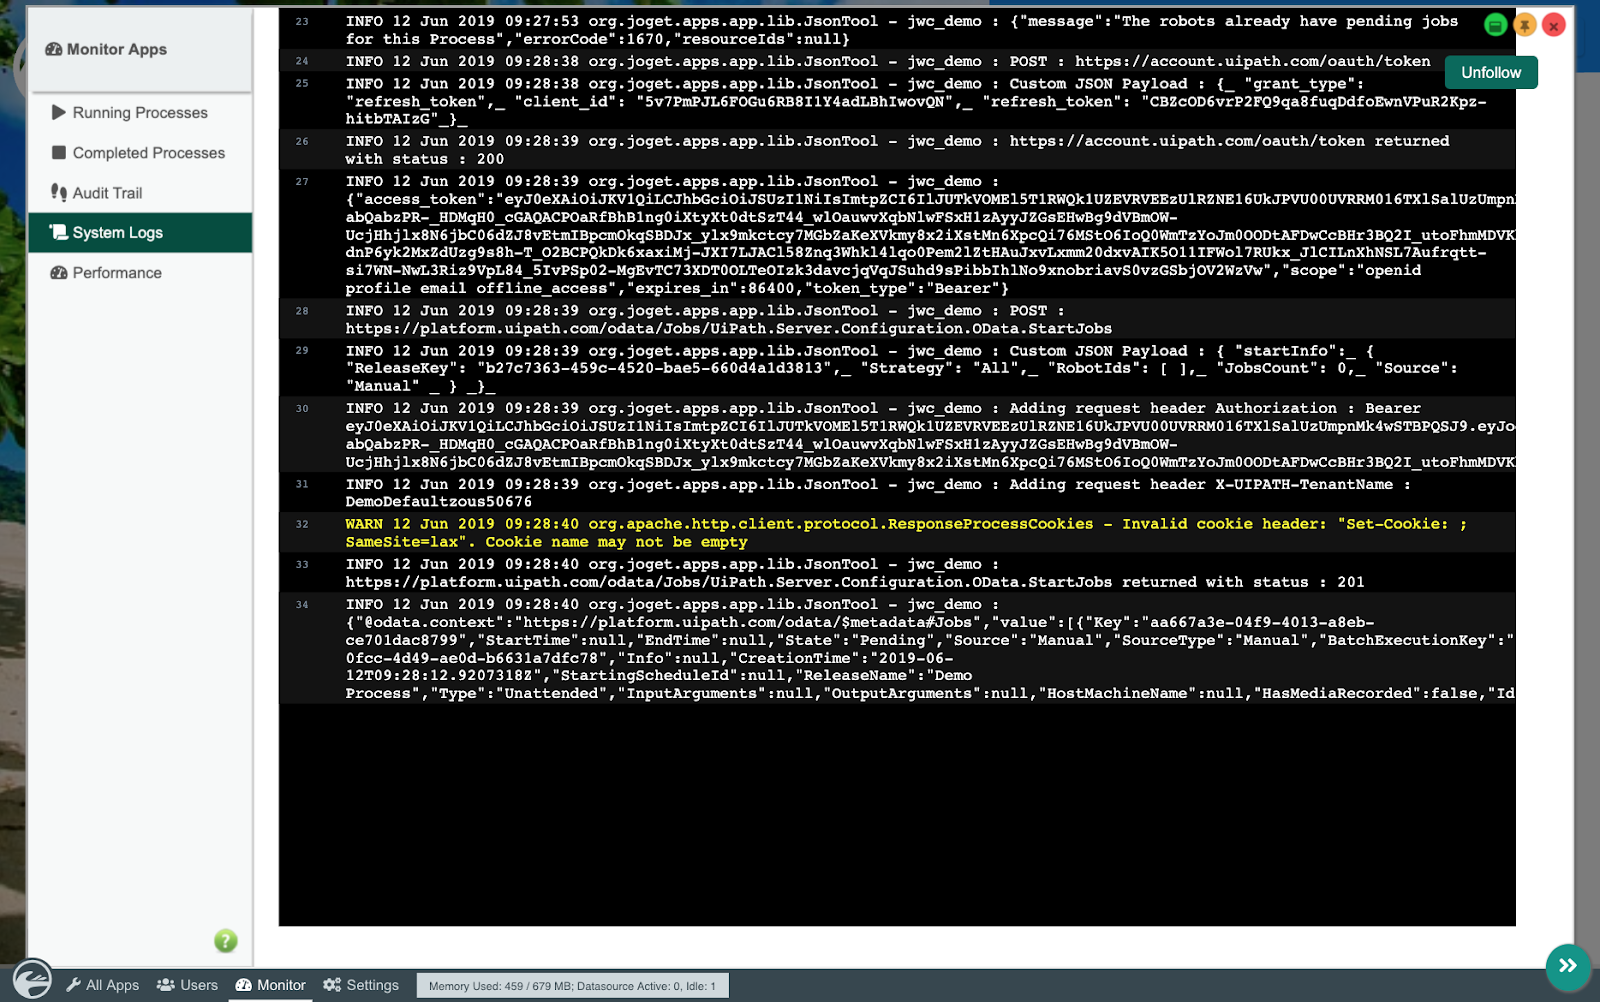
If you are running Joget on-premise and have access to the system logs, you will be able to see the tool requests and responses if the debugging option is enabled.
Sample log output:
| Thai |
|---|
| Code Block |
|---|
INFO 12 Jun 2019 09:28:38 org.joget.apps.app.lib.JsonTool - POST : https://account.uipath.com/oauth/token
INFO 12 Jun 2019 09:28:38 org.joget.apps.app.lib.JsonTool - Custom JSON Payload : {_ "grant_type": "refresh_token",_ "client_id": "5v7PmPJL6FOGu6RB8I1Y4adLBhIwovQN",_ "refresh_token": "CBZcOD6vrP2FQ9qa8fuqDdfoEwnVPuR2Kpz-hitbTAIzG"_}_
INFO 12 Jun 2019 09:28:39 org.joget.apps.app.lib.JsonTool - https://account.uipath.com/oauth/token returned with status : 200
INFO 12 Jun 2019 09:28:39 org.joget.apps.app.lib.JsonTool - {"access_token":"eyJ0eX...","scope":"openid profile email offline_access","expires_in":86400,"token_type":"Bearer"}
INFO 12 Jun 2019 09:28:39 org.joget.apps.app.lib.JsonTool - POST : https://platform.uipath.com/odata/Jobs/UiPath.Server.Configuration.OData.StartJobs
INFO 12 Jun 2019 09:28:39 org.joget.apps.app.lib.JsonTool - Custom JSON Payload : { "startInfo":_ { "ReleaseKey": "b27c7363-459c-4520-bae5-660d4a1d3813",_ "Strategy": "All",_ "RobotIds": [ ],_ "JobsCount": 0,_ "Source": "Manual" _ } _}_
INFO 12 Jun 2019 09:28:39 org.joget.apps.app.lib.JsonTool - Adding request header Authorization : Bearer eyJ0eX...
INFO 12 Jun 2019 09:28:39 org.joget.apps.app.lib.JsonTool - Adding request header X-UIPATH-TenantName : DemoDefaultzous50676
INFO 12 Jun 2019 09:28:40 org.joget.apps.app.lib.JsonTool - https://platform.uipath.com/odata/Jobs/UiPath.Server.Configuration.OData.StartJobs returned with status : 201
INFO 12 Jun 2019 09:28:40 org.joget.apps.app.lib.JsonTool - {"@odata.context":"https://platform.uipath.com/odata/$metadata#Jobs","value":[{"Key":"aa667a3e-04f9-4013-a8eb-ce701dac8799","StartTime":null,"EndTime":null,"State":"Pending","Source":"Manual","SourceType":"Manual","BatchExecutionKey":"68fa4d0a-0fcc-4d49-ae0d-b6631a7dfc78","Info":null,"CreationTime":"2019-06-12T09:28:12.9207318Z","StartingScheduleId":null,"ReleaseName":"Demo Process","Type":"Unattended","InputArguments":null,"OutputArguments":null,"HostMachineName":null,"HasMediaRecorded":false,"Id":10173064}]} |
If you are using Joget DX, you can stream the logs directly in the web browser.
| Thai |
|---|
Back at the UiPath Orchestrator and UiPath Robot, you would also be able to monitor the execution of the job.
| Thai |
|---|
Sample Joget App
| Thai |
|---|
The sample app containing this process can be downloaded below:
| Thai |
|---|
View file name APP_rpa_uipath-1-20190612141440.jwa height 250
...