Red Hat OpenShift is the industry’s most comprehensive enterprise Kubernetes platform, and operators are the modern way to automate infrastructure management tasks. A new Joget DX Operator has now been released to further simplify and accelerate app development on Red Hat OpenShift. It has achieved Red Hat OpenShift Operator Certification, and is now available in the OpenShift Embedded OperatorHub.
| Thai |
|---|
Red Hat OpenShift เป็นแพลตฟอร์ม Kubernetes สำหรับองค์กรที่ครอบคลุมมากที่สุดในอุตสาหกรรมและ operators เป็นวิธีที่ทันสมัยในการจัดการงานโครงสร้างพื้นฐานอัตโนมัติJoget DX Operatorใหม่ได้รับการเผยแพร่เพื่อให้การพัฒนาแอพง่ายขึ้นและเร็วขึ้นบน Red Hat OpenShift ได้รับการรับรองRed Hat OpenShift Operator Certification และขณะนี้มีให้บริการใน OpenShift Embedded OperatorHub |
| Table of Contents |
|---|
Tutorial Part 1: Install Joget DX Operator from the OperatorHub
| Thai |
|---|
บทช่วยสอนส่วนที่ 1: ติดตั้ง Joget DX Operator จาก OperatorHub |
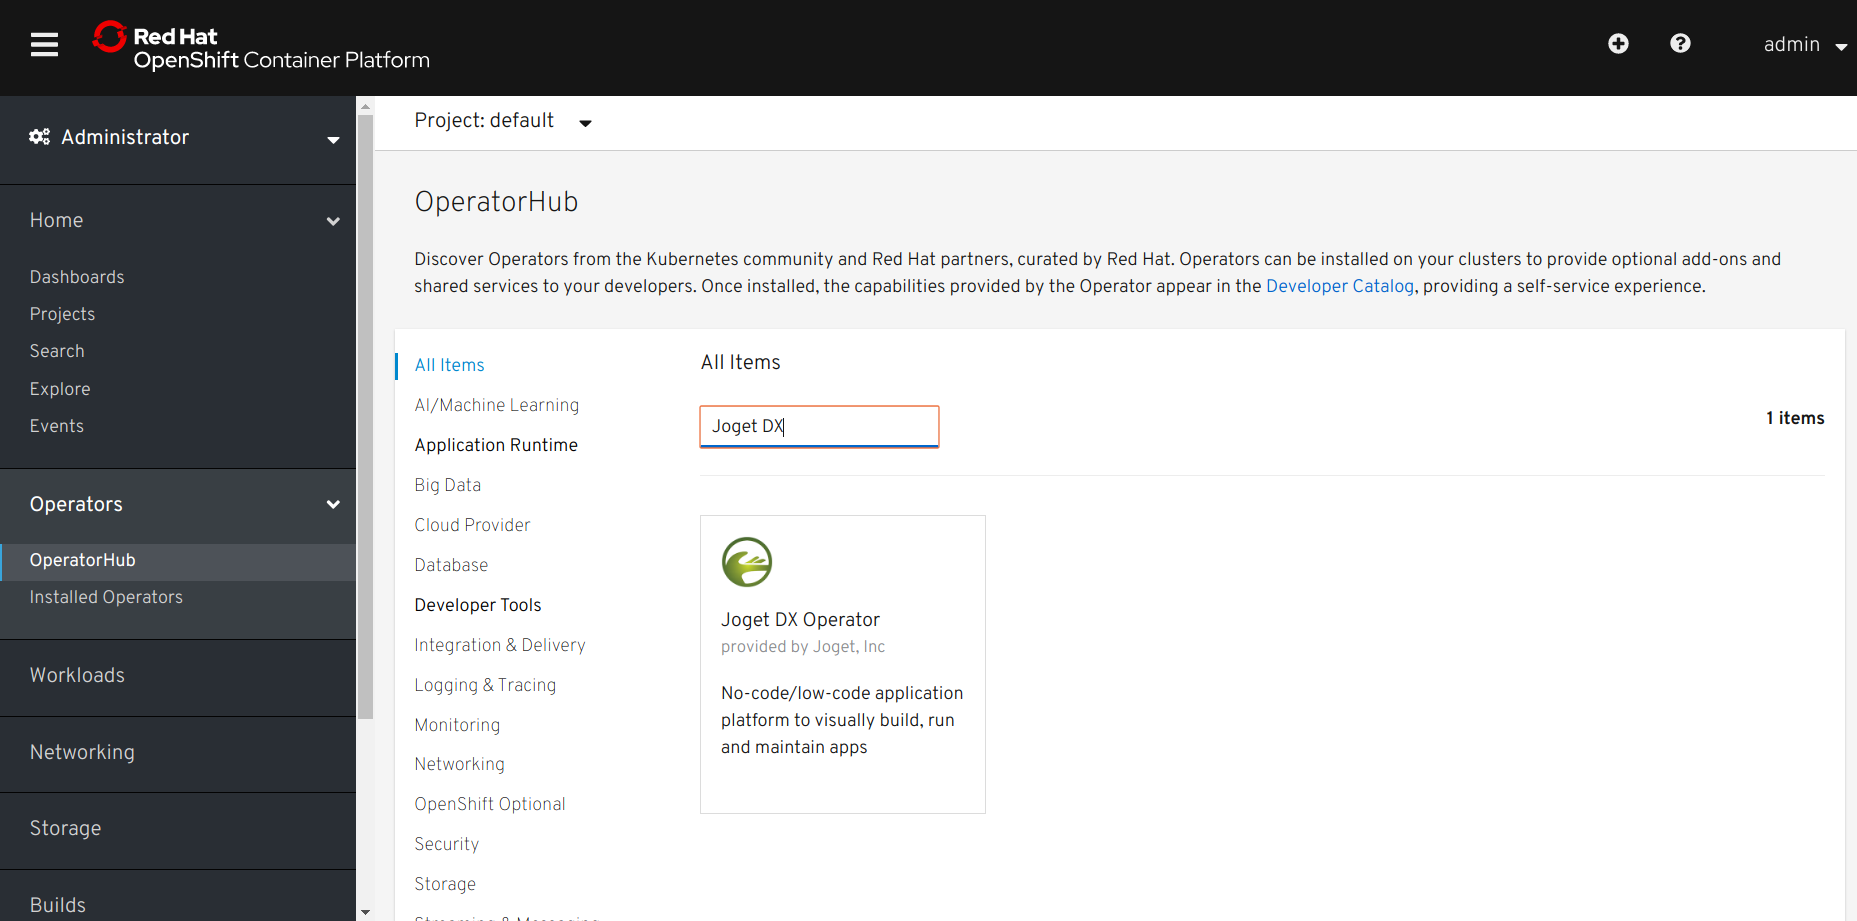
The Joget DX Operator enables customers to rapidly deploy, manage and scale a Joget DX cluster on Red Hat OpenShift. As a certified Operator, it is listed in the OpenShift Embedded OperatorHub catalog. Joget DX is a development platform as well as an application runtime, so the Joget DX Operator is listed under both the Application Runtime and Developer Tools categories.
These steps assume that you already have a running OpenShift 4 cluster. You can access https://try.openshift.com/ and select Openshift 4 playground to setup a new cluster.
| Thai |
|---|
Joget DX Operator ช่วยให้ลูกค้าสามารถปรับใช้จัดการและปรับขนาดคลัสเตอร์ Joget DX บน Red Hat OpenShift ได้อย่างรวดเร็ว ในฐานะที่เป็นผู้ประกอบการที่ผ่านการรับรองแล้วจะมีรายชื่ออยู่ในแคตตาล็อก OpenShift Embedded OperatorHub Joget DX เป็นแพลตฟอร์มการพัฒนาเช่นเดียวกับแอปพลิเคชันรันไทม์ดังนั้น Joget DX Operator จึงอยู่ภายใต้หมวดหมู่ Application Runtime และ Developer Tools ขั้นตอนเหล่านี้สมมติว่าคุณมีคลัสเตอร์ OpenShift 4 ที่รันอยู่แล้ว คุณสามารถเข้าถึง https://try.openshift.com/ และเลือก Openshift 4 playground เพื่อตั้งค่าคลัสเตอร์ใหม่ |
1.1 Install Joget DX Operator as Cluster Admin
| Thai |
|---|
ติดตั้ง Joget DX Operator เป็น Cluster Admin |
Login to the OpenShift console as the cluster admin
Thai ล็อกอินเข้าสู่คอนโซล OpenShift ในฐานะผู้ดูแลระบบคลัสเตอร์
Browse to Catalog > OperatorHub and search for Joget DX
Thai เรียกดูแคตตาล็อก> OperatorHub และค้นหา Joget DX
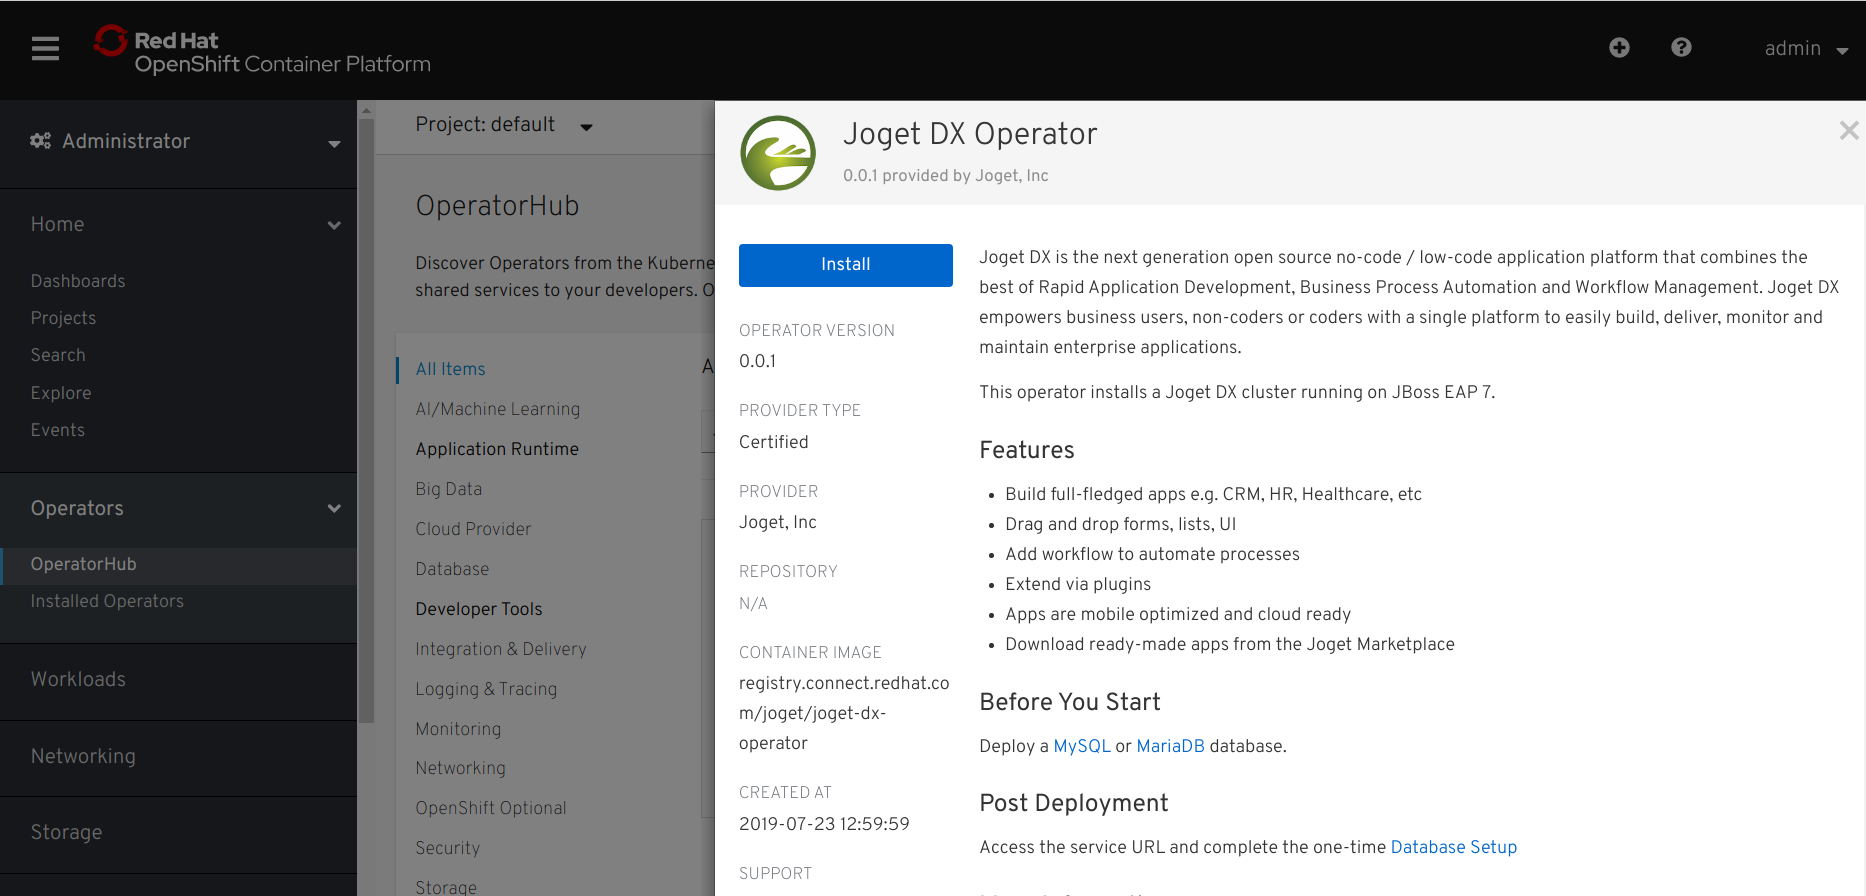
Select the Joget DX Operator, and click on the Install button
Thai เลือก Joget DX Operator และคลิกที่ปุ่มติดตั้ง
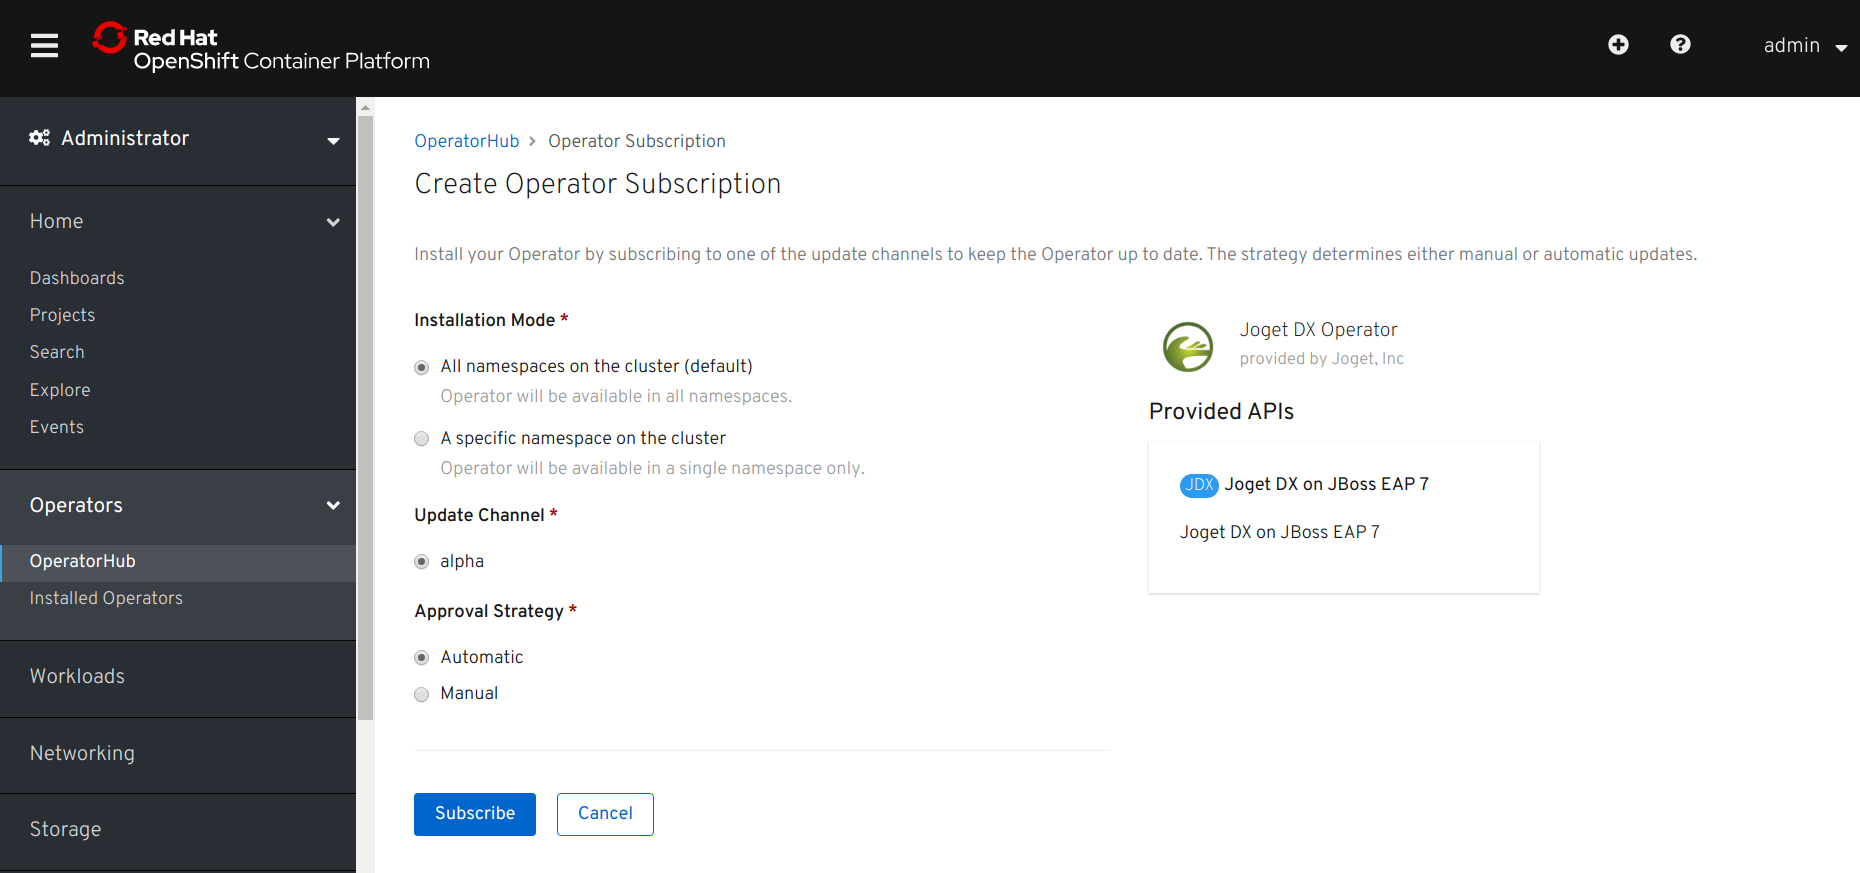
Click on the Subscribe button to install the Joget DX Operator.
Thai คลิกที่ปุ่มสมัครสมาชิกเพื่อติดตั้ง Joget DX Operator
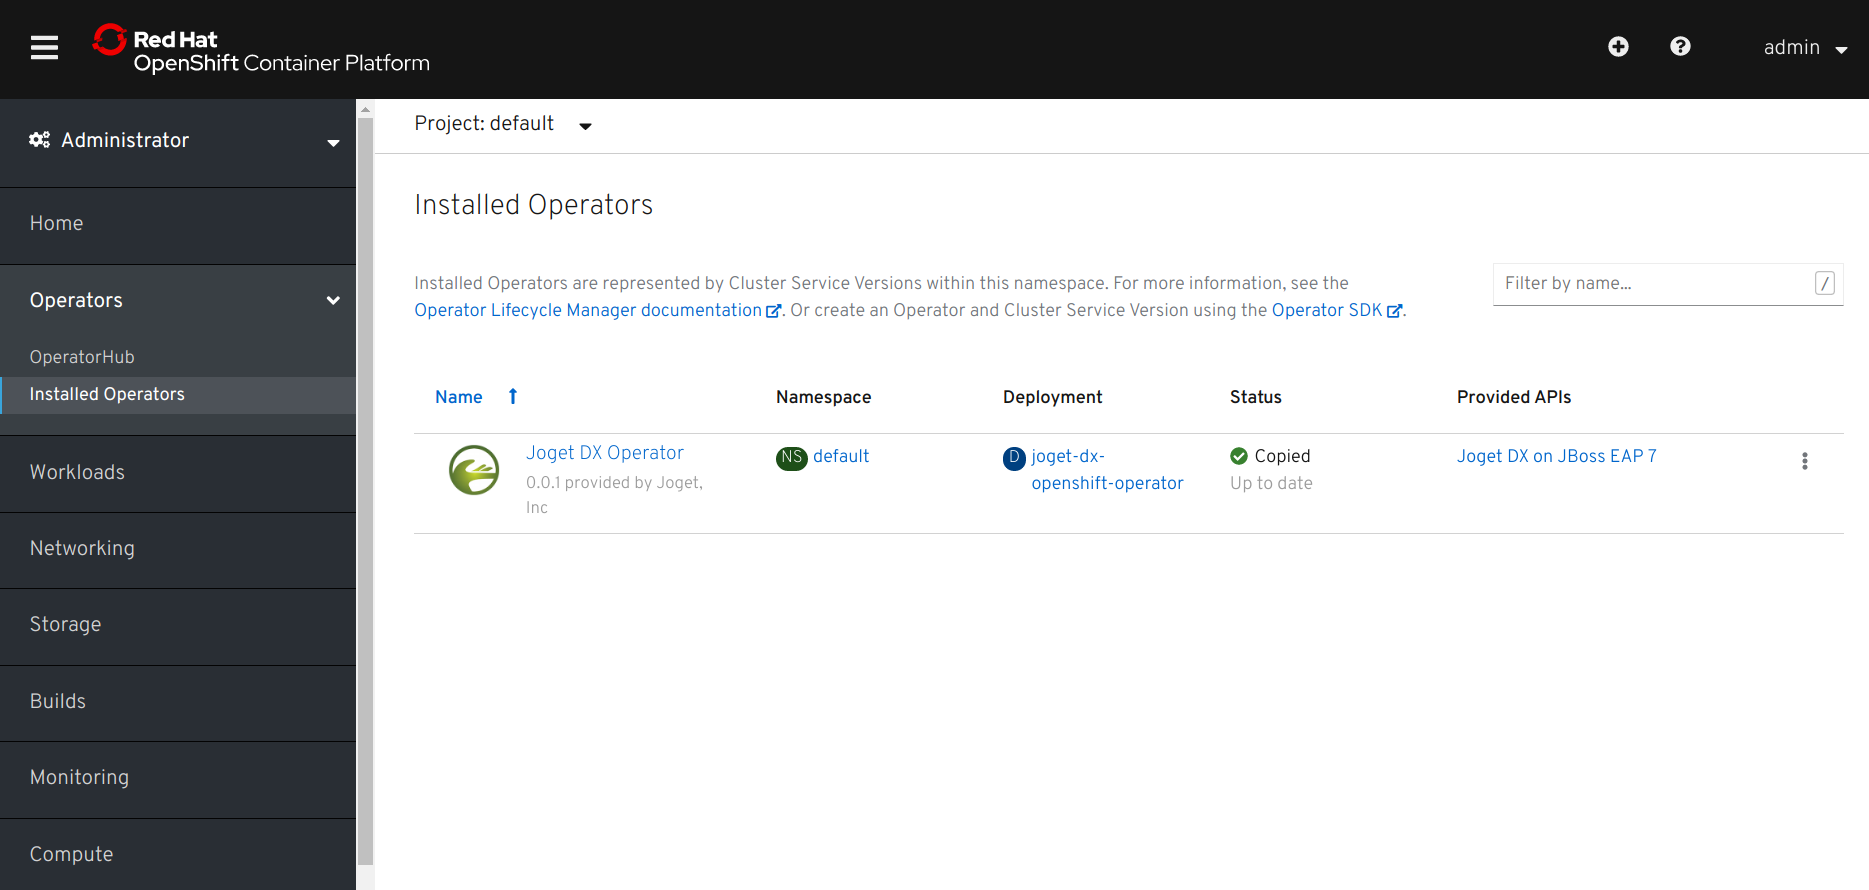
Browse to Catalog > Installed Operators and select Joget DX Operator to confirm that the operator has been installed successfully.
Thai เรียกดูแคตตาล็อก> ผู้ประกอบการที่ติดตั้งและเลือก Joget DX Operator เพื่อยืนยันว่าผู้ประกอบการได้รับการติดตั้งเรียบร้อยแล้ว
Tutorial Part 2: Create a Joget Cluster with the Joget DX Operator
| Thai |
|---|
บทช่วยสอนส่วนที่ 2: สร้าง Joget Cluster ด้วย Joget DX Operator |
2.1 Create New Project and Deploy Database
| Thai |
|---|
สร้างโครงการใหม่และปรับใช้ฐานข้อมูล |
Now that the Joget Operator has been installed, login to the OpenShift console as a normal user.
Thai เมื่อติดตั้ง Joget Operator แล้วให้เข้าสู่คอนโซล OpenShift ในฐานะผู้ใช้ปกติ
Browse to Projects and click on the Create Project button. Enter a name and click on Create.
Thai เรียกดูโครงการและคลิกที่ปุ่มสร้างโครงการ ใส่ชื่อและคลิกที่สร้าง
As a prerequisite, you will need to deploy either a MySQL or MariaDB database in the project.
Thai ตามข้อกำหนดเบื้องต้นคุณจะต้องปรับใช้ฐานข้อมูล MySQL หรือ MariaDB ในโครงการ
The fastest way to deploy MySQL would be to use the OpenShift CLI e.g.:
Thai วิธีที่เร็วที่สุดในการปรับใช้ MySQL คือใช้ OpenShift CLI เช่น:
Code Block # deploy persistent mysql export DB_APP_NAME=jogetdb export MYSQL_DATABASE=jwdb export MYSQL_USER=joget export MYSQL_PASSWORD=joget oc new-app openshift/mysql-persistent --name $DB_APP_NAME -p DATABASE_SERVICE_NAME=$DB_APP_NAME -p MYSQL_USER=$MYSQL_USER -p MYSQL_PASSWORD=$MYSQL_PASSWORD -p MYSQL_DATABASE=$MYSQL_DATABASE
Alternatively, you can deploy using the OpenShift Console.
Thai หรือคุณสามารถปรับใช้โดยใช้ OpenShift Console
Browse to the project, go to Workloads and click on add other content.
Thai เรียกดูโครงการไปที่เวิร์กโหลดและคลิกที่เพิ่มเนื้อหาอื่น ๆ
Select Database.
Thai เลือกฐานข้อมูล
Search for MySQL.
Thai ค้นหา MySQL
Select MySQL then click on Instantiate Template.
Thai เลือก MySQL จากนั้นคลิกที่แม่แบบอินสแตนซ์
Key in the following configuration and click on Create.
Thai ป้อนการกำหนดค่าต่อไปนี้และคลิกที่สร้าง
- Database Service Name: jogetdb
- MySQL Connection Username: joget
- MySQL Connection Password: joget
- MySQL Database Name: jwdb
Go to Workloads → Deployment Configs to verify that the MySQL database has been deployed successfully.
Thai ไปที่ Workloads → Deployment Configs เพื่อตรวจสอบว่าฐานข้อมูล MySQL ได้รับการติดตั้งเรียบร้อยแล้ว
2.2 Deploy Joget DX using the Joget DX Operator
| Thai |
|---|
ปรับใช้ Joget DX โดยใช้ Joget DX Operator |
Browse to Operators > Installed Operators.
Thai เรียกดูผู้ประกอบการ> ผู้ประกอบการที่ติดตั้ง
Select the Joget DX Operator, and click on Create Instance.
Thai เลือก Joget DX Operator และคลิกที่สร้างอินสแตนซ์
By default the configuration for “name” is “example-joget” and “size” is 1 (the number of required Joget instances). Modify the values as required, click Create.
Thai โดยค่าเริ่มต้นการกำหนดค่าสำหรับ "ชื่อ" คือ "example-joget" และ "ขนาด" คือ 1 (จำนวนอินสแตนซ์ของ Joget ที่ต้องการ) ปรับเปลี่ยนค่าตามต้องการคลิกสร้าง
The Joget DX Operator will automatically start to deploy the required number of Joget DX instances along with all the required resources, which should take a few minutes.
Thai Joget DX Operator จะเริ่มปรับใช้อินสแตนซ์ Joget DX ตามจำนวนที่ต้องการโดยอัตโนมัติพร้อมกับทรัพยากรที่จำเป็นทั้งหมดซึ่งควรใช้เวลาสองสามนาที
Select the created Joget name, and click on Resources to see the resources automatically created and managed by the Joget DX Operator.
Thai เลือกชื่อ Joget ที่สร้างขึ้นและคลิกที่ทรัพยากรเพื่อดูทรัพยากรที่สร้างและจัดการโดยอัตโนมัติโดย Joget DX Operator
Click on Events to see the events as they happen
Thai คลิกที่กิจกรรมเพื่อดูเหตุการณ์ที่เกิดขึ้น
2.3 Complete One-Time Joget Database Setup
| Thai |
|---|
ตั้งค่าฐานข้อมูล Joget แบบครั้งเดียวให้เสร็จสมบูรณ์ |
Browse to Home > Projects and select the Joget DX project. Click on Workloads tab and select Joget DX deployment. After a few minutes, you should see at least 1 available MATCHING PODS.
Thai เรียกดูหน้าหลัก> โครงการและเลือกโครงการ Joget DX คลิกที่แท็บ Workloads และเลือกการปรับใช้ Joget DX หลังจากนั้นไม่กี่นาทีคุณควรเห็นการจับคู่ฝักอย่างน้อย 1 ที่
Select Resources to see the created Services and Routes. Copy the Location in the created Route. That is the URL to access Joget DX from an external browser.
Thai เลือกทรัพยากรเพื่อดูบริการและเส้นทางที่สร้างขึ้น คัดลอกตำแหน่งในเส้นทางที่สร้าง นั่นคือ URL สำหรับเข้าถึง Joget DX จากเบราว์เซอร์ภายนอก
Access the Joget DX URL and in the Database Setup page, key in the database configuration of the database deployed earlier and click on the Save button.
Thai เข้าถึง Joget DX URL และในหน้าการตั้งค่าฐานข้อมูลให้ป้อนการกำหนดค่าฐานข้อมูลของฐานข้อมูลที่ปรับใช้ก่อนหน้านี้และคลิกที่ปุ่มบันทึก
- Database Type: MySQL
- Database Host: the service name of the database e.g. jogetdb
- Database Port: 3306
- Database Name: the configured database name e.g. jwdb
- Database User: the configured username e.g. joget
- Database Password: the configured password e.g. joget
Once the setup is completed, click on Done and you will be brought to the Joget DX App Center.
Thai เมื่อการตั้งค่าเสร็จสมบูรณ์ให้คลิกที่เสร็จสิ้นแล้วคุณจะถูกนำไปที่ Joget DX App Center


