...
| Thai |
|---|
เข้าถึง OpenShift Web Console และเข้าสู่ระบบ |
Create a project using the Create Project button from the Projects dropdown and key in the desired Name, Display Name and Description.
| Thai |
|---|
สร้างโครงการโดยใช้ปุ่มสร้างโครงการและคีย์ในชื่อที่ต้องการชื่อที่แสดงและคำอธิบาย |

Step 2: Deploy MySQL Database
...
| Thai |
|---|
ขั้นตอนที่ 2: ปรับใช้ฐานข้อมูล MySQL
|

Key in the appropriate settings and click on Create e.g.
...
Namespace | openshift |
Database Service Name | jogetdb |
MySQL Connection Username | joget |
MySQL Connection Password | joget |
MySQL Database Name | jwdb |

Step 3: Deploy Joget Certified Container Image
...
Secret Name | registry.connect.redhat.com |
Authentication Type | Image Registry Credentials |
Image Registry Server Address | registry.connect.redhat.com |
Username | Red Hat account username |
Password | Red Hat account password |
Red Hat account email |

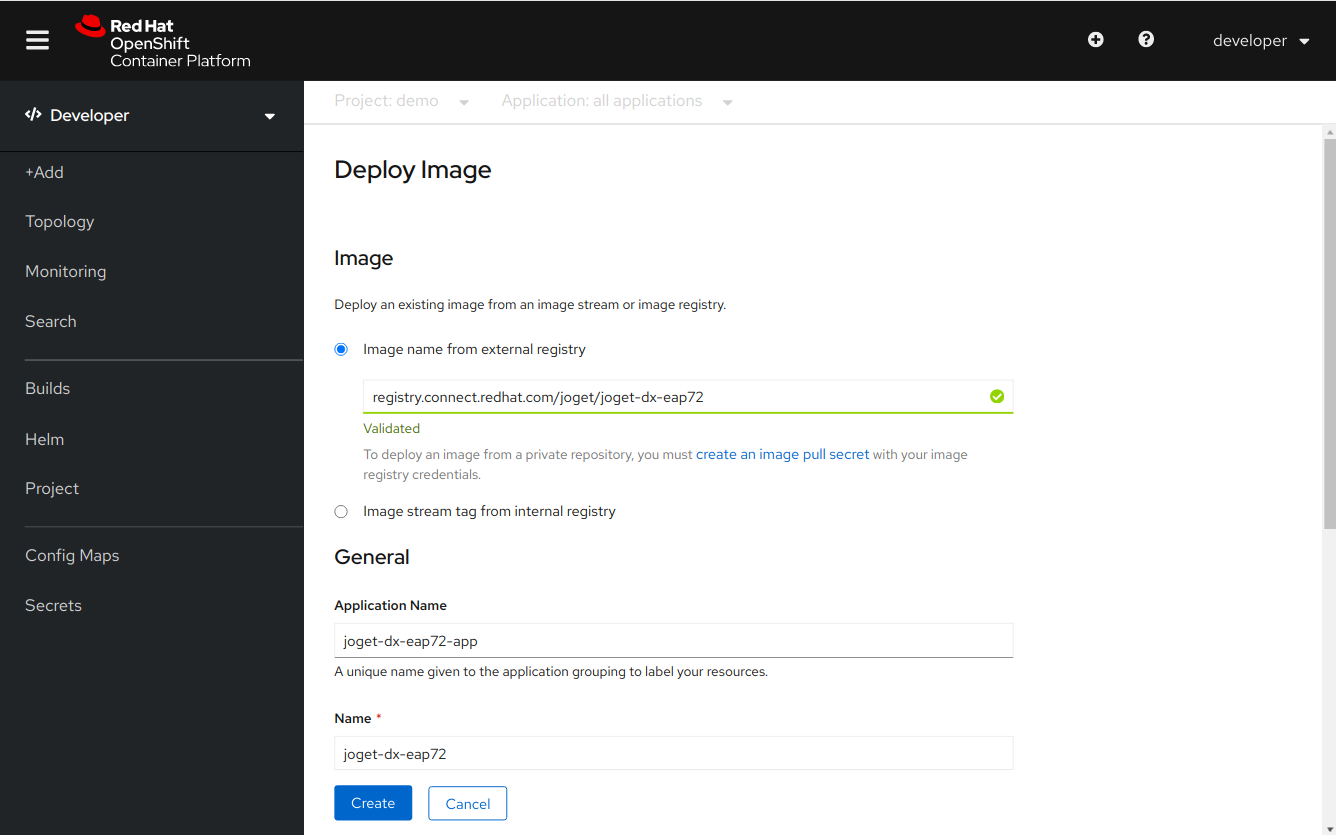
Once the secret has been created, select the Image Name option and key in registry.connect.redhat.com/joget/joget-dx7-eap7. Key in the desired Application Name and Name.
...
Image Name | registry.connect.redhat.com/joget/joget-dx7-eap7 |
Name | joget-dx7-eap7 |
| Note | ||
|---|---|---|
| ||
Do ensure that the exposed service route is configured to: Path → /jw Port → 8080 |
...
| Thai |
|---|
ขั้นตอนที่ 4: เพิ่มที่เก็บข้อมูลถาวร
|

In the Add Storage page under Persistent Volume Claim, select Create new claim and fill in desired values then Save.
...
Name | joget-dx7-eap7-claim |
Access Mode | Shared Access (RWX) |
Size | 10GB (or as required) |
| Mount Path | /home/jboss/wflow |

Step 5: Configure for Clustering and Licensing
...
Once the pods in the deployment have finished starting up, access the Deployment under Topology to see the running pods. You will also see a Route created for it, so click on the Location URL to access Joget.

Deploy Joget using the OpenShift CLI
...
Database Host | jogetdb |
Database Port | 3306 |
Database Name | jwdb |
Database User | joget |
Database Password | joget |

Upon successful configuration, the Joget App Center will be loaded.
| Thai |
|---|
เมื่อกำหนดค่าสำเร็จแล้ว Joget App Center จะถูกโหลด |

| Warning | ||
|---|---|---|
NOTE: If you encounter a 504 Gateway Timeout during the database setup, it is caused by the database initialization taking longer than the default OpenShift Route timeout. You can actually ignore the error and wait a couple of minutes before accessing the Application URL from the Overview page again. You can also increase the route timeout using the OpenShift CLI i.e. oc annotate route $APP_NAME --overwrite haproxy.router.openshift.io/timeout=60s
|
...