...
Create service account for the project
| Thai |
|---|
สร้างบัญชีบริการสำหรับโครงการ |
Go to https://console.developers.google.com/projectselector/permissions/serviceaccounts
Thai ไปที่ https://console.developers.google.com/projectselector/permissions/serviceaccounts
Select a project. You can create a new one too if you do not have one yet (e.g. jogetsample).
Thai เลือกโครงการ คุณสามารถสร้างใหม่ได้เช่นกันหากคุณยังไม่มี (เช่น jogetsample)

Click on Create Service Account.
Thai คลิกที่ Create Service Account

Name the service account (e.g. jogetsample).
Remember to check Furnish a new private key and also Enable Google Apps Domain-wide Delegation. Press Create.Thai ตั้งชื่อบัญชีบริการ (เช่น jogetsample)
อย่าลืมตรวจสอบการสร้างคีย์ส่วนตัวใหม่และเปิดใช้งานการมอบหมายทั่วโดเมนของ Google Apps กดสร้าง
A .json file will be downloaded. Open up the file in your favorite text editor.
Thai ไฟล์. json จะถูกดาวน์โหลด เปิดไฟล์ในโปรแกรมแก้ไขข้อความที่คุณชื่นชอบ
Enable Google Drive API for the project
| Thai |
|---|
เปิดใช้งาน Google Drive API สำหรับโครงการ |
Go to https://console.developers.google.com/apis/library
Thai Make sure that your current project is selected (e.g. jogetsample).
Thai ตรวจสอบให้แน่ใจว่าได้เลือกโครงการปัจจุบันของคุณ (เช่น jogetsample)
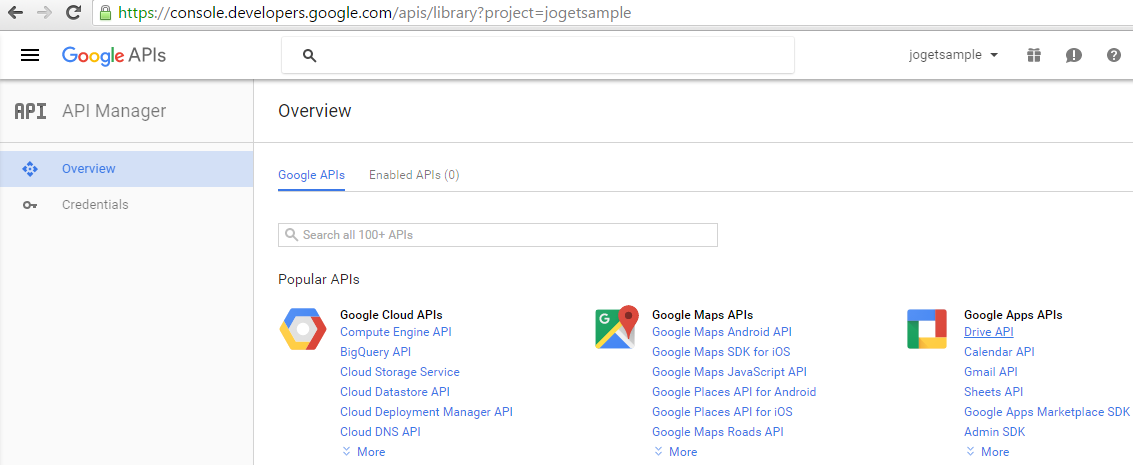
Click on Google Drive API.
Thai คลิกที่ Google Drive API

Enable it.
Thai เปิดใช้งาน
Delegate Google Drive access to the project service account
| Thai |
|---|
มอบสิทธิ์ให้ Google Drive เข้าถึงบัญชีบริการโครงการ |
Go to https://admin.google.com/AdminHome?chromeless=1#OGX:ManageOauthClients.
Thai ไปที่ https://admin.google.com/AdminHome?chromeless=1#OGX:ManageOauthClients.
From the downloaded JSON file earlier, copy the "client_id" and put into the Client Name field.
Thai จากไฟล์ JSON ที่ดาวน์โหลดมาก่อนหน้านี้ให้คัดลอก "client_id" และใส่ลงในฟิลด์ชื่อลูกค้า

In the field
Thai ในฟิลด์ อย่างน้อยหนึ่งขอบเขตให้ป้อนค่าต่อไปนี้
Code Block https://www.googleapis.com/auth/drive.file
Click Authorize.
Thai คลิกอนุญาต
Configure Joget Workflow App
| Thai |
|---|
กำหนดค่า Joget Workflow App |
From the downloaded JSON file earlier, copy the "client_email" and "private_key" values.
Thai จากไฟล์ JSON ที่ดาวน์โหลดมาก่อนหน้านี้ให้คัดลอกค่า "client_email" และ "private_key"
In your Joget app, select Google API Configuration in Properties & Export -> Set Default Plugin Properties
Thai ในแอป Joget ของคุณเลือกการกำหนดค่า Google API ใน Properties & Export -> Set Default Plugin Properties
Key in the value of "client_email" value into OAuth 2.0 Client ID, and value of "private_key" into OAuth 2.0 Client Secret, then Submit.
Thai ป้อนค่าของ "client_email" ค่าลงใน OAuth 2.0 รหัสลูกค้าและค่าของ "private_key" ลงใน OAuth 2.0 ไคลเอนต์ลับแล้วส่ง Submit

Google Drive Form Element
| Thai |
|---|
องค์ประกอบของฟอร์ม Google Drive |
With the steps above done, you are now ready to use the Google Drive File form element.
Thai เมื่อทำตามขั้นตอนข้างต้นเสร็จแล้วคุณก็พร้อมที่จะใช้องค์ประกอบของไฟล์ในรูปแบบ Google Drive File
Just configure on which user's Google Drive you want to store to and name the folder accordingly.
Thai เพียงกำหนดค่าไดรฟ์ Google ของผู้ใช้ที่คุณต้องการจัดเก็บและตั้งชื่อโฟลเดอร์ตามนั้น

Files uploaded will follow the same folder structure as the native File Upload element. Here's the sample screenshot in Google Drive.
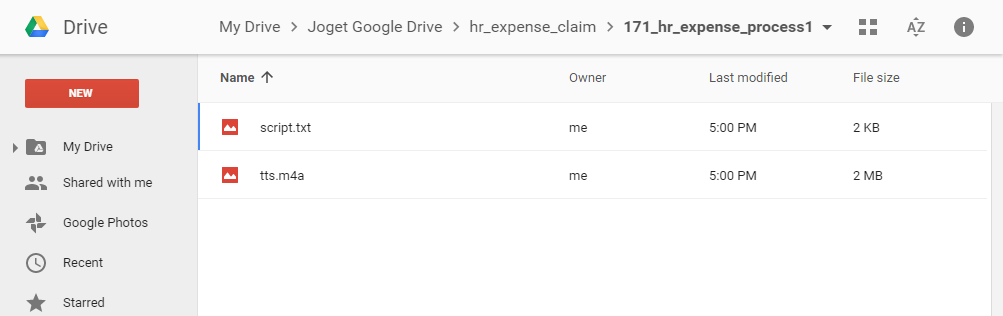
Thai ไฟล์ที่อัปโหลดจะเป็นไปตามโครงสร้างโฟลเดอร์เดียวกับองค์ประกอบก File Upload ดั้งเดิม นี่คือภาพตัวอย่างใน Google Drive