Table of Contents
| English |
|---|
| Red Hat OpenShift is a container application platform that brings Docker and Kubernetes to the enterprise. As a cloud native computing platform, OpenShift allows teams to automate the build, deployment, and management of applications. They can focus on developing apps without worrying about the underlying infrastructure, whether on physical/virtual servers, or on public/ private/hybrid cloud environments. |
| Thai |
|---|
Red Hat OpenShift เป็นแพลตฟอร์มแอปพลิเคชั่น container ที่นำ Docker และ Kubernetes มาสู่องค์กร ในฐานะที่เป็นแพลตฟอร์มcloud native computing OpenShift ช่วยให้ทีมสามารถสร้างการปรับใช้และการจัดการแอปพลิเคชันโดยอัตโนมัติ พวกเขาสามารถมุ่งเน้นไปที่การพัฒนาแอพโดยไม่ต้องกังวลกับโครงสร้างพื้นฐานที่สำคัญไม่ว่าจะเป็นบนเซิร์ฟเวอร์จริง / เสมือนหรือบนสภาพแวดล้อมคลาวด์สาธารณะ / ส่วนตัว / ไฮบริด |
...
| Thai |
|---|
ในฐานะที่เป็นแพลตฟอร์มโอเพนซอร์ซไม่มีรหัส / รหัสต่ำเพื่อสร้างแอปพลิเคชันเว็บสำหรับองค์กรสำหรับผู้เขียนโค้ดและผู้ไม่ใช้โค้ดให้เห็นได้ Joget จึงเป็นส่วนประกอบที่สมบูรณ์แบบสำหรับ OpenShift เพื่อเติมเต็มช่องว่าง ขณะนี้แพลตฟอร์ม Joget มีให้บริการในฐานะ Red Hat Certified Container ดังนั้นจึงเชื่อถือได้ปลอดภัยและได้รับการสนับสนุนทางการค้าใน OpenShift บทความนี้อธิบายขั้นตอนในการปรับใช้อิมเมจคอนเทนเนอร์ Joget ที่ได้รับการรับรองซึ่งทำงานกับฐานข้อมูล MySQL |


Deploy Joget using the OpenShift Web Console
...
| Thai |
|---|
เข้าถึง OpenShift Web Console และเข้าสู่ระบบ |
Create a project using the Create Project button from the Projects dropdown and key in the desired Name, Display Name and Description.
| Thai |
|---|
สร้างโครงการโดยใช้ปุ่มสร้างโครงการและคีย์ในชื่อที่ต้องการชื่อที่แสดงและคำอธิบาย |

Step 2: Deploy MySQL Database
...
| Thai |
|---|
ขั้นตอนที่ 2: ปรับใช้ฐานข้อมูล MySQL
|

Key in the appropriate settings and click on Create e.g.
...
Namespace | openshift |
Database Service Name | jogetdb |
MySQL Connection Username | joget |
MySQL Connection Password | joget |
MySQL Database Name | jwdb |

Step 3: Deploy Joget Certified Container Image
...
Secret Name | registry.connect.redhat.com |
Authentication Type | Image Registry Credentials |
Image Registry Server Address | registry.connect.redhat.com |
Username | Red Hat account username |
Password | Red Hat account password |
Red Hat account email |

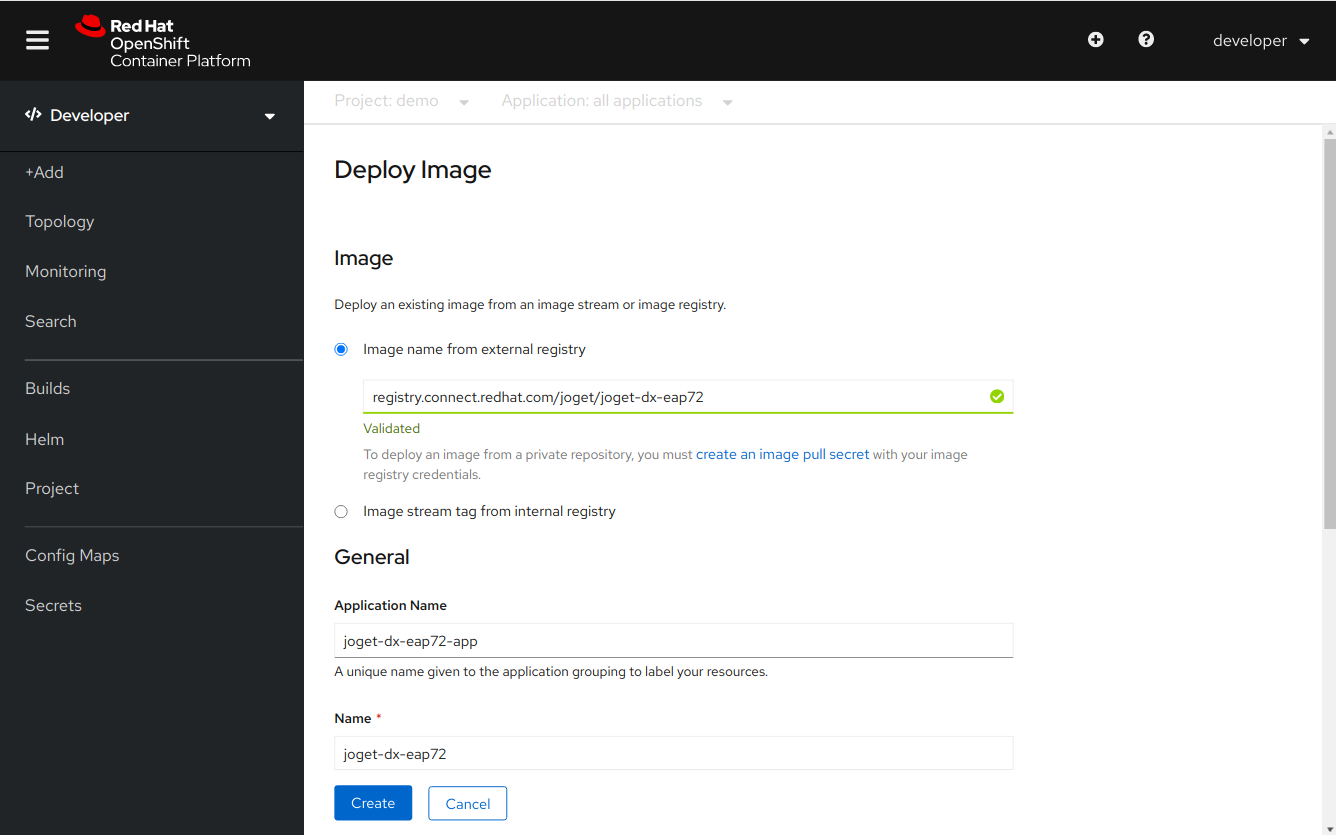
Once the secret has been created, select the Image Name option and key in registry.connect.redhat.com/joget/joget-dx7-eap7. Key in the desired Application Name and Name.
...
Image Name | registry.connect.redhat.com/joget/joget-dx7-eap7 |
Name | joget-dx7-eap7 |
| Note | ||
|---|---|---|
| ||
Do ensure that the exposed service route is configured to: Path → /jw Port → 8080 |
...
| Thai |
|---|
ขั้นตอนที่ 4: เพิ่มที่เก็บข้อมูลถาวร
|

In the Add Storage page under Persistent Volume Claim, select Create new claim and fill in desired values then Save.
...
Name | joget-dx7-eap7-claim |
Access Mode | Shared Access (RWX) |
Size | 10GB (or as required) |
| Mount Path | /home/jboss/wflow |

Step 5: Configure for Clustering and Licensing
...
Once the pods in the deployment have finished starting up, access the Deployment under Topology to see the running pods. You will also see a Route created for it, so click on the Location URL to access Joget.

Deploy Joget using the OpenShift CLI
...
Database Host | jogetdb |
Database Port | 3306 |
Database Name | jwdb |
Database User | joget |
Database Password | joget |

Upon successful configuration, the Joget App Center will be loaded.
| Thai |
|---|
เมื่อกำหนดค่าสำเร็จแล้ว Joget App Center จะถูกโหลด |

| Warning | ||
|---|---|---|
NOTE: If you encounter a 504 Gateway Timeout during the database setup, it is caused by the database initialization taking longer than the default OpenShift Route timeout. You can actually ignore the error and wait a couple of minutes before accessing the Application URL from the Overview page again. You can also increase the route timeout using the OpenShift CLI i.e. oc annotate route $APP_NAME --overwrite haproxy.router.openshift.io/timeout=60s
|