OpenShift Online (Widget Connector width 650 url https://
openshiftwww. youtube.com/watch?v=8xdNVKtflxE
Red Hat OpenShift is a container application platform that brings Docker and Kubernetes to the enterprise. As a cloud native computing platform, OpenShift allows teams to automate the build, deployment, and management of applications. They can focus on developing apps without worrying about the underlying infrastructure, whether on physical/virtual servers, or on public/ private/hybrid cloud environments.
) is an application hosting platform by Red Hat (www.redhat.com) that makes it easy to run container-based web applications in the cloud. As an open source no-code/low-code platform to easily visually build enterprise web apps for cloud coders and mobile, Joget Workflow (www.joget.org) is a good complement for OpenShift.
| Info |
|---|
OpenShift Online has a free monthly plan that allows you to host up to 3 web applications in the cloud for free. As such, you can run a basic Joget Workflow deployment without any cost! |
This article describes the steps required to deploy Joget Workflow on OpenShift Online using an Ubuntu Linux client. Just follow the steps below and you can get a running Joget Workflow installation very quickly. You can also manage OpenShift using other OS platforms (e.g. Windows, OSX, etc) by adapting the commands accordingly.
Step 1: Signup for OpenShift
Sign up for free at https://www.openshift.com/app/account/new and follow the instructions

Step 2: Install Prerequisites i.e. Git, Ruby and OpenShift Client Tools
Run the following commands in your Ubuntu client to install the prerequisite tools to manage OpenShift applications:
| Code Block | ||
|---|---|---|
| ||
# install git and ruby
echo === Install Git and Ruby ===
sudo apt-get install git ruby

# install openshift client tools
echo === Install OpenShift Client Tools ===
sudo gem install rhc

# run openshift setup
echo === Run OpenShift Setup ===
rhc setup |
Step 3: Create OpenShift App and Deploy Joget Workflow
Run the following script in your Ubuntu client to create an OpenShift application and install Joget Workflow v5 Enterprise Edition:
non-coders, Joget is an ideal complement to OpenShift to fill the gap. The Joget platform is now available as a Red Hat Certified Container, so it is trusted, secure and commercially supported on OpenShift. This article describes the steps in deploying the certified Joget container image running with the MySQL database.


Deploy Joget using the OpenShift Web Console
Step 1: Create OpenShift Project
Access the OpenShift Web Console and login

Create a project using the Create Project button and key in the desired Name, Display Name and Description.

Step 2: Deploy MySQL Database
Under the selected project, select Add to Project > Browse Catalog and select the MySQL image.
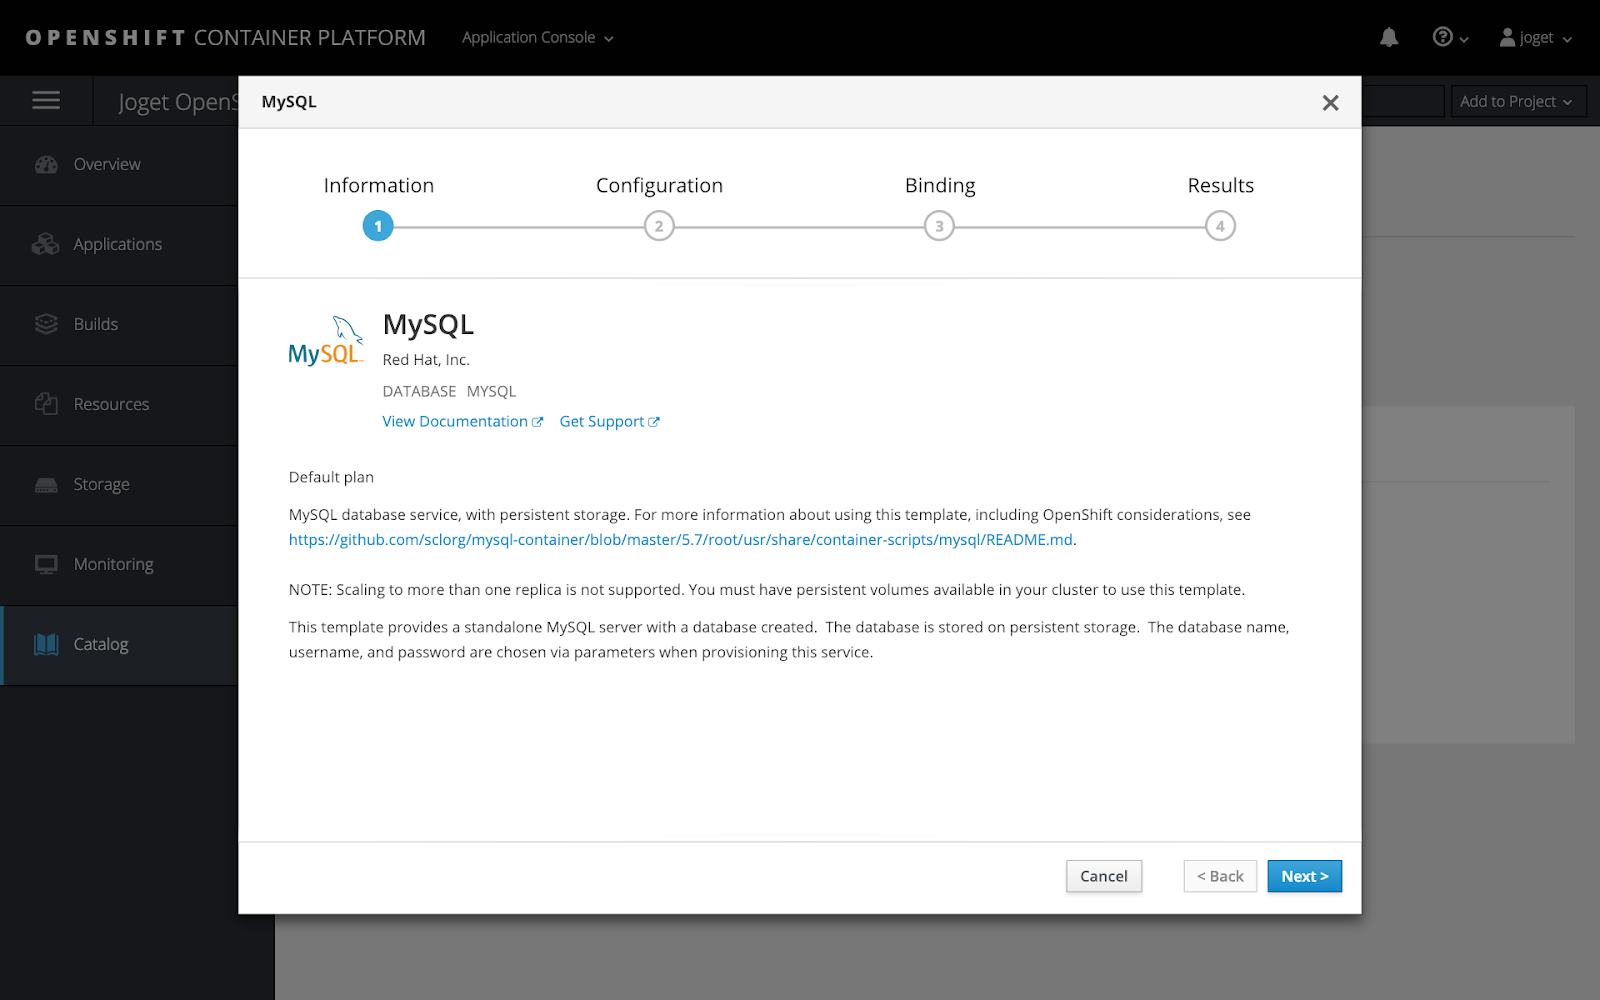
Key in the appropriate settings and click on Create e.g.
Namespace | openshift |
Database Service Name | jogetdb |
MySQL Connection Username | joget |
MySQL Connection Password | joget |
MySQL Database Name | jwdb |

Step 3: Deploy Joget Platform
To access the Red Hat Container Catalog, a valid username and password that is used to log in to the Red Hat Customer Portal is required.
| Info |
|---|
If you do not have an account, you can acquire one by registering for one of the following options:
|
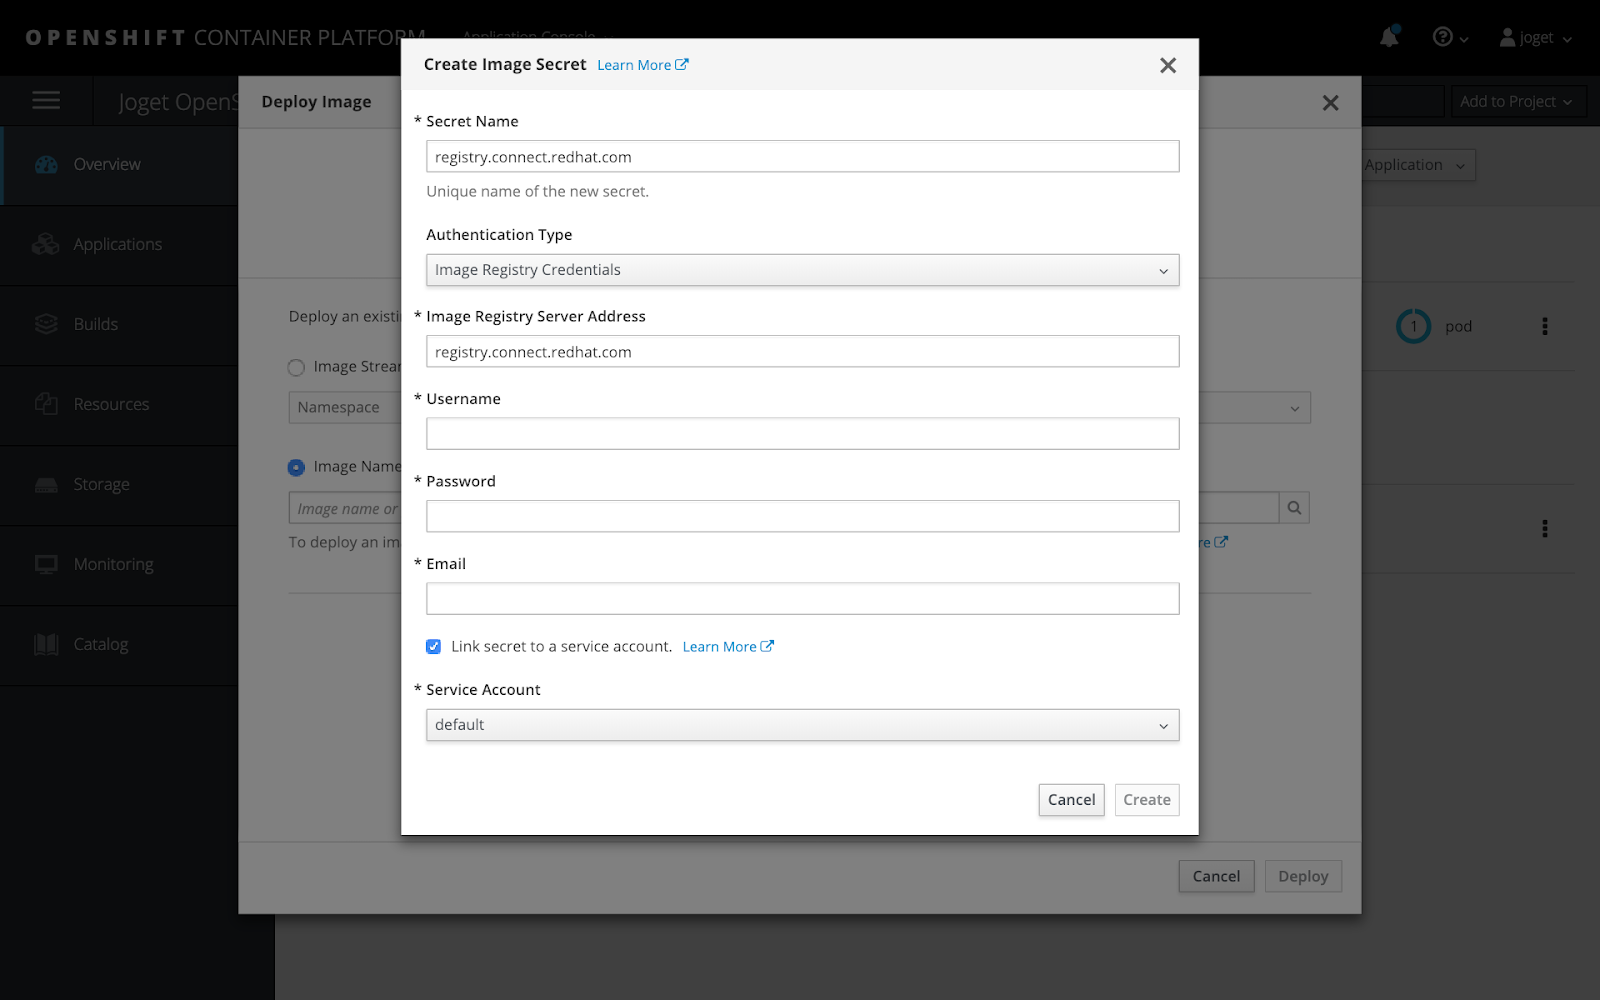
Under the selected project, select Add to Project > Deploy Image and click on the create an image pull secret link. In the ensuing popup, key in the Red Hat login details for the registry.
Secret Name | |
Authentication Type | Image Registry Credentials |
Image Registry Server Address | |
Username | Red Hat account username |
Password | Red Hat account password |
Red Hat account email | |
Link secret to a service account | Yes |
Service Account | default |
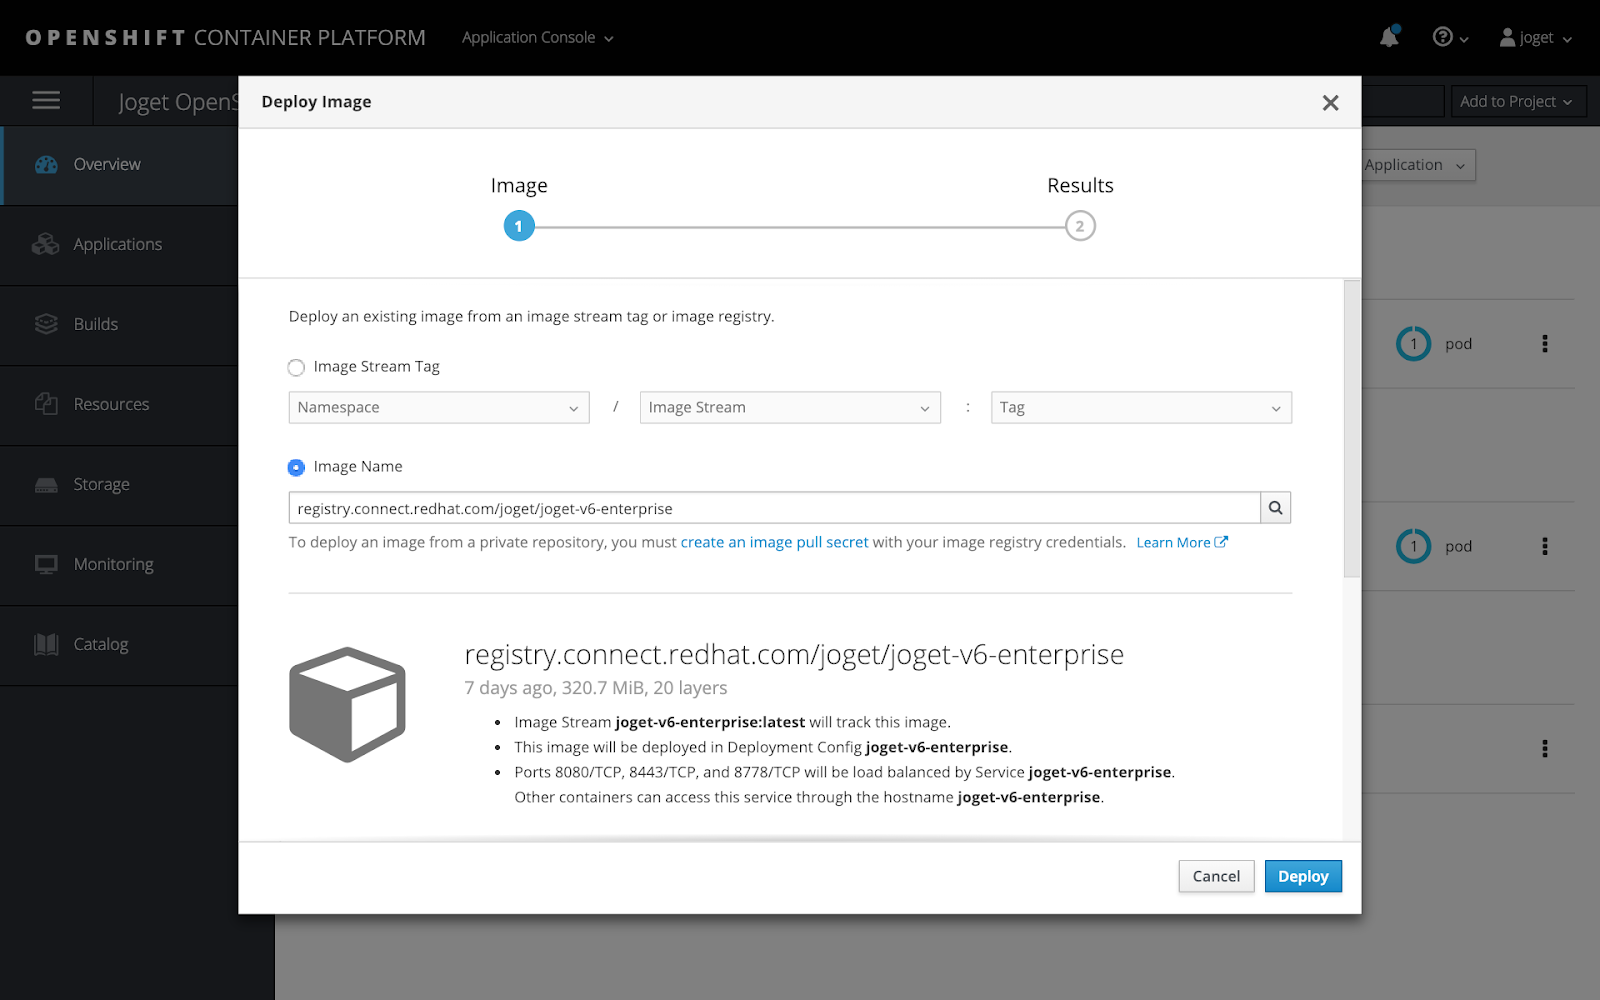
Once the secret has been created, select Add to Project > Deploy Image, select the Image Name option and key in registry.connect.redhat.com/joget/joget-v6-enterprise. Click on the small search icon to load the image details from the registry, key in the desired Name then click Deploy.
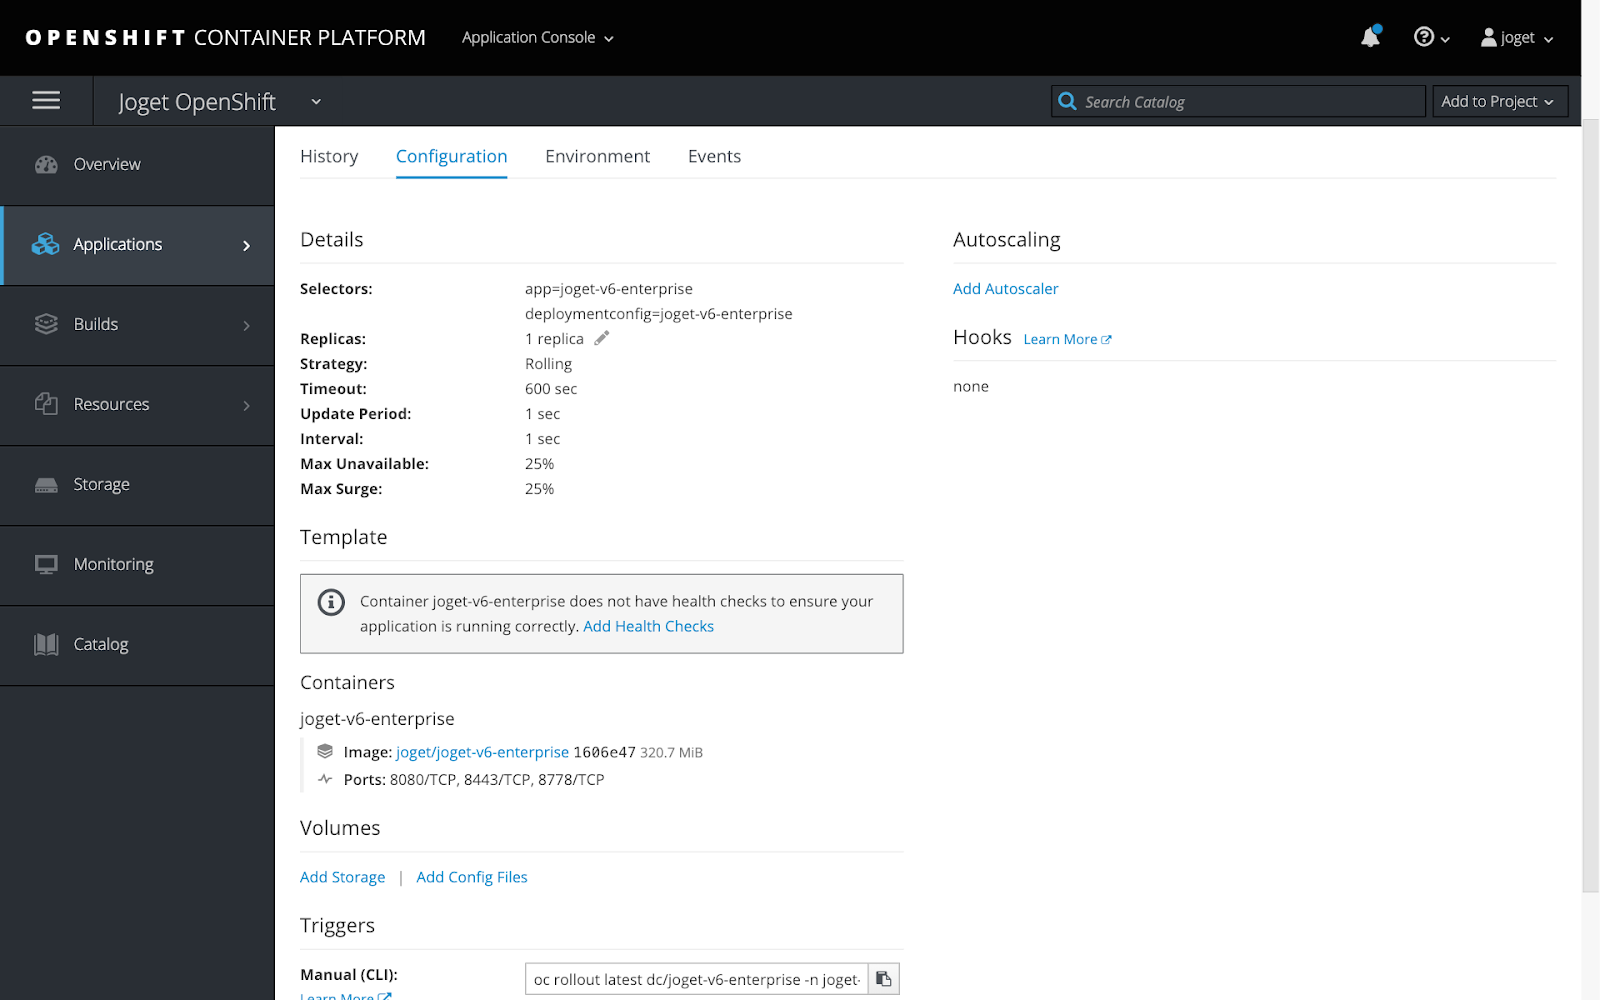
Step 4: Add Persistent Storage
The next step is to add persistent storage to the container for storing configuration files and persistent file uploads. Under Applications > Deployments, select the application, then the Configuration tab. Scroll down to the Volumes section and click on the Add Storage link.
In the Add storage page, click on the small create storage link. Create the new storage with the desired values e.g.
Name | joget-data |
Access Mode | Shared Access (RWX) |
Size | 1GB (or as required) |

Back in the Add Storage page, select the newly created storage, set the Mount Path to /opt/joget/wflow, then Add.
Mount Path | /opt/joget/wflow |

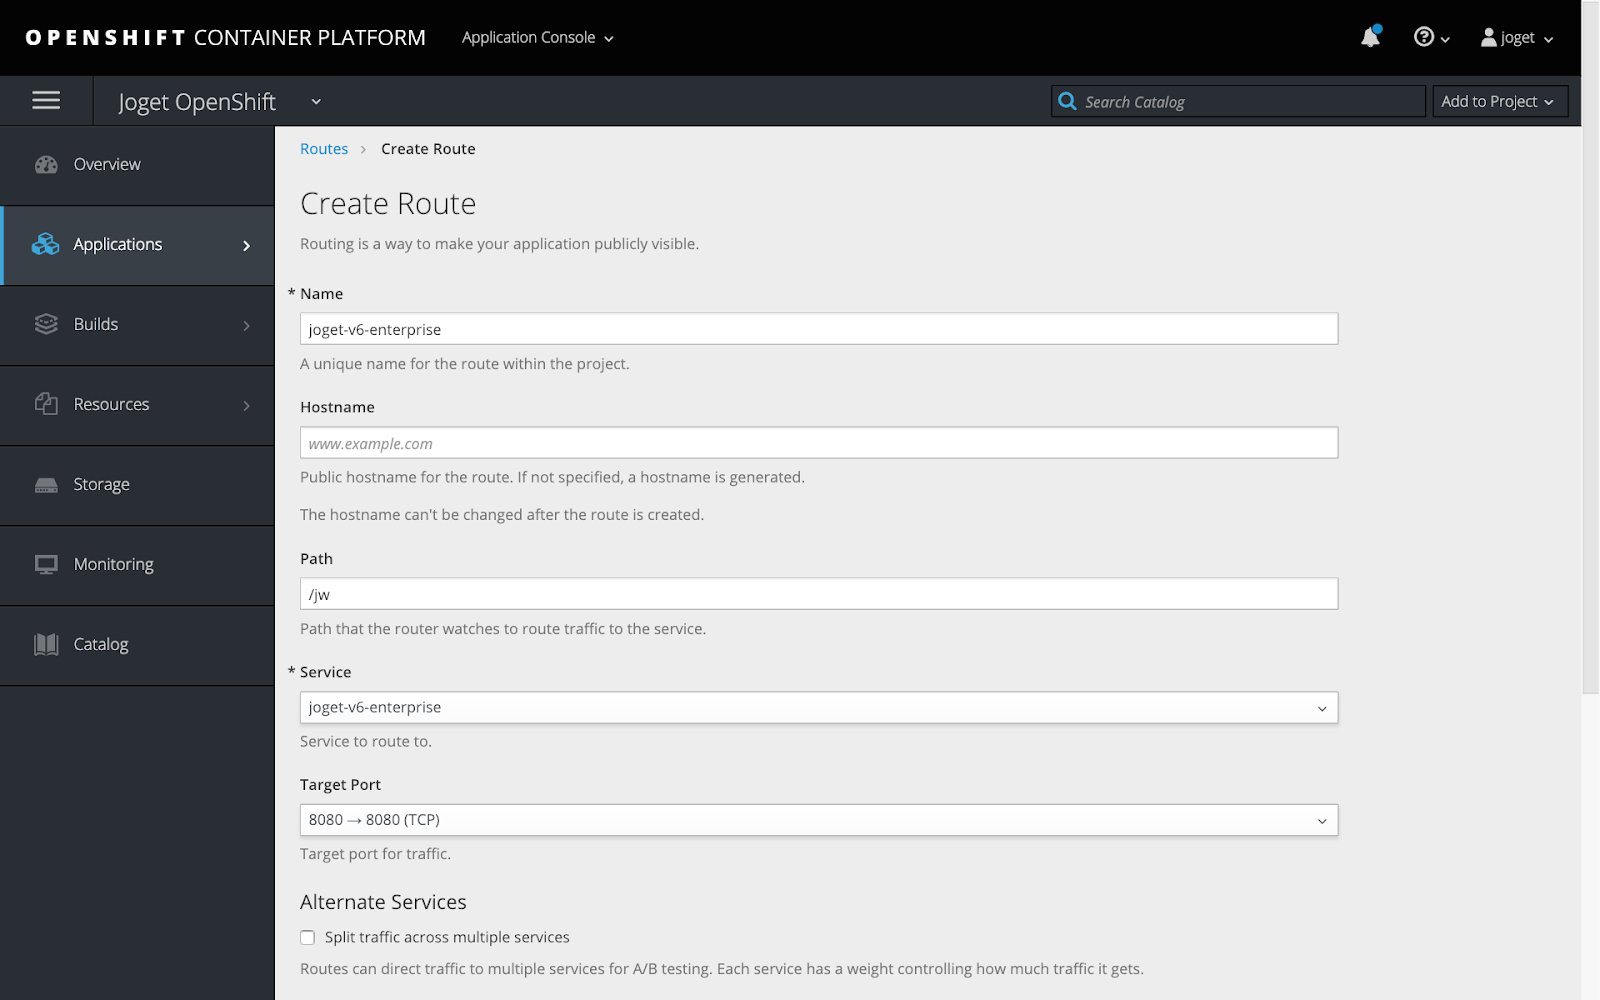
Step 5: Create Service Route for External Access
At this point, the service is not accessible from an external web browser so you will need to create a route, which exposes a service at a host name.
Click on Applications > Services and select joget-v6-enterprise.

Select Actions > Create Route, set the Path to /jw and click on Create.
Path | /jw |
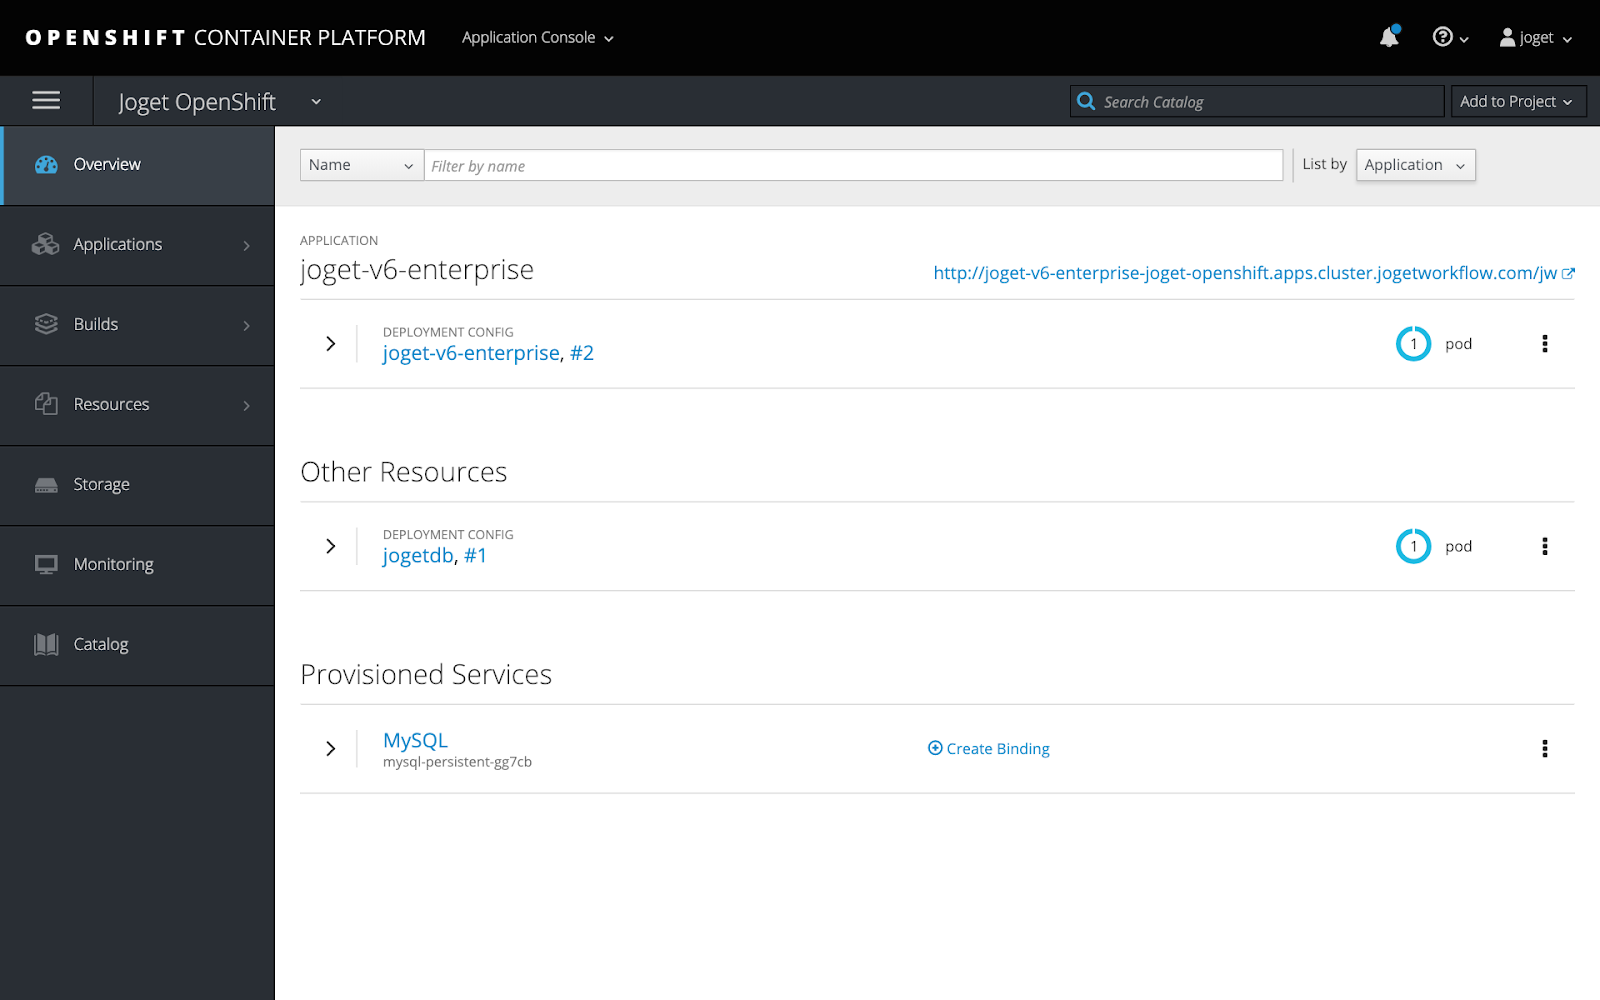
Return to the Overview and click on the URL next to the application name to launch the Joget platform.
Deploy Joget using the OpenShift CLI
For those more inclined to use a non-graphical command line interface, it is actually faster to use the OpenShift command line interface (CLI) to deploy the Joget platform.
The following is a Linux script to accomplish a similar Joget platform deployment. Before running this script, install the CLI and login. Change the environment variables in the script accordingly, at least the four values below:
PROJECT_NAME | The desired project name |
REGISTRY_USERNAME | Red Hat account username |
REGISTRY_PASSWORD | Red Hat account password |
REGISTRY_EMAIL | Red Hat account email |
| Code Block | ||
|---|---|---|
| ||
#!/bin/sh

export PROJECT_NAME=joget-openshift
export REGISTRY_USERNAME=email@domain
export REGISTRY_PASSWORD=password
export REGISTRY_EMAIL=email@domain
export REGISTRY_SERVER=registry.connect.redhat.com
export IMAGE_NAMESPACE=joget
export IMAGE_NAME=joget-v6-enterprise
export IMAGE_TAG=latest
export APP_NAME=joget-v6-enterprise
export DB_APP_NAME=joget-mysql
export STORAGE_NAME=joget-data
export MYSQL_DATABASE=jwdb
export MYSQL_USER=joget
export MYSQL_PASSWORD=joget

echo === deploy Joget on OpenShift ===
echo PROJECT_NAME: $PROJECT_NAME
echo REGISTRY_SERVER: $REGISTRY_SERVER
echo REGISTRY_USERNAME: $REGISTRY_USERNAME
echo REGISTRY_EMAIL: $REGISTRY_EMAIL
echo IMAGE_NAMESPACE: $IMAGE_NAMESPACE
echo IMAGE_NAME: $IMAGE_NAME
echo IMAGE_TAG $IMAGE_TAG
echo IMAGE_NAME: $IMAGE_NAME
echo APP_NAME: $APP_NAME
echo DB_APP_NAME: $DB_APP_NAME
echo STORAGE_NAME: $STORAGE_NAME
echo MYSQL_DATABASE: $MYSQL_DATABASE
echo MYSQL_USER: $MYSQL_USER
echo MYSQL_PASSWORD: $MYSQL_PASSWORD

echo === create project ===
oc new-project $PROJECT_NAME

echo === deploy MySQL ===
oc new-app openshift/mysql:5.7 --name $DB_APP_NAME -e MYSQL_USER=$MYSQL_USER -e MYSQL_PASSWORD=$MYSQL_PASSWORD -e MYSQL_DATABASE=$MYSQL_DATABASE

echo === create and bind secret to pull Joget image ===
oc create secret docker-registry $REGISTRY_SERVER --docker-server=$REGISTRY_SERVER --docker-username=$REGISTRY_USERNAME docker-password=$REGISTRY_PASSWORD --docker-email=$REGISTRY_EMAIL
oc secrets link default $REGISTRY_SERVER --for=pull

echo === import Joget image ===
oc import-image $PROJECT_NAME/$IMAGE_NAME --from=$REGISTRY_SERVER/$IMAGE_NAMESPACE/$IMAGE_NAME --confirm

#echo === grant pull permission if from different project ===
#oc policy add-role-to-user system:image-puller system:serviceaccount:$PROJECT_NAME:default -n $IMAGE_NAMESPACE

echo === deploy Joget ===
oc new-app $PROJECT_NAME/$IMAGE_NAME:$IMAGE_TAG -e GC_MAX_METASPACE_SIZE=300 --name | ||
| Code Block | ||
| ||
export JOGET_VERSION=5.0.1 export APP_NAME=joget5 echo === Create OpenShift Tomcat MySQL App === rhc app-create $APP_NAME tomcat7 mysql-5.5 phpmyadmin echo === Configure Java VM and Environment Variables === export OPENSHIFT_DATA_DIR=$(rhc ssh $APP_NAME 'echo $OPENSHIFT_DATA_DIR');\ rhc env-set JAVA_OPTS_EXT="-Djava.awt.headless=true -Dwflow.home=${OPENSHIFT_DATA_DIR}wflow/" --app $APP_NAME;\ export OPENSHIFT_MYSQL_DB_HOST=$(rhc ssh $APP_NAME 'echo $OPENSHIFT_MYSQL_DB_HOST');\ export OPENSHIFT_MYSQL_DB_USERNAME=$(rhc ssh $APP_NAME 'echo $OPENSHIFT_MYSQL_DB_USERNAME');\ export OPENSHIFT_MYSQL_DB_PASSWORD=$(rhc ssh $APP_NAME 'echo $OPENSHIFT_MYSQL_DB_PASSWORD');\ export OPENSHIFT_DATA_DIR=$(rhc ssh $APP_NAME 'echo $OPENSHIFT_DATA_DIR') echo === Restart OpenShift App === rhc app restart $APP_NAME echo === Deploycreate Jogetpersistent Workflowstorage $JOGET_VERSIONclaim === rhccat <<EOF ssh $APP_NAME "cd ~/app-root/data;\ echo '--- Download Bundle ---';\ wget http://dev.joget.org/downloads/enterprise/joget-enterprise-linux-$JOGET_VERSION.tar.gz;\ echo '--- Extract Bundle ---';\ tar xvfz joget-enterprise-linux-$JOGET_VERSION.tar.gz;\ cd joget-enterprise-linux-$JOGET_VERSION;\ echo '--- Setup Datasource ---';\ apache-ant-1.7.1/bin/ant setup -Dprofile.name=default -Ddb.name=jwdb -Ddb.host=$OPENSHIFT_MYSQL_DB_HOST -Ddb.port=3306 -Ddb.user=$OPENSHIFT_MYSQL_DB_USERNAME -Ddb.password=$OPENSHIFT_MYSQL_DB_PASSWORD;\ cp -rf wflow/ $OPENSHIFT_DATA_DIR/;\ echo '--- Setup WARs ---';\ mv apache-tomcat-8.0.20/webapps/jw* ~/jbossews/webapps/;\ echo '--- Clean Bundle ---';\ cd ..;\ rm -r joget-enterprise-linux-*" |
Step 4: Access Joget Workflow installation
Deployment may take some time so be patient, check the OpenShift app logs using:
| Code Block | ||
|---|---|---|
| ||
rhc tail -a $APP_NAME
|
> pvc.yaml
apiVersion: "v1"
kind: "PersistentVolumeClaim"
metadata:
name: "$STORAGE_NAME"
spec:
accessModes:
  - "ReadWriteMany"
resources:
  requests:
    storage: "1Gi"
EOF
oc create -f pvc.yaml
rm pvc.yaml

echo === mount storage ===
oc set volume dc/$APP_NAME --add --type=persistentVolumeClaim --claim-name=$STORAGE_NAME --mount-path=/opt/joget/wflow

echo === expose service route for external excess ===
oc expose svc $APP_NAME --path=/jw
oc annotate route $APP_NAME --overwrite haproxy.router.openshift.io/timeout=60s
oc get route
echo URL: http://$(oc get route $APP_NAME --template='{{ .spec.host }}')/jw |
Setup Database
The first time the Joget platform is accessed, the Database Setup page will be displayed. Configure the database settings using the values defined when deploying the MySQL database previously e.g.
Database Host | jogetdb |
Database Port | 3306 |
Database Name | jwdb |
Database User | joget |
Database Password | joget |
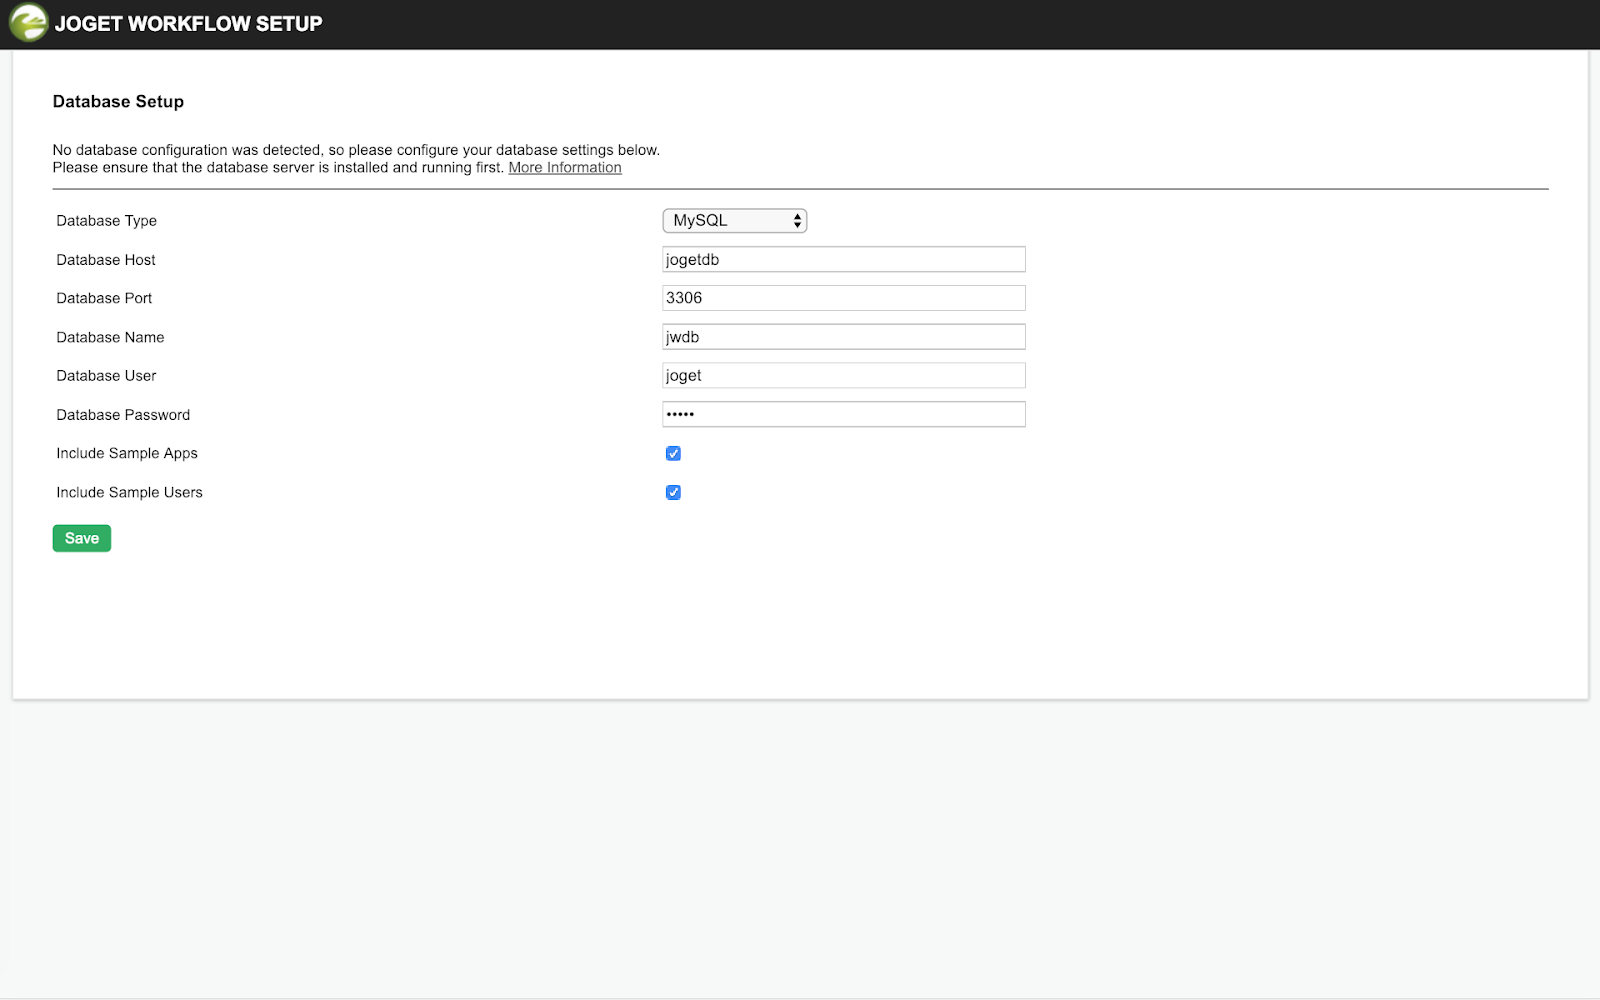
Upon successful configuration, the Joget App Center will be loaded.

| Warning |
|---|
NOTE: If you encounter a 504 Gateway Timeout during the database setup, it is caused by the database initialization taking longer than the default OpenShift Route timeout. You can actually ignore the error and wait a couple of minutes before accessing the Application URL from the Overview page again. You can also increase the route timeout using the OpenShift CLI i.e. oc annotate route $APP_NAME --overwrite haproxy.router.openshift.io/timeout=60s |
Once the deployment is complete, browse to your Joget Workflow installation at http://joget5-Your_OpenShift_Account.rhcloud.com/jw