| Info | ||
|---|---|---|
| ||
Make sure that you have first completed the previous tutorial - Designing a Userview请确保您已完成之前的课程 - 设计1个用户界面 |
| Table of Contents | ||
|---|---|---|
|
| Widget Connector | ||||
|---|---|---|---|---|
|
Introducing the new Process Builder
流程设计器介绍
- 在应用设计页面, 点击左侧 流程 菜单, 然后点击顶部 设计流程 按钮In the App design page, click on the Processes menu on the left, and then on the Design Processes button along the top.
- The Process Builder is one of the main highlights in Joget Workflow v5 replacing the older Workflow Designer流程设计器 是在v5中的一个重要变化,它替代了原来老的客户端 流程设计器.

- There are 3 main areas in the Process Builder. On the top (red), the Navigator panel contains a list of processes together with the action buttons on the right. On the left (blue), this is where the element palette is placed by default. One can move it around to suit one's style. The main panel in the middle is the Graph area (green) that contains the actual process diagram设计器有3个主要区域. 顶部区域(如图红色区域)为流程导航面板(显示所有流程名称). 左侧区域 (如图蓝色区域), 所有流程默认元素. 您可以拖拽它们到主区域(流程图区域). 中间 流程图 区域 (如图绿色区域) 用于设计实际的流程图.

- Click on the edit icon under the process name in the Navigator. This brings up the properties dialog where you can edit the process details点击流程名称的编辑图标. 它将提供流程属性配置对话框.
Add Participants into the - process by clicking on the green add button under current Participant. Participants represent users or roles that perform a certain task. Click on the edit button while hovering over the participant name to set its properties想添加 参与者 可以点击当前参与者下的绿色"+"按钮. 参与者代表执行一类任务的用户或角色. 鼠标悬浮点击编辑可以编辑它的属性.
- Add activities, tools and routes into the process diagram. Activities represent forms which require human interaction. Tools represent system or automated tasks, and routes are decision points. Use transitions to link them all together in a flow. You may either expand your design by connecting from existing nodes or by dragging the required nodes from the element palette into the process diagram添加 活动, 工具 和 路由活动 到流程图中. 活动代表需要人工参与的任务节点. 工具代表系统自动执行的任务节点, 路由活动则为决策分支节点. 使用连线可以将他们连接为一个工作流. 您既可以从现有节点扩展元素或通过拖拽左侧元素到流程图中进行流程设计.


- To handle routing (for example approval conditions), use Routes in combination with workflow variables. To create a workflow variable, double click on the process name in the Navigator to bring up the process dialog. Click on the first small icon under the Workflow variable heading, and key in the ID of the variable 定义路由分支 (例如审批结果), 使用 路由活动(Routes) 结合 工作流变量(workflow variables). 要创建工作流变量, 点击流程名称的属性编辑对话框. 点击在工作流变量的“+”号图标可以添加工作流变量名 e.g. status.
- Once a workflow variable has been defined, hover over on a transition and click on the edit icon to open the transition dialog一旦工作流变量被定义, 鼠标悬浮在连线上点击编辑按钮.

- In the transition dialog, select type Condition, select the variable status in Variable and key in Approved into the Value field*.* This means that this transition will occur if the value of status is "Approved"在弹出的对话框中选择类型 条件, 在变量列选择工作流变量 status 输入 Approved 在 值 列. 这代表如果工作流变量status为 "Approved" 时,流程走该分支.

- Set the transition type to Otherwise to indicate that it is the default path to take when other conditions are not met. The Otherwise transition is shown in orange. An example of a simple routing process is as shown below设置连线类型 其它 代表如果不满足(其它分支)条件,流程默认走该分支. 其它分支显示为桔色. 以下为一个简单的样例:

- Ensure that the process has a proper Start and End. Click on Deploy to deploy the process to the server.
Mapping Participants to Users
- Once a process has been successfully deployed, return to the previous tab/window. The new process diagram will be generated after you click on OK. Joget Workflow will interpret the process diagram and load the process details.

- Participants defined in the process are listed in the Map Participants to Users tab, and you can map each participant to specific people. Click on Add/Edit Mapping to map to specific groups, users, organization chart, etc. If no mapping is done for a participant, any tasks are automatically defaulted to the current user instead.
Mapping Activities to Forms
- 请确保流程有 开始 和 结束. 点击 部署 将流程部署到服务器.
匹配参与者与用户
- 当流程成功部署后, 返回之前打开流程设计器的页面, 点击 “确定” 后, 新的流程图会自动生成.
- 在流程图中定义的 参与者 将被列在 匹配参与者与用户 标签页, 您可以定义每个参与者到指定的人. 点击 增加/编辑映射 指定给用户组, 用户, 组织等. 如果未配置映射, 所有任务将自动指派给当前用户自己.
匹配活动到表单
- 在 匹配活动到表单 标签页, 列出了所有流程中的活动.
- 在每个活动, 点击 增加/编辑表单 从弹出的本应用所有表单列表中选择1个表单In the Map Activities to Forms tab, all process activities are listed.
For each activity, click on Add/Edit Form to select from a list of current forms in the app.
- As an example to handle an approval process, click on Create New Form to create a new 或则, 点击 创建新表单 创建 Travel Approval Form. In this new form, add a Subform that displays the original submitted form, and radio buttons to capture the approval status在此表单中, 添加一个 子表单 元素, 用于显示之前提交的表单, 添加一个 单选项 元素获取审批结果.

- Configure this Subform to select the original request form配置子表单, 选择已创建的表单.
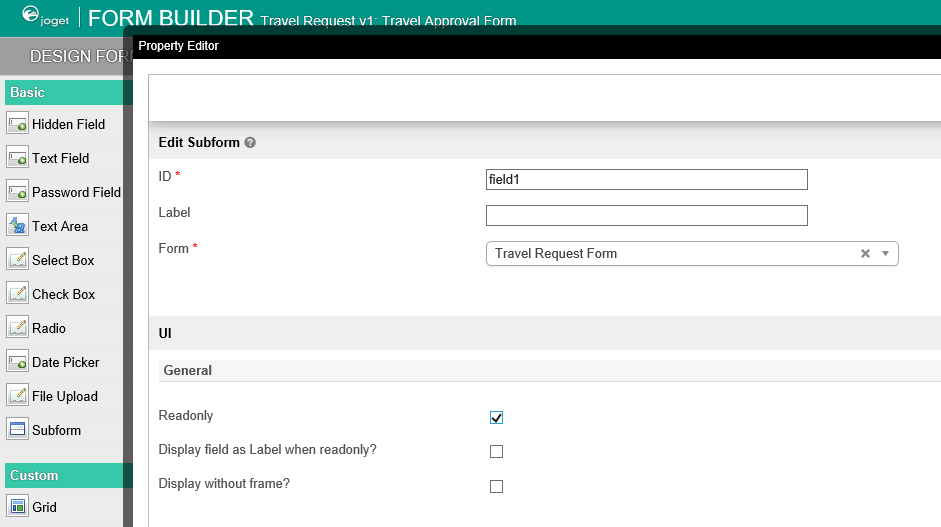
- Configure the status radio button to have Approved and Rejected options配置 status 单选项, 提供 Approved 和 Rejected 选项.
- For routing purposes, an important setting in the radio button is the mapping to a workflow variable under Advanced Options. In this case, setting the mapping to status means that the value will be stored in the status workflow variable为了决定流程分支走向, 不要忘记一个重要的设置, 即在 高级选项 中将 工作流变量名 写入. 这样, 表单中用户填入的值将会传递给工作流变量 status , 从而决定流程分支的走向.
- After all the configuration, the new approval form should look similar to the following screenshot当审批表单所有配置完成, 后可以得到如下页面:

Mapping Tools to Plugins
匹配工具到插件
- 在 匹配工具到插件 标签页, 您可以将插件配置到流程的工具节点(例如配置1个邮件发送工具)In the Map Tools to Plugins tab, you can map tools defined in the process to plugins.

- For each tool, click on Add/Edit Plugin to select and configure a plugin在每个工具节点, 点击 增加/编辑插件 选择1个插件并配置.
Test Driving the Process
测试流程
- 您可以点击顶部的 运行流程 按钮测试流程To perform a test run on a process, click on the Run Process button along the top of the App design process page.
Incorporating the Process into the Userview
将流程放入用户界面
- 在应用设计页面, 点击已有的用户界面, 启动用户界面设计器In the App design page, click on the name of an existing userview to launch the Userview Builder.
- Drag a Run Process element into a menu category. This menu element allows the user to start a process from the userview拖拽 启动流程 元素到菜单类中. 此菜单用于最终用户从用户界面启动流程.
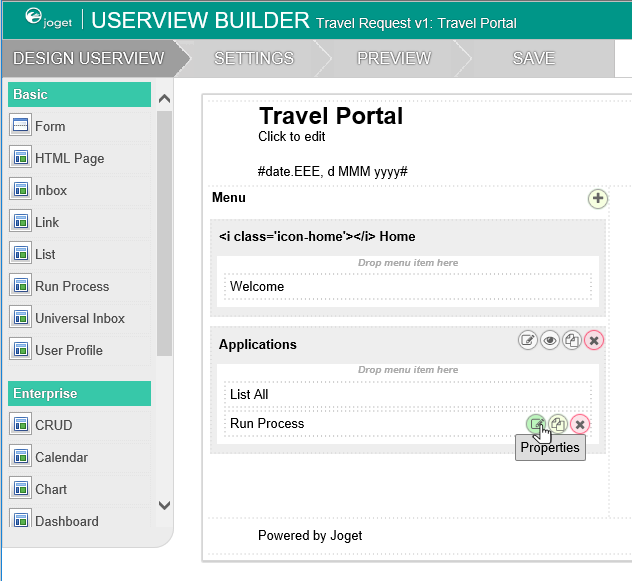
- Click on Properties of the Run Process element and select the process to run点击启动流程菜单的 属性 选择流程名称.

- Drag an Inbox element into a menu category. This menu element provides the user with an inbox to manage their assigned workflow tasks拖拽1个 任务箱 元素到菜单类中. 此菜单用于最终用户打开流程中指定给自己的任务.
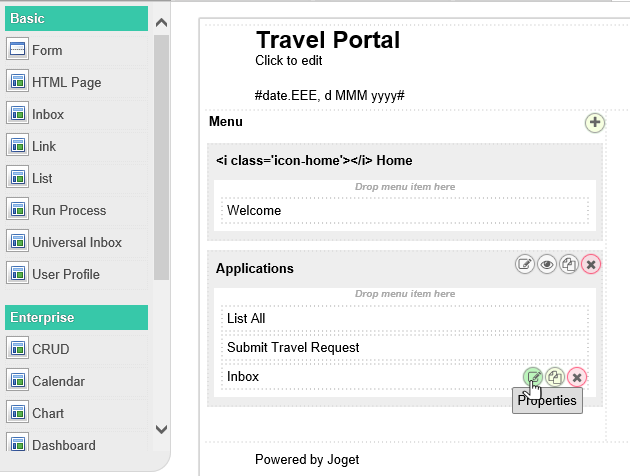
- Save the userview, and you will be able to run and perform assigned tasks in the published userview保存用户界面, 您可以从已发布应用的用户界面中查看效果.
