| Table of Contents |
|---|
| Warning |
|---|
Disclaimer: Please refrain from using this plugin, as it may pose security risks. |
Introduction
The Lazy Approval Tool Plugin is designed for effortless assignment approval using a URL. In this article, we will examine a sample application that sends a URL via email. The recipient of the email can then approve or reject the assignment by clicking on the URL provided in the email. This plugin source code is available in JogetOSS repository at https://github.com/jogetoss/lazy-approval-tool.
Plugin Information
Plugins Available in the Bundle:
Lazy Approval Tool
This plugin bundle is compatible with Joget DX 8.
...
Inside The App
In this section, we will examine what the app does and how it does it.
Form
Expected Outcome
The user is able to approve or reject the assignment outside of Joget App. By utilising the email tool to send email with the URL, the user is able to click on the URL to perform assignment approval or rejection.

Get Started
Prerequisites
1. Setup SMTP values in Joget App for the email tool to be working properly.

Figure 1: SMTP Settings
Refer to Sign in with app passwords to generate the password for SMTP Gmail.
For more details, please refer to General Settings > SMTP Settings.
2. API Domain/IP Whitelist
To ensure the successful operation of this plugin, it is essential to whitelist the domains or IP addresses of the host. Typically, this involves adding the IP address or domain name of your Joget application server to the whitelist. To access this section of Joget, go to Settings → General Settings and scroll down till you see API Domain/IP Whitelist section.
(IMPORTANT NOTE: If this is not set, you will get a 400 Forbidden error when clicking on approve/reject)

Figure 2: API Domain/IP Whitelist
Name | Description |
|---|---|
| API Domain Whitelist (Separated by ';') | Domain whitelist to allow API calls to Joget Workflow. Separated by semicolon. Example "localhost;www.joget.org;dev.joget.org”, or "*" to allow from everywhere. In a production environment, do not use "*". Doing so will allow anyone to call all JSON APIs from the Joget server. |
| API IP Whitelist (Separated by ';') | IP address whitelist to allow API calls to Joget. Separated by semicolon. Example "localhost; 192.168.101.10; www.joget.org;dev.joget.org ”, or "*" to allow from everywhere. In a production environment, do not use "*". Doing so will allow anyone to call all JSON APIs from the Joget server. |
Steps
1. You can obtain the jar file by the latest release at https://github.com/jogetoss/lazy-approval-tool/releases.
2. Upload the plugin jar file in Joget by going to Settings → Manage Plugins.
3. You can choose to import the demo app or create the app from scratch.
Steps for importing demo app
1. Download the demo app from Download Demo App.
2. Go to Joget Home or All Apps and click on Import App to import the downloaded demo app.
Steps for creating app from scratch
1. The first part of the app is the form. This form gathers the user's name and email address (this can be any fields as they are not important for the plugin flow).
The Select Approver select box will be the value for Workflow Variable assignee which we will use in the workflow process later.
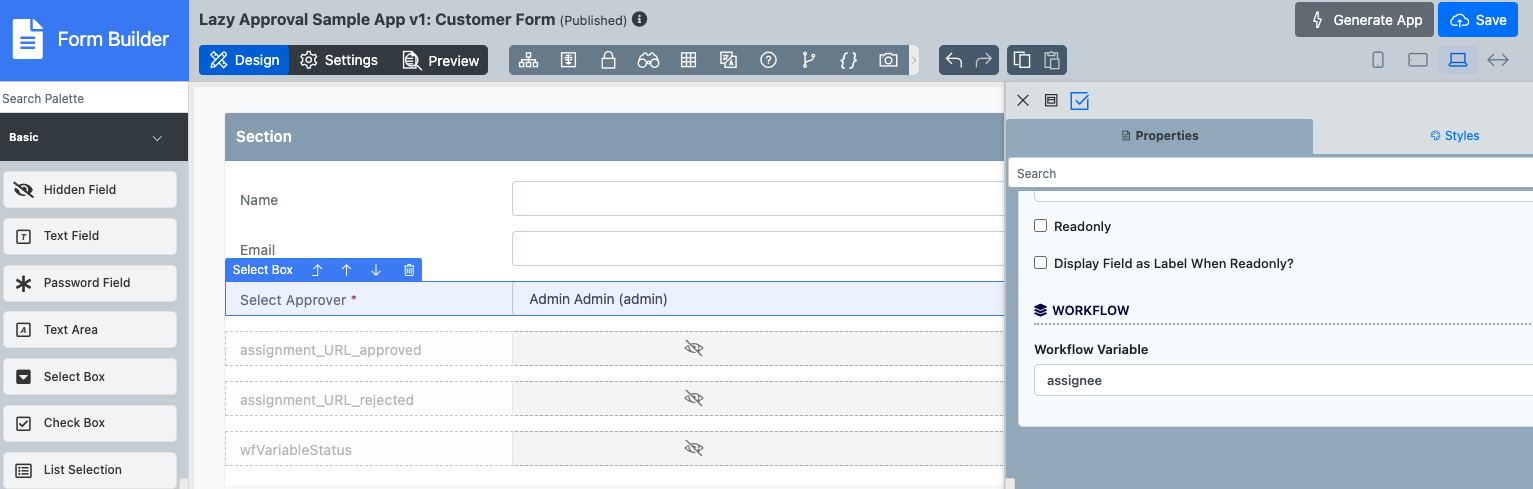
Figure 3: Select Approver Select Box
Inside the form, we also have hidden fields that keep track of the approval status.
...
These hidden fields must be exactly same as it is case sensitive to be picked up in our plugin code.

Figure 4: Hidden Fields in the Form
2.

Figure 1: Sample App Form
Process
The second part of the sample app is the process.
...
Below shows the process of the single activity.

Figure 5: Process of Sample App (Single Activity)
For multiple activity, we will need to duplicate the route twice, as we will need to call the lazy approval tool again to run the second activity.

Figure 6: Process of Sample App (Multiple Activity)
By breaking out the process step by step, the first process starts off by prompting the user to submit the form
...
.
Once the form has been submitted, the Lazy Approval Tool will be triggered. To see how to configure the tool, check out Lazy Approval Tool Properties.
Form: The form field will be the existing form we created in step 1
Process: The process will be the process that needs lazy approval (in this demo we use the current process)
Activity: the activity will be the activity that needs the lazy approval inside the configured process
...
Assignee (Participant ID): this will be the approver (participant ID) in the process whereby we configured the assignee (created in form in step 1) to the Approver, refer to Figure 8
Workflow Variable (Status): this will be the workflow variable to configure the status of approved / rejected

Figure 7: Lazy Approval Tool configuration

Figure 8: Approver config
After the lazy approval tool is triggered, the Email Tool will be triggered. The Lazy Approval Tool will generate a URL based on the configurations, then we can pass the URL to the Email Tool using Hash Variable. You can refer to Figure 9 for the Email Tool Configurations.

Figure 9: Email Tool Configurations
| HTML for Email Tool |
|---|
Please approve or reject the assignment: <a href="#form.lasa_cust.assignment_URL_approved#">Approve</a> <a href="#form.lasa_cust.assignment_URL_rejected#">Reject</a> |
Table 1: HTML for email tool
After the Email Tool, we will add an activity 1 that the lazy approval link will be approving.

Figure 10: Activity 1 in process
Then, a decision route will be deciding the route based on the status chosen from the Email. If approved, it will send an approved email, if rejected, it will also send a rejected email.

Figure 11: Email tool after status decision route
3. Now you can create a UI to show the processes and an Inbox list to show the process list.
Drag the "Run Process" and attach the single activity, rename it to "Run Process Approval (Single Activity)".
Do the same for the multiple activity, rename it to "Run Process Approval (Multiple Activity)".
.Drag the inbox list and rename it to "Process List"

Figure 12: UI Builder
Steps to run the plugin
1. To test on single activity, go to "Run Process Approval (Single Activity)" form and fill it. Make sure the approver has configured an email address in the "Users" section.

Figure 13: Process for Single Activity
2. In "Process List", you will see that a process is running.
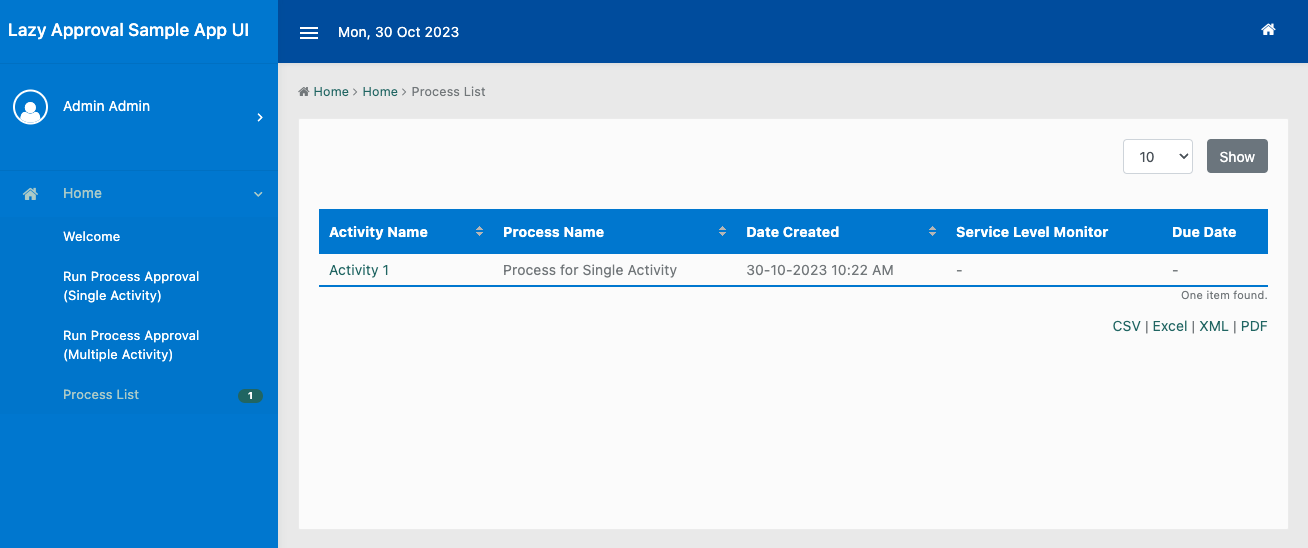
Figure 14: Process List with a running process
3. Check your email, you will receive an email for the selected approver's email.

Figure 15: Email received
4. Click on the email and click on "Approve" or "Reject".
Figure 16: Email to Approve or Reject Assignment
5. If "Show Redirect Popup Page After Action" is checked in Lazy Approval Tool configuration, you will be directed to a page saying assignment completed with all the details. After that, you can close the window. You can see the similar details in Monitor > Running Processes as shown in Figure 14.

Figure 17: Redirected to message page
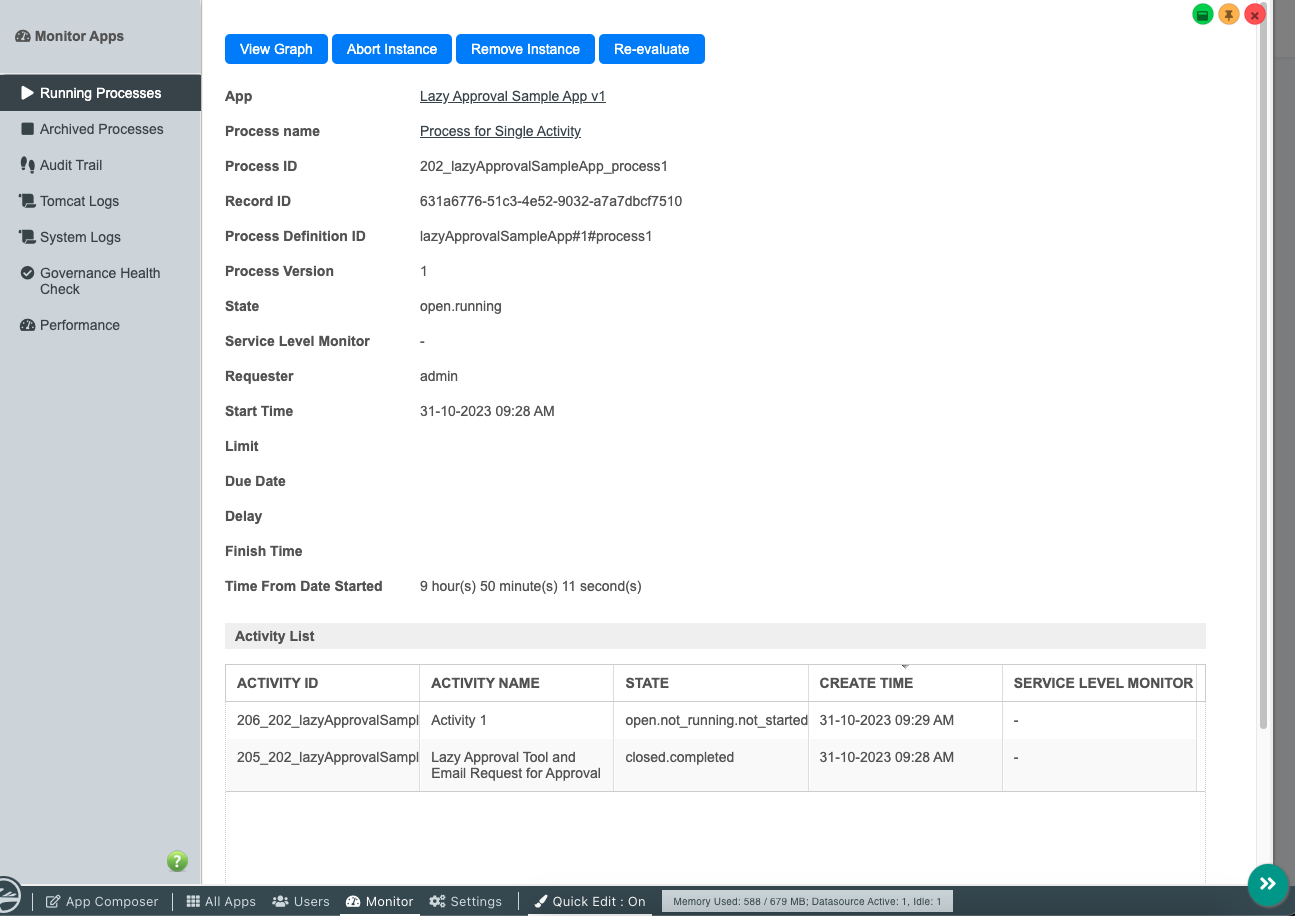
Figure 18: Monitor > Running Processes
6. After that, go back to the app and see the "Process List". The assignment just now has been completed.

Figure 19: Process List with no process
7. There will be an email saying assignment approved.

Figure 20: Email with Assignment Approved
Notes
1. You can also click on the approval link and perform assignment in Incognito Mode, meaning that your Joget App does not have to be signed in to perform the task. Therefore, the assignee that the URL is sent to is important not to be shared out to unauthorised users.
Lazy Approval Tool Properties
Configure Lazy Approval Tool

Figure 21: Lazy Approval Tool Configuration
Name | Description |
|---|---|
Form * | The form of the process. |
Process * | The process value to generate the lazy approval link. |
Activity * | The activity value to generate the lazy approval link. |
Assignee (Participant ID) * | The assignee who will be assigned to perform the assignment. |
Workflow Variable (Status) * | The workflow variable that defines the approve or reject status. |
Show Redirect Popup Page After Action | If checked, a redirect popup page will be shown after user performs action by clicking on the lazy approval link. |
Download Demo App
...

Figure 2: Email Sent
After accepting or rejecting the assignment, there will be another email sent to the user notifying them of their decision.

Figure 3: Email of the Notification
This is how the overall process looks like and how it works.

Figure 4: Process of Sample App
This is what the configuration of the Lazy Approval Tool looks like in the process.

Figure 5: Lazy Approval Tool Configuration
If you would like to download the sample app and try out the tool for yourself, please note that you have to:
- Configure the SMTP settings in the process in order to receive the emails.
- In the Joget System Settings > General Settings, set API Domain Whitelist to * (IMPORTANT NOTE: If this is not set, you will get a 400 Forbidden error when clicking on approve/reject).
Download the Sample App
...