| Table of Contents | ||||
|---|---|---|---|---|
|
Introduction
Overview
This document is intended to describe the steps required to deploy Joget Workflow Large Enterprise Edition (LEE) in a clustered environment for scalability and redundancy.
Requirements
In order for clustering to work, the Large Enterprise Edition is required. The standard Enterprise Edition will not work due to licensing restrictions. Clustering requires several layers to be prepared and configured:
- Load Balancers
- Application Servers
- Shared File Directory
- Shared Database
Architecture
There are many ways to design the clustering architecture, but the core concepts will be similar. In this document, the architecture used is as follows: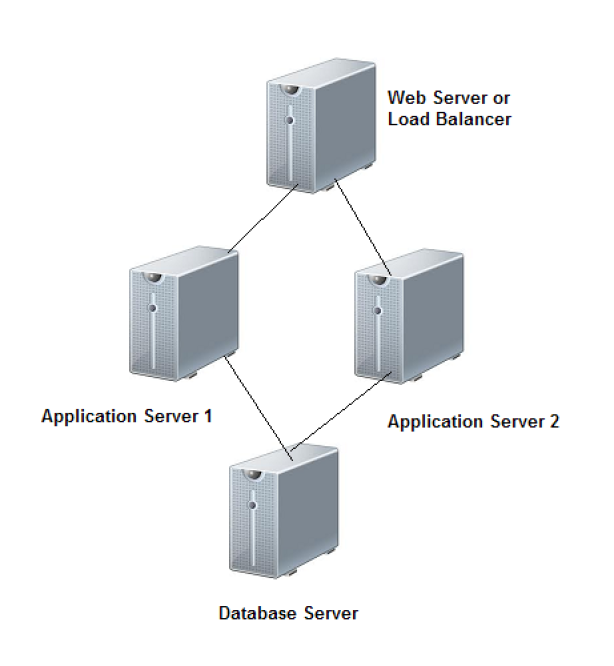
Deployment and Configuration Guide
This guide describes the steps required to setup Joget Workflow LEE clustering. The exact steps will depend on the actual products used in each layer.
| Warning |
|---|
| IMPORTANT: Please note that there is minimal configuration required in Joget Workflow LEE itself, and almost all the work is done on the separate layers so it is vital to ensure that you have sufficient expertise in your chosen products. |
Pre-Deployment Requirements
Before the clustering installation can be done, the following prerequisites are needed:
Shared file directory
Common directory to be accessed by the application servers with read/write permissions. This directory is used to store shared configuration files, system generated files, and uploaded files. Verify that the shared directory is mounted on the application servers and that files can be accessed with read and write permissions.
Shared database
Common database to be accessed by the application servers with permission to select, update, delete, create and alter tables. Verify that the application servers can connect and query the shared database.
Application servers
Java web application server to be installed and running on each server in the cluster. Verify that each application server has been installed correctly and can be accessed with a web browser.
Session replication
Session replication to be configured on the application servers and network. Verify that session replication has been configured for each application server and the network.
Load balancer
Load balancer (hardware or software) to be installed and configured to direct traffic for requests beginning with /jw to the application servers. Verify that the load balancer has been installed and configured correctly so that web traffic is directed to the individual application servers.
Joget Workflow Clustering Configuration
It is important to ensure that the pre-deployment requirements have been verified. Once verified, the Joget Workflow specific steps are as follows:
Datasource Configuration
Configure the datasource properties files in the shared directory
...
| Code Block |
|---|
workflowDriver=com.mysql.jdbc.DriverworkflowUrlDriver workflowUrl=jdbc\:mysql\://host\:port/database_name?characterEncoding\=UTF-8 workflowUser=username profileName= workflowPassword=password |
Application Deployment and Configuration
Deploy Joget WAR files to the application servers and configure the startup properties to point to the shared directory.
- Deploy the WAR files jw.war and jwdesigner.war from the LEE bundle to each of the application servers, e.g. for Apache Tomcat, copy the files into the tomcat webapps directory
- Add a Java -wflow.home=shared_directory_path option in the application server startup e.g. for Apache Tomcat, modify the JAVA_OPTS line
| Code Block |
|---|
export JAVA_OPTS="-XX:MaxPermSize=128m -Xmx1024M -Dwflow.home=/shared_directory_path" |
License Activation
Activate license for each server. Each server has a unique system key and requires a separate license activation.
- For each of the application servers, use the browser to directly access the Joget web console bypassing the load balancer e.g. {+}http://server1:8080/jw/web/console/home+
- Request for license and activate it using the link in the web console footer.
Post-Deployment Testing
Once the pre-deployment and clustering configuration has been done, the testing is a matter of using a web browser to access the load balancer.
Sample Installation and Configuration
This sample describes an installation using the following products:
Joget Workflow | Joget Workflow v5 LEE |
Load Balancer | Apache HTTP Web Server 2.4 with mod_proxy and mod_balancer (proxy and load balancing modules) running on Ubuntu 14.04 |
Application Servers | Apache Tomcat 8.0 running on Ubuntu 14.04 |
Shared File Directory | NFS on Ubuntu 14.04 |
Shared Database | MySQL 5.5 on Ubuntu 14.04 |
| Warning |
|---|
| IMPORTANT: Please note that this is not a comprehensive guide and does not cover production-level requirements e.g. user permissions, network and database security, etc. Please ensure that these are covered by your system, network and database administrators. |
Create a Shared File Directory
Share a file directory to be accessed by the application servers. This directory is used to store configuration files, system generated files, and uploaded files.
In this sample, the shared file directory will be a directory /export/wflow in the file server
...
| Code Block |
|---|
sudo exportfs -ra sudo service nfs-kernel-server restart |
...
Mount the Shared Directory in the Application Servers
In the application servers, install the NFS client
...
| Code Block |
|---|
echo test123 > /opt/joget/shared/wflow/test.txt |
Create a Shared Database
Install MySQL (https://help.ubuntu.com/14.04/serverguide/mysql.html)
...
| Code Block |
|---|
mysql -h database_host -u joget -p |
Deploy Application Servers
Install Apache Tomcat on each of the application servers. In each application server, run the following to extract tomcat into /opt/joget:
...
Open a web browser and access each server to confirm that http://server:8080/jw
Configure Application Server Session Replication
Configure Tomcat for clustering by editing apache-tomcat-8.0.20/conf/server.xml. Add jvmRoute="node01" to the Engine tag and uncomment the Cluster tag.
...
More information on Tomcat clustering is at http://tomcat.apache.org/tomcat-8.0-doc/cluster-howto.html
Configure Load Balancer
In the load balancer server, install Apache HTTP Server
...
| Code Block |
|---|
sudo a2enmod headers proxy proxy_balancer proxy_http |
If you are running Apache 2.4, you will need to also enable the following module.
| Code Block |
|---|
sudo a2enmod lbmethod_byrequests |
Configure a new site with the proxy and balancer modules. Create a new file in /etc/apache2/sites-available, named jwsite
...
| Code Block |
|---|
NameVirtualHost * <VirtualHost *> DocumentRoot "/var/www/jwsite" ServerName localhost ServerAdmin support@mycompany.com ErrorLog /var/log/apache2/jwsite-error.log CustomLog /var/log/apache2/jwsite-access.log combined DirectoryIndex index.html index.htm <Proxy balancer://cluster> BalancerMember http://server1:8080 route=node01 BalancerMember http://server2:8080 route=node02 Order deny,allow Allow from all </Proxy> ProxyPreserveHost On ProxyPass /jw balancer://cluster/jw stickysession=JSESSIONID ProxyPassReverse /jw balancer://cluster/jw </VirtualHost> |
...
| Code Block |
|---|
sudo a2ensite jwsite sudo service apache2 reload |
Deploy and Configure Joget Workflow LEE
Deploy and configure Joget Workflow LEE as described earlier in 2.2 Joget Clustering Configuration