...
| Thai |
|---|
รู้เบื้องต้นเกี่ยวกับ Kubernetes |
| English |
|---|
Kubernetes is the leading open source container orchestration platform. Originally created by Google based on their need to support massive scale, Kubernetes is now under the purview of Cloud Native Computing Foundation (CNCF), a vendor-neutral foundation managing popular open source projects. There are several basic and essential concepts that need to be understood: |
| Thai |
|---|
Kubernetes เป็นแพลตฟอร์มโอเพ่นซอร์สคอนเทนเนอร์ เดิมทีสร้างโดย Google ตามความต้องการของพวกเขาในการสนับสนุนขนาดใหญ่ตอนนี้ Kubernetes อยู่ภายใต้ขอบเขตของ Cloud Native Computing Foundation Computing Foundation (CNCF) สำหรับผู้ขายที่จัดการโครงการโอเพ่นซอร์สยอดนิยม มีแนวคิดพื้นฐานและจำเป็นหลายประการที่ต้องเข้าใจ: |
A Kubernetes cluster consists of one or more nodes. Nodes are machines (VMs, physical servers, etc) that run the applications.
Thai คลัสเตอร์ Kubernetes ประกอบด้วยหนึ่งโหนดขึ้นไป Nodes คือเครื่อง (VM, ฟิสิคัลเซิร์ฟเวอร์ ฯลฯ ) ที่รันแอ็พพลิเคชัน
A Pod is the smallest Kubernetes object that contains one or more containers, storage resources, network IP and other configuration.
Thai Pod เป็นวัตถุ Kubernetes ที่เล็กที่สุดที่มีหนึ่งคอนเทนเนอร์ขึ้นไปทรัพยากรหน่วยเก็บข้อมูล IP เครือข่ายและการกำหนดค่าอื่น ๆ
A Service defines a set of Pods and how they are accessed.
Thai ไดรฟ์ข้อมูล Service เป็นที่เก็บข้อมูลที่ใช้ร่วมกันสำหรับตู้คอนเทนเนอร์และรองรับหลายประเภท
A Volume is a shared storage for containers, and many different types are supported.
Thai ไดรฟ์ข้อมูล Volume เป็นที่เก็บข้อมูลที่ใช้ร่วมกันสำหรับตู้คอนเทนเนอร์และรองรับหลายประเภท
These Kubernetes objects are defined in YAML format in .yaml files
Thai วัตถุ Kubernetes เหล่านี้ถูกกำหนดในรูปแบบ YAML ในไฟล์. yaml
A command line interface tool, kubectl, is used to manage these objects via the Kubernetes API.
Thai เครื่องมืออินเตอร์เฟสบรรทัดคำสั่ง kubectl, ใช้เพื่อจัดการวัตถุเหล่านี้ผ่าน Kubernetes API.
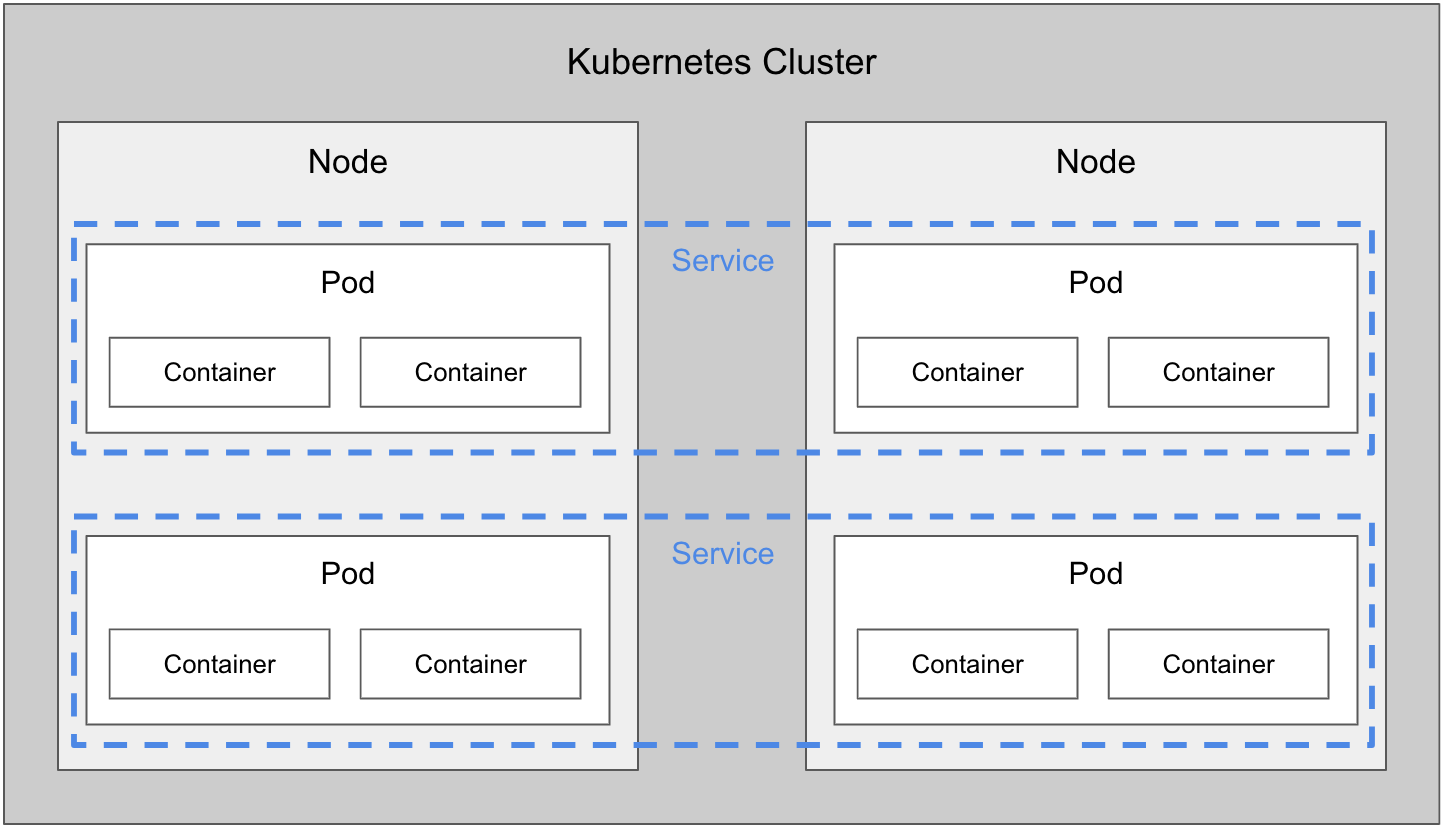
Simplified view of Kubernetes objects
...
| Code Block |
|---|
minikube v1.8.1 on Darwin 10.14.6 Automatically selected the hyperkit driver Downloading VM boot image ... Creating hyperkit VM (CPUs=2, Memory=3072MB, Disk=20000MB) ... Preparing Kubernetes v1.17.3 on Docker 19.03.6 ... Launching Kubernetes ... Enabling addons: default-storageclass, storage-provisioner Waiting for cluster to come online ... Done! kubectl is now configured to use "minikube" |
2. Install Ingress on Minikube for external access:
| Code Block |
|---|
minikube addons enable ingress |
Test Minikube Installation
...
| Thai |
|---|
สร้างหน่วยเก็บข้อมูลถาวรโดยใช้ PersistentVolume and PersistentVolumeClaim |
| Code Block |
|---|
kubectl apply -f https://k8s.io/examples/application/mysql/mysql-pv.yaml |
...
Once the MySQL database is running, let’s run a Docker image for Joget Enterprise that connects to that MySQL service.
1. Deploy joget image using an example YAML file. Download the contents of joget-dx7-dxtomcat9-deployment.yaml into a file with the same name and run kubectl.
| Thai |
|---|
เมื่อฐานข้อมูล MySQL ทำงานแล้วให้เรียกใช้อิมเมจ Docker image for Joget Enterprise ที่เชื่อมต่อกับบริการ MySQL นั้น 1. ปรับใช้อิมเมจ joget โดยใช้ไฟล์ YAML ตัวอย่าง ดาวน์โหลดเนื้อหาของ joget-dx7-dxtomcat9-deployment.yaml ลงในไฟล์ที่มีชื่อเดียวกันและรัน kubectl |
| View file | ||||
|---|---|---|---|---|
|
| Code Block |
|---|
kubectl apply -f joget-dxdx7-tomcat9-deployment.yaml |
2. Inspect the deployment
...
| Code Block |
|---|
kubectl describe deployment joget-dx7-tomcat9 kubectl get pods -l app=joget-dx7-tomcat9 |
3. Once the STATUS is Running, get the URL for the service
...
| Code Block |
|---|
minikube service joget-dx7-tomcat9 --url |
4. Access the URL in a browser with an additional /jw in the path to access the Joget App Center e.g. http://192.168.99.100:32496/jw
| Thai |
|---|
เข้าถึง URL ในเบราว์เซอร์ที่มี / jw เพิ่มเติมในเส้นทางเพื่อเข้าถึง Joget App Center เช่น http://192.168.99.100:32496/jw |
5. Access the Joget DX URL and in the Database Setup page, key in the database configuration of the database deployed earlier, and click on the Save button.
- Database Type: MySQL
- Database Host: the service name of the database e.g. mysql
- Database Port: 3306
- Database Name: jwdb
- Database User: root
- Database Password: the configured password e.g. password

You now have a running installation of Joget, and you’ll be able to visually build a full app in 30 minutes without coding.
...
| Code Block |
|---|
kubectl scale --replicas=2 deployment joget-dx7-tomcat9 |
2. Examine the running pods, and you should see 2 pods running Joget
...
| Code Block |
|---|
kubectl get pods NAME READY STATUS RESTARTS AGE joget-dx7-tomcat9-7d879db895-c9sbb 1/1 Running 0 27s joget-dx7-tomcat9-7d879db895-wpnsf 1/1 Running 0 37m mysql-7b9b7999d8-lk9gq 1/1 Running 0 65m |
...
| Code Block |
|---|
kubectl scale --replicas=1 deployment joget-dx7-tomcat9 |
4. Examine the running pods, and you should now see 1 pod running Joget.
...
| Code Block |
|---|
kubectl get pods |
Common Errors
How to Validate Your Installation System Key
- Launch Joget from your browser and login as admin.
- Navigate to Settings > License.
- Your system key should contains dashes as the following.

If the system key matches any of the nodes listed at the bottom, then it is wrong. - If it does not, chances are that you did not assign the service account cluster view permission for Joget to retrieve the deployment info.
Check the logs to look for "io.kubernetes.client.openapi.ApiException: Forbidden".ERROR 14 Apr 2021 12:35:03 org.joget.apps.license.LicenseManager - Forbidden io.kubernetes.client.openapi.ApiException: Forbidden at io.kubernetes.client.openapi.ApiClient.handleResponse(ApiClient.java:971) at io.kubernetes.client.openapi.ApiClient.execute(ApiClient.java:883) at io.kubernetes.client.openapi.apis.CoreV1Api.readNamespacedPodWithHttpInfo(CoreV1Api.java:45995) at io.kubernetes.client.openapi.apis.CoreV1Api.readNamespacedPod(CoreV1Api.java:45965) at org.joget.apps.license.LicenseManager.generateK8sDeploymentSystemKey(LicenseManager.java:934) at org.joget.apps.license.LicenseManager.generateClusterSystemKey(LicenseManager.java:854) at org.joget.apps.license.LicenseManager.checkClusterLicense(LicenseManager.java:1055) at org.joget.apps.license.LicenseManager$4.run(LicenseManager.java:1029) The "io.kubernetes.client.openapi.ApiException: Forbidden"exception shows this permission is missing. You may need to change namespace value if they are not using the default namespace. Once that you have resolved this error, then only the system key would change back to using the deployment ID.
- The following in the YAML file.
apiVersion: rbac.authorization.k8s.io/v1
kind: ClusterRoleBinding
metadata:
name: joget-dx7-tomcat9-clusterrolebinding
roleRef:
apiGroup: rbac.authorization.k8s.io
kind: ClusterRole
name: view
subjects:
- kind: ServiceAccount
name: default
namespace: default
is to assign the service account cluster view permission to retrieve Deployment info for the license system key.