...
In the UiPath Robot, it will show “Installing package…”. Once the package has been installed, it will show “Job started processing” which means the process has started. In this demo process, a Hello popup dialog will appear.
| Thai |
|---|
ใน UiPath Robot มันจะแสดง“ การติดตั้งแพ็คเกจ…” เมื่อติดตั้งแพคเกจแล้วมันจะแสดง“ การประมวลผลเริ่มงาน” ซึ่งหมายถึงกระบวนการเริ่ม ในกระบวนการสาธิตนี้กล่องโต้ตอบสวัสดีป๊อปอัพจะปรากฏขึ้น |

The robot has successfully started the job. You can monitor the robots and jobs in the Monitoring menu in the UiPath Orchestrator.
| Thai |
|---|
หุ่นยนต์เริ่มงานได้สำเร็จ คุณสามารถตรวจสอบหุ่นยนต์และงานในเมนูการตรวจสอบใน UiPath Orchestrator |

Step 9: Prepare for UiPath Integration
| Thai |
|---|
ขั้นตอนที่ 9: เตรียมความพร้อมสำหรับการรวม UiPath |
In June 2019, UiPath introduced a new mechanism for consuming its Cloud APIs. There are a number of steps required to retrieve some required information for integration:
| Thai |
|---|
ในเดือนมิถุนายน 2019 UiPath แนะนำกลไกใหม่สำหรับการใช้ Cloud API มีหลายขั้นตอนที่จำเป็นในการดึงข้อมูลที่จำเป็นสำหรับการรวม: |
1. Get Access and ID Tokens
| Thai |
|---|
รับการเข้าถึงและโทเค็น ID |
1.1 Generate Code Challenge and Code Verifier
| Thai |
|---|
สร้าง Code Challenge และ Code Verifier |
In a web browser, visit https://repl.it/languages/nodejs and run the following code:
| Thai |
|---|
ในเว็บเบราว์เซอร์ไปที่ https://repl.it/languages/nodejs และเรียกใช้รหัสต่อไปนี้: |
| Code Block |
|---|
function base64URLEncode(str) {
  return str.toString('base64')
    .replace(/\+/g, '-')
    .replace(/\//g, '_')
    .replace(/=/g, '');
}

function sha256(buffer) {
  return crypto.createHash('sha256').update(buffer).digest();
}

console.log("Generating challenge and Verifier");
var cryptoResult = crypto.randomBytes(32);
var verifier = base64URLEncode(cryptoResult);
var challenge = base64URLEncode(sha256(verifier));
console.log("Code challenge: " + challenge)
console.log("Code verifier: " + verifier); |
Take note of the code challenge and code verifier values in the output e.g.
| Thai |
|---|
จดรหัส code challenge และcode verifier โค้ดผลลัพธ์เช่น |
| Code Block |
|---|
Generating challenge and Verifier Code challenge: RzYlHiiGzPGgOLaRQJYftZ1mmc3sCbeicZVRftTmC-A Code verifier: YVMnLczXQgJ9dwzV7MlMWEjGyAia4nXvTZzU4UVrAPE |
...
1.2 Get Authorization Code
| Thai |
|---|
รับรหัสอนุญาต |
Replace the code challenge into the URL below, and visit the updated URL in a browser.
| Thai |
|---|
แทนที่ code challenge เป็น URL ด้านล่างและไปที่ URL ที่อัปเดตในเบราว์เซอร์ |
https://account.uipath.com/authorize?response_type=code&nonce=b0f368cbc59c6b99ccc8e9b66a30b4a6&state=47441df4d0f0a89da08d43b6dfdc4be2&code_challenge=[code_challenge]&code_challenge_method=S256&scope=openid+profile+offline_access+email &audience=https%3A%2F%2Forchestrator.cloud.uipath.com&client_id=5v7PmPJL6FOGu6RB8I1Y4adLBhIwovQN&redirect_uri=https%3A%2F%2Faccount.uipath.com%2Fmobile
The browser should redirect to:
| Thai |
|---|
เบราว์เซอร์ควรเปลี่ยนเส้นทางไปที่: |
https://account.uipath.com/mobile?code=[authorization_code]&state=47441df4d0f0a89da08d43b6dfdc4be2
Copy the authorization_code in the URL.
| Thai |
|---|
คัดลอก author_code ใน URL |
1.3 Get Refresh Token
| Thai |
|---|
รับโทเค็นรีเฟรช |
Using any API testing tool (e.g. Postman), submit a POST request to
https://account.uipath.com/oauth/token with the body below, replacing the values for [authorization_code] and [code_verifier] accordingly.
| Thai |
|---|
ใช้เครื่องมือทดสอบ API ใด ๆ (เช่น Postman) ส่งคำขอ POST ถึง https://account.uipath.com/oauth/token ด้วยเนื้อหาด้านล่างแทนที่ค่าสำหรับ [authorization_code] และ [code_verifier] ตามลำดับ |
| Code Block |
|---|
{
   "grant_type": "authorization_code",
   "code": "[authorization_code]",
   "redirect_uri": "https://account.uipath.com/mobile",
   "code_verifier": "[code verifier]",
   "client_id": "5v7PmPJL6FOGu6RB8I1Y4adLBhIwovQN"
} |
Copy the value of the refresh_token from the response:
| Thai |
|---|
คัดลอกค่าของ refresh_token จากการตอบกลับ: |
| Code Block |
|---|
{
   "access_token": "eyJ0eX...",
   "refresh_token": "CBZcOD6vrP2FQ9qa8fuqDdfoEwnVPuR2Kpz-hitbTAIzG",
   "id_token": "eyJ0eX...",
   "scope": "openid profile email offline_access",
   "expires_in": 86400,
   "token_type": "Bearer"
} |
...
1.4 Get Access Token and ID using the Refresh Token
| Thai |
|---|
รับโทเค็นการเข้าถึงและ ID โดยใช้รีเฟรชโทเค็น |
Using any API testing tool, submit a POST request to
https://account.uipath.com/oauth/token with the body below, replacing the values for [refresh_token] accordingly.
| Thai |
|---|
ใช้เครื่องมือทดสอบ API ใด ๆ ส่งคำขอ POST ถึง https://account.uipath.com/oauth/token ด้วยเนื้อหาด้านล่างแทนที่ค่าสำหรับ [refresh_token] ตามลำดับ |
| Code Block |
|---|
{
   "grant_type": "refresh_token",
   "client_id": "5v7PmPJL6FOGu6RB8I1Y4adLBhIwovQN",
   "refresh_token": "[refresh_token]"
} |
Copy the values for access_token and id_token from the response.
| Thai |
|---|
คัดลอกค่าสำหรับ access_token และ id_token จากการตอบกลับ |
| Code Block |
|---|
{
   "access_token": "eyJ0eX...",
   "id_token": "eyJ0eX...",
   "scope": "openid profile email offline_access",
   "expires_in": 86400,
   "token_type": "Bearer"
} |
...
2. Get UiPath Account, Service and Process Identifiers
| Thai |
|---|
รับบัญชี UiPath บริการและตัวระบุกระบวนการ |
2.1 Get the Account Logical Name
| Thai |
|---|
รับชื่อตรรกะบัญชี |
Using any API testing tool, submit a GET request to
https://platform.uipath.com/cloudrpa/api/getAccountsForUser with a request header
| Thai |
|---|
ใช้เครื่องมือทดสอบ API ใด ๆ ส่งคำขอ GET ถึง https://platform.uipath.com/cloudrpa/api/getAccountsForUser พร้อมส่วนหัวคำขอ |
| Code Block |
|---|
Authorization: Bearer [id_token] |
Copy the value for accountLogicalName from the response:
| Thai |
|---|
คัดลอกค่าสำหรับ accountLogicalName จากการตอบกลับ: |
| Code Block |
|---|
{
   "userEmail": "demo@domain.com",
   "accounts": [
       {
           "accountName": "Demo",
           "accountLogicalName": "Demo"
       }
   ]
} |
...
2.2 Get Service Instance Logical Name
| Thai |
|---|
รับชื่อตรรกะของอินสแตนซ์ของบริการ |
Using any API testing tool, submit a GET request to
https://platform.uipath.com/cloudrpa/api/account/[accountLogicalName]/getAllServiceInstances with a request header
| Thai |
|---|
ใช้เครื่องมือทดสอบ API ใด ๆ ส่งคำขอ GET ถึง https://platform.uipath.com/cloudrpa/api/account/ ชัดaccountLogicalNameเหมือนกัน /getAllServiceInstance พร้อมส่วนหัวคำขอ |
| Code Block |
|---|
Authorization: Bearer [id_token] |
Copy the value for serviceInstanceLogicalName from the response:
| Thai |
|---|
คัดลอกค่าสำหรับ serviceInstanceLogicalName จากการตอบกลับ: |
| Code Block |
|---|
[
   {
       "serviceInstanceName": "DemoDefault",
       "serviceInstanceLogicalName": "DemoDefaultzous50676",
       "serviceType": "ORCHESTRATOR",
       "serviceUrl": "https://platform-community.azurewebsites.net"
   }
] |
...
2.3 Get Release Key for the Desired Process
| Thai |
|---|
รับรหัสการอนุมัติสำหรับกระบวนการที่ต้องการ |
We will now need to retrieve the Release Key, a unique identifier for a desired process. Using any API testing tool, submit a GET request to
https://platform.uipath.com/odata/Releases with request headers
| Thai |
|---|
ตอนนี้เราจะต้องดึงรหัสรีลีสซึ่งเป็นตัวระบุเฉพาะสำหรับกระบวนการที่ต้องการ ใช้เครื่องมือทดสอบ API ใด ๆ ส่งคำขอ GET ถึง https://platform.uipath.com/odata/Releases กับส่วนหัวคำขอ |
| Code Block |
|---|
Authorization: Bearer [access_token] X-UIPATH-TenantName: [serviceInstanceLogicalName] |
Copy the value for Key from the response:
| Thai |
|---|
คัดลอกค่าสำหรับคีย์จากการตอบกลับ: |
| Code Block |
|---|
{
   "@odata.context": "https://platform.uipath.com/odata/$metadata#Releases",
   "@odata.count": 1,
   "value": [
       {
           "Key": "b27c7363-459c-4520-bae5-660d4a1d3813",
           "ProcessKey": "Demo_Process",
           "ProcessVersion": "1.0.21",
           "IsLatestVersion": false,
           "IsProcessDeleted": false,
           "Description": "Demo Process",
           "Name": "Demo Process",
           "EnvironmentId": 98069,
           "EnvironmentName": "Demo Environment",
           "InputArguments": null,
           "QueueDefinitionId": null,
           "QueueDefinitionName": null,
           "Id": 120897,
           "Arguments": {
               "Input": null,
               "Output": null
           },
           "ProcessSettings": null
       }
   ]
} |
...
2.4 Test Orchestrator API Call to Start a Job
| Thai |
|---|
ทดสอบ Orchestrator API เพื่อเริ่มงาน |
At this point, make sure you have the following critical information at hand:
| Thai |
|---|
ณ จุดนี้ตรวจสอบให้แน่ใจว่าคุณมีข้อมูลสำคัญต่อไปนี้: |
refresh_token (Refresh Token)
access_token (Access Token)
serviceInstanceLogicalName (Service Instance Logical Name)
Key (Release Key)
...
https://platform.uipath.com/odata/Jobs/UiPath.Server.Configuration.OData.StartJobs with 2 request headers
...
| Thai |
|---|
ลองทำการเรียก API เพื่อเริ่มงานสำหรับกระบวนการ ใช้เครื่องมือทดสอบ API ใด ๆ ส่งคำขอ POST ถึง https://platform.uipath.com/odata/Jobs/UiPath.Server.Configuration.OData.StartJobs พร้อม 2 ส่วนหัวคำขอ |
| Code Block |
|---|
Authorization: Bearer [access_token] X-UIPATH-TenantName: [serviceInstanceLogicalName] |
and the body:
| Thai |
|---|
และร่างกาย: |
| Code Block |
|---|
{ "startInfo":
  { "ReleaseKey": "[Key]",
    "Strategy": "All",
    "RobotIds": [ ],
    "JobsCount": 0,
    "Source": "Manual"
  }
} |
If successful, the response will be as follows, with the status of the Job shown in the State attribute:
| Thai |
|---|
หากประสบความสำเร็จการตอบสนองจะเป็นดังนี้ด้วยสถานะของงานที่แสดงในแอตทริบิวต์ของรัฐ: |
| Code Block |
|---|
{
   "@odata.context": "https://platform.uipath.com/odata/$metadata#Jobs",
   "value": [
       {
           "Key": "e811bd29-26fb-4cc3-af91-7fd6308ca643",
           "StartTime": null,
           "EndTime": null,
           "State": "Pending",
           "Source": "Manual",
           "SourceType": "Manual",
           "BatchExecutionKey": "382e7a96-a5b9-4343-b258-26a80cf87f80",
           "Info": null,
           "CreationTime": "2019-06-12T08:02:03.2595408Z",
           "StartingScheduleId": null,
           "ReleaseName": "Demo Process",
           "Type": "Unattended",
           "InputArguments": null,
           "OutputArguments": null,
           "HostMachineName": null,
           "HasMediaRecorded": false,
           "Id": 10169582
       }
   ]
} |
...
Integrate UiPath with Joget
| Thai |
|---|
รวม UiPath เข้ากับ Joget |
How to Integrate with UiPath
| Thai |
|---|
วิธีผสานรวมกับ UiPath |
UiPath provides the Orchestrator API for integration.
The most commonly used function is Starting a Job, which should satisfy a majority of use cases. We will use this function in the following integration tutorial.
| Thai |
|---|
UiPath จัดเตรียม Orchestrator API สำหรับการรวมเข้าด้วยกัน ฟังก์ชั่นที่ใช้กันมากที่สุดคือ Starting a Job ซึ่งควรเป็นไปตามกรณีการใช้งานส่วนใหญ่ เราจะใช้ฟังก์ชั่นนี้ในการสอนการรวมต่อไปนี้ |
Design a Process to Start a UiPath Job
| Thai |
|---|
ออกแบบกระบวนการเพื่อเริ่มงาน UiPath |
Since the UiPath Orchestrator API is a REST API with data in JSON format, we can use the Joget JSON Tool to invoke the API.
Before we start, ensure that you have the following critical UiPath information at hand (obtained from the previous Prepare for UiPath Integration tutorial):
| Thai |
|---|
เนื่องจาก UiPath Orchestrator API เป็น REST API ที่มีข้อมูลในรูปแบบJSONเราจึงสามารถใช้ JogetJSON Toolเพื่อเรียกใช้ API ก่อนที่เราจะเริ่มตรวจสอบให้แน่ใจว่าคุณมีข้อมูล UiPath ที่สำคัญต่อไปนี้อยู่ในมือ (ได้รับจากบทเรียนการเตรียมการสำหรับการรวม UiPath ก่อนหน้านี้): |
refresh_token (Refresh Token)
serviceInstanceLogicalName (Service Instance Logical Name)
Key (Release Key)
...
Step 1. Design New App
| Thai |
|---|
ขั้นตอนที่ 1 ออกแบบแอพใหม่ |
First, let’s design a new app by clicking on Design New App in the Joget App Center.
| Thai |
|---|
ขั้นแรกให้ออกแบบแอปใหม่โดยคลิกที่ออกแบบแอปใหม่ใน Joget App Center |
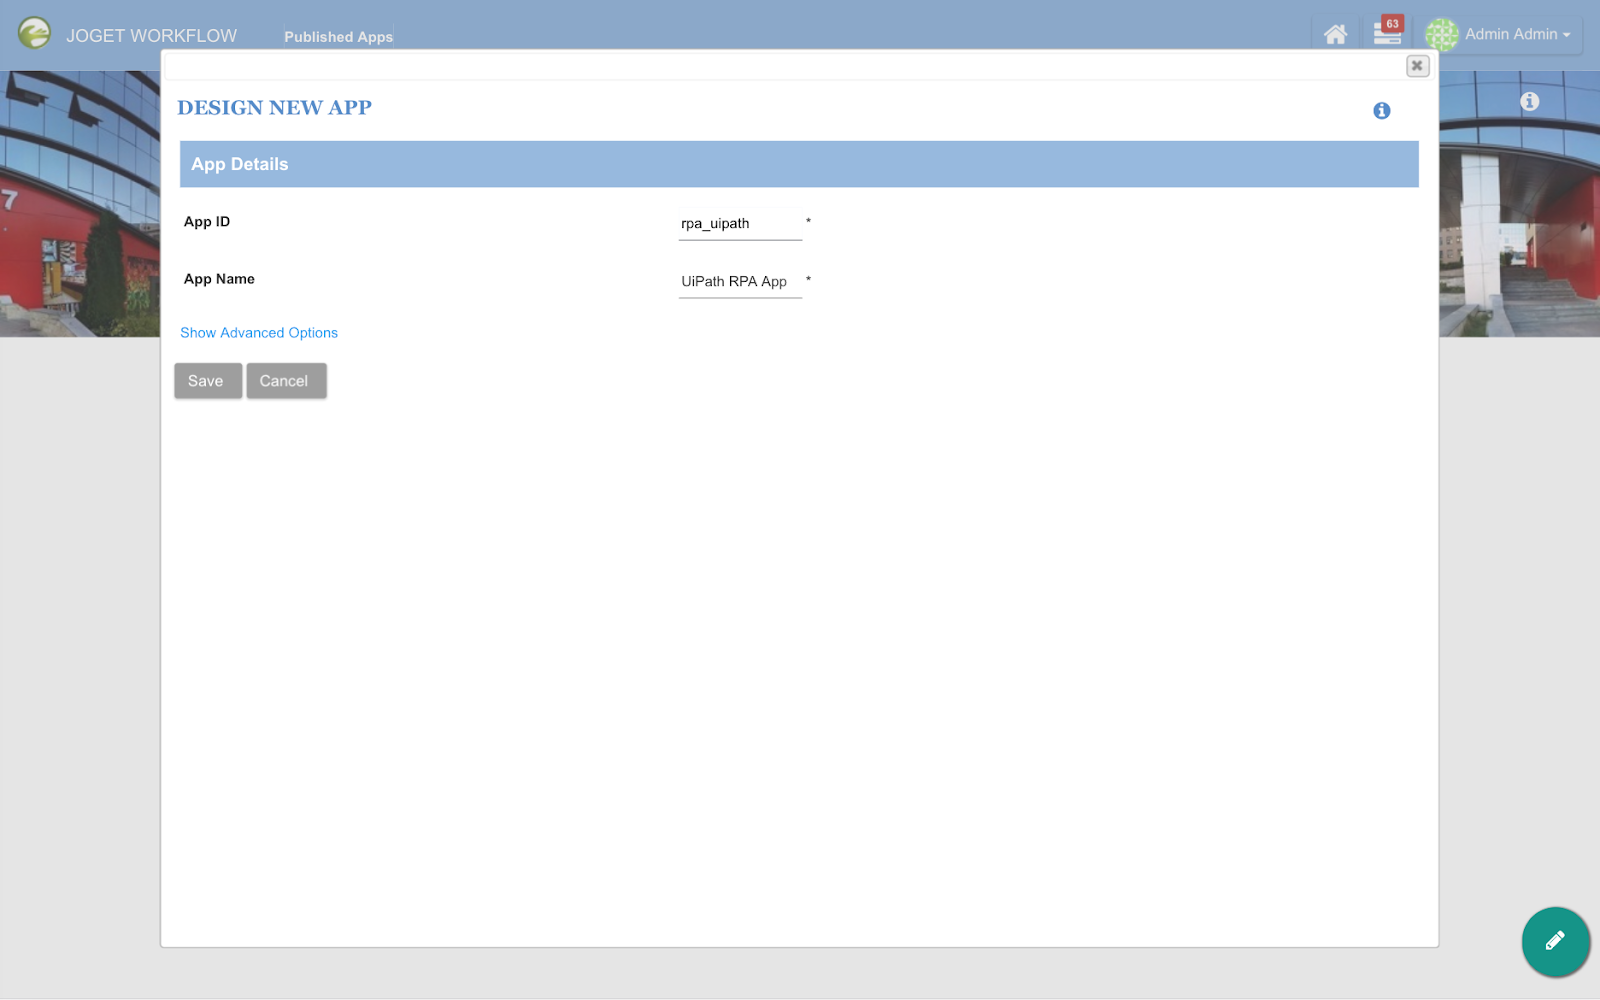
Fill in desired values for the App ID and App Name, and click Save.
| Thai |
|---|
กรอกค่าที่ต้องการสำหรับ ID แอปและชื่อแอพแล้วคลิกบันทึก |
Step 2. Design New Process
| Thai |
|---|
ขั้นตอนที่ 2 ออกแบบกระบวนการใหม่ |
Click on the Processes menu, then on the Design Process button to launch the Process Builder.
Design a simple process containing 2 tools, as shown below.
| Thai |
|---|
คลิกที่เมนูกระบวนการจากนั้นคลิกที่ปุ่มออกแบบกระบวนการเพื่อเปิดตัว Process Builder ออกแบบกระบวนการง่าย ๆ ที่ประกอบด้วย 2 เครื่องมือดังแสดงด้านล่าง |

Click on the edit pencil icon after hovering over the process name along the top. Enter a suitable process name and create 3 workflow variables to store the response values from UiPath API call:
| Thai |
|---|
คลิกที่ไอคอนแก้ไขดินสอหลังจากโฮเวอร์เหนือชื่อกระบวนการด้านบน ป้อนชื่อกระบวนการที่เหมาะสมและสร้าง 3 ตัวแปรเวิร์กโฟลว์เพื่อเก็บค่าการตอบสนองจากการเรียก UiPath API: |
status
Id_token
access_token

Click on Deploy.
| Thai |
|---|
คลิกที่ปรับใช้ |
Step 3. Configure First Tool to Get UiPath Access Token
| Thai |
|---|
ขั้นตอนที่ 3 กำหนดค่าเครื่องมือแรกเพื่อรับโทเค็นการเข้าถึง UiPath |
Once the process has been deployed, close the Process Builder. In the process view page, select the Map Tools to Plugins tab.
| Thai |
|---|
เมื่อกระบวนการได้รับการปรับใช้ให้ปิดตัวสร้างกระบวนการ ในหน้ามุมมองกระบวนการให้เลือกแท็บเครื่องมือแผนที่เป็นปลั๊กอิน |

Click on Configure Plugin for the first tool and select JSON Tool, then key in the following configuration:
| Thai |
|---|
คลิกที่กำหนดค่าปลั๊กอินสำหรับเครื่องมือแรกและเลือกเครื่องมือ JSON จากนั้นป้อนการกำหนดค่าต่อไปนี้: |
JSON URL | |
Call Type | POST |
POST Method | Custom JSON Payload |
Custom JSON Payload | { "grant_type": "refresh_token", "client_id": "5v7PmPJL6FOGu6RB8I1Y4adLBhIwovQN", "refresh_token": "[refresh_token]" } |
...
Under Store to Workflow Variable, map the variables to store the tokens in the matching workflow variables i.e.
| Thai |
|---|
ใต้ Store to Workflow Variable ให้จับคู่ตัวแปรเพื่อเก็บโทเค็นในตัวแปรเวิร์กโฟลว์ที่ตรงกันเช่น |
access_token | access_token |
id_token | id_token |
...
Click on Submit to save.
| Thai |
|---|
คลิกที่ส่งเพื่อบันทึก |
Step 4. Configure Second Tool to Start Job Using the Access Token
| Thai |
|---|
ขั้นตอนที่ 4 กำหนดค่าเครื่องมือที่สองเพื่อเริ่มงานโดยใช้โทเค็นการเข้าถึง |
Click on Configure Plugin for the second tool and select JSON Tool, then key in the following configuration:
| Thai |
|---|
คลิกที่ Configure Plugin สำหรับเครื่องมือที่สองและเลือกเครื่องมือ JSON จากนั้นป้อนการกำหนดค่าต่อไปนี้: |
JSON URL | https://platform.uipath.com/odata/Jobs/UiPath.Server.Configuration.OData.StartJobs |
Call Type | POST |
POST Method | Custom JSON Payload |
Custom JSON Payload (Replace [Key] with the actual Release Key) | { "startInfo": { "ReleaseKey": "[Key]", "Strategy": "All", "RobotIds": [ ], "JobsCount": 0, "Source": "Manual" } } |
Request Headers (Replace [serviceInstanceLogicalName] with the actual Service Instance Logical Name | Authorization: Bearer #variable.access_token# X-UIPATH-TenantName: [serviceInstanceLogicalName] |
...
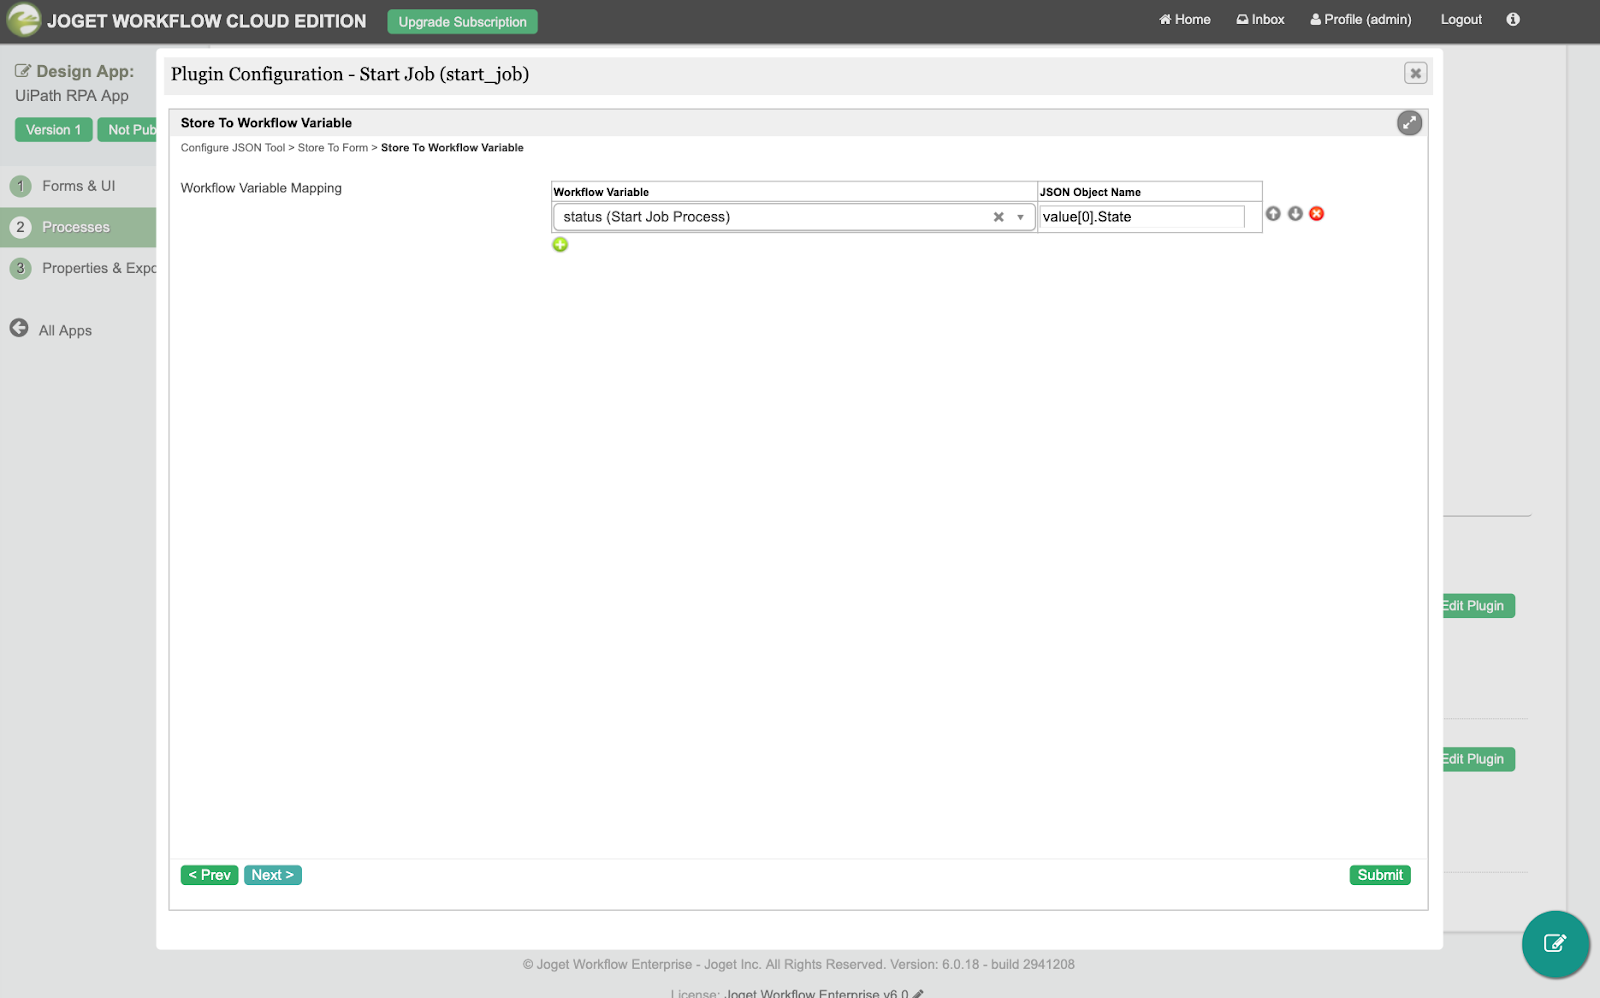
Under Store to Workflow Variable, map the status variable to the State attribute in the response JSON i.e.
...
response JSON i.e.
| Thai |
|---|
ใต้ Store to Workflow Variable ให้จับคู่ตัวแปรสถานะกับแอตทริบิวต์ State ในการตอบสนอง JSON เช่น |
status | value[0].State |
That’s it. The Joget process has been configured to invoke the UiPath Orchestrator API to start a job.
| Thai |
|---|
แค่นั้นแหละ. กระบวนการ Joget ได้รับการกำหนดค่าให้เรียกใช้ UiPath Orchestrator API เพื่อเริ่มงาน |
Step 5. Run the Process
| Thai |
|---|
ขั้นตอน 5. เรียกใช้กระบวนการ |
Now, let’s test the process. Click on the Run Process button at the top, then Run Process again in the confirmation dialog.
| Thai |
|---|
ตอนนี้มาทดสอบกระบวนการกัน คลิกที่ปุ่ม Run Process ที่ด้านบนจากนั้น Run Process อีกครั้งในกล่องโต้ตอบการยืนยัน |

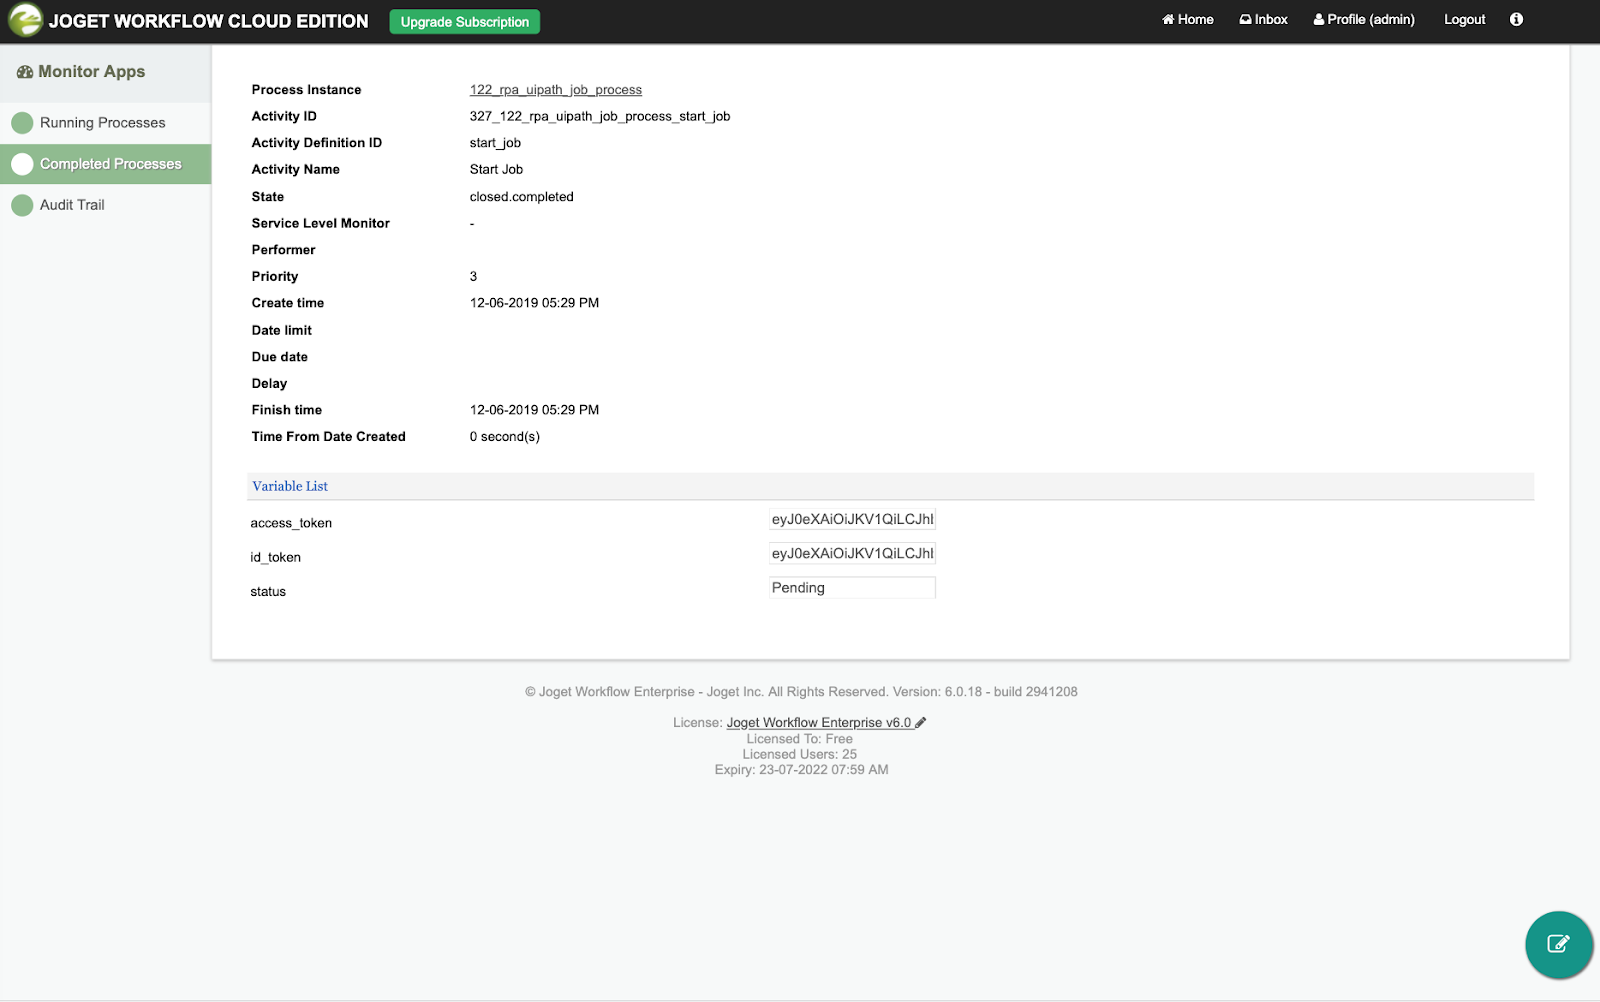
Once the process has started, the 2 tools will execute as configured. To view the results of the process, navigate to Monitor -> Completed Processes.
Select the process instance and you will see the 2 tools executed.
| Thai |
|---|
เมื่อกระบวนการเริ่มต้นเครื่องมือ 2 ตัวจะทำงานตามที่กำหนดไว้ หากต้องการดูผลลัพธ์ของกระบวนการให้ไปที่การตรวจสอบ -> กระบวนการที่เสร็จสมบูรณ์ เลือกตัวอย่างกระบวนการและคุณจะเห็นเครื่องมือ 2 ตัวดำเนินการ |

Click on each activity to view the values of the workflow variables which obtained the results of the Orchestrator API calls.
| Thai |
|---|
คลิกที่แต่ละกิจกรรมเพื่อดูค่าของตัวแปรเวิร์กโฟลว์ที่ได้รับผลลัพธ์ของการเรียกใช้ Orchestrator API |
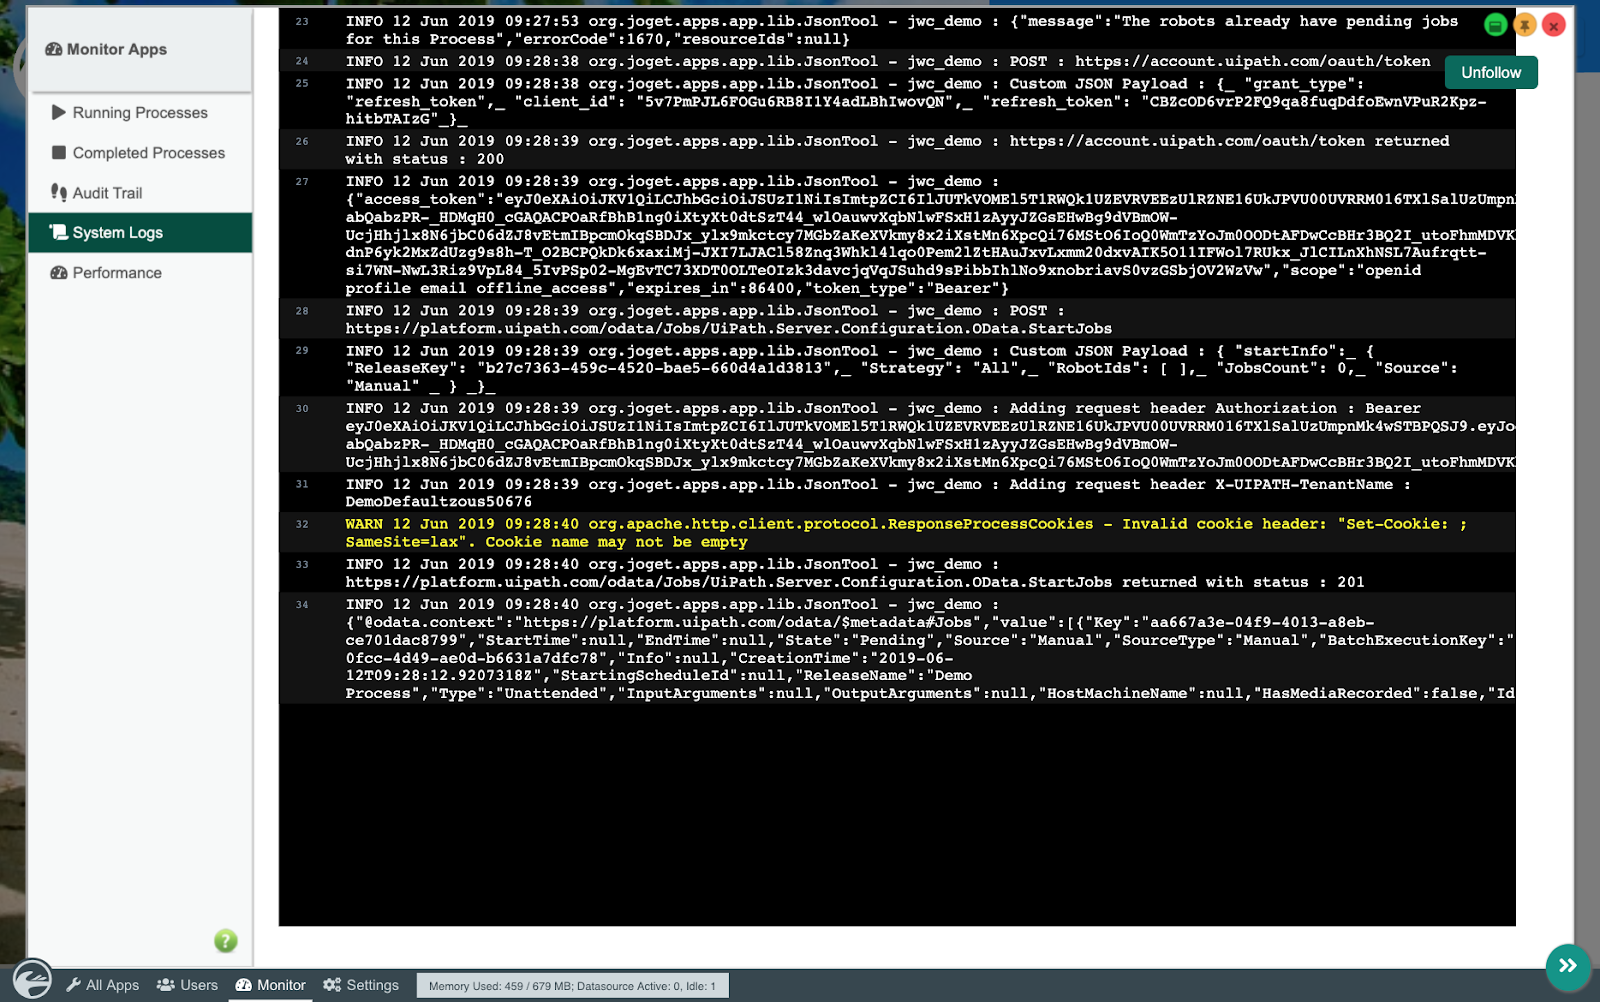
If you are running Joget on-premise and have access to the system logs, you will be able to see the tool requests and responses if the debugging option is enabled.
Sample log output:
| Thai |
|---|
หากคุณใช้งาน Joget ในสถานที่และสามารถเข้าถึงบันทึกของระบบคุณจะสามารถเห็นคำขอเครื่องมือและการตอบสนองหากเปิดใช้งานตัวเลือกการแก้ไขข้อบกพร่อง เอาต์พุตบันทึกตัวอย่าง: |
| Code Block |
|---|
INFO 12 Jun 2019 09:28:38 org.joget.apps.app.lib.JsonTool - POST : https://account.uipath.com/oauth/token
INFO 12 Jun 2019 09:28:38 org.joget.apps.app.lib.JsonTool - Custom JSON Payload : {_ "grant_type": "refresh_token",_ "client_id": "5v7PmPJL6FOGu6RB8I1Y4adLBhIwovQN",_ "refresh_token": "CBZcOD6vrP2FQ9qa8fuqDdfoEwnVPuR2Kpz-hitbTAIzG"_}_
INFO 12 Jun 2019 09:28:39 org.joget.apps.app.lib.JsonTool - https://account.uipath.com/oauth/token returned with status : 200
INFO 12 Jun 2019 09:28:39 org.joget.apps.app.lib.JsonTool - {"access_token":"eyJ0eX...","scope":"openid profile email offline_access","expires_in":86400,"token_type":"Bearer"}
INFO 12 Jun 2019 09:28:39 org.joget.apps.app.lib.JsonTool - POST : https://platform.uipath.com/odata/Jobs/UiPath.Server.Configuration.OData.StartJobs
INFO 12 Jun 2019 09:28:39 org.joget.apps.app.lib.JsonTool - Custom JSON Payload : { "startInfo":_ { "ReleaseKey": "b27c7363-459c-4520-bae5-660d4a1d3813",_ "Strategy": "All",_ "RobotIds": [ ],_ "JobsCount": 0,_ "Source": "Manual" _ } _}_
INFO 12 Jun 2019 09:28:39 org.joget.apps.app.lib.JsonTool - Adding request header Authorization : Bearer eyJ0eX...
INFO 12 Jun 2019 09:28:39 org.joget.apps.app.lib.JsonTool - Adding request header X-UIPATH-TenantName : DemoDefaultzous50676
INFO 12 Jun 2019 09:28:40 org.joget.apps.app.lib.JsonTool - https://platform.uipath.com/odata/Jobs/UiPath.Server.Configuration.OData.StartJobs returned with status : 201
INFO 12 Jun 2019 09:28:40 org.joget.apps.app.lib.JsonTool - {"@odata.context":"https://platform.uipath.com/odata/$metadata#Jobs","value":[{"Key":"aa667a3e-04f9-4013-a8eb-ce701dac8799","StartTime":null,"EndTime":null,"State":"Pending","Source":"Manual","SourceType":"Manual","BatchExecutionKey":"68fa4d0a-0fcc-4d49-ae0d-b6631a7dfc78","Info":null,"CreationTime":"2019-06-12T09:28:12.9207318Z","StartingScheduleId":null,"ReleaseName":"Demo Process","Type":"Unattended","InputArguments":null,"OutputArguments":null,"HostMachineName":null,"HasMediaRecorded":false,"Id":10173064}]} |
If you are using Joget DX, you can stream the logs directly in the web browser.
| Thai |
|---|
หากคุณใช้ Joget DX คุณสามารถสตรีมบันทึกได้โดยตรงในเว็บเบราว์เซอร์ |
Back at the UiPath Orchestrator and UiPath Robot, you would also be able to monitor the execution of the job.
| Thai |
|---|
กลับไปที่ UiPath Orchestrator และ UiPath Robot คุณจะสามารถตรวจสอบการทำงานของงานได้ |
Sample Joget App
| Thai |
|---|
ตัวอย่างแอพ Joget |
The sample app containing this process can be downloaded below:
| Thai |
|---|
แอปตัวอย่างที่มีกระบวนการนี้สามารถดาวน์โหลดได้ด้านล่าง: |
View file name APP_rpa_uipath-1-20190612141440.jwa height 250
...