Download the desired Tomcat version from its official site. You can click here to get Tomcat 8.
Info title 32 or 64 bits? Make sure that you match Tomcat with the version of Java that you are using.
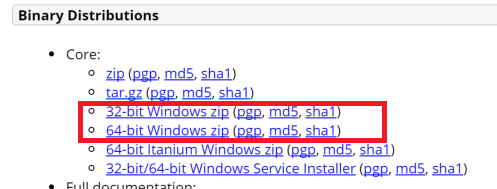
- Make sure that you pick the bundle meant for Windows as highlighted below.
- Extract the content and put it into the Joget's installation directory.
In this article, our Joget Workflow installation directory is C:\joget\Joget-v5-Enterprise\
At the time of writing, "apache-tomcat-8.0.33" is the version downloaded.
- Copy the jw.war and jwdesigner.war from existing tomcat's webapps folder into the new one (i.e. from \apache-tomcat-8.0.20\webapp\ to \apache-tomcat-8.0.33\webapp\)
Optional step: If you every plan to start up Joget Workflow manually next time by running the usual batch file or through Windows Start Menu, you can modify joget.start to point to the new tomcat folder.
Code Block title Existing code set CATALINA_HOME=.\apache-tomcat-8.0.20
Code Block title New code set CATALINA_HOME=.\apache-tomcat-8.0.33
- Open up \apache-tomcat-8.0.33\bin in your command prompt.
Run service.bat install.
Code Block title Command Prompt C:\joget\Joget-v5-Enterprise\apache-tomcat-8.0.33\bin>service.bat install Installing the service 'Tomcat8' ... Using CATALINA_HOME: "C:\joget\Joget-v5-Enterprise\apache-tomcat-8.0.33" Using CATALINA_BASE: "C:\joget\Joget-v5-Enterprise\apache-tomcat-8.0.33" Using JAVA_HOME: "C:\Program Files\Java\jdk1.7.0_79" Using JRE_HOME: "C:\Program Files\Java\jdk1.7.0_79\jre" Using JVM: "C:\Program Files\Java\jdk1.7.0_79\jre\bin\server\jvm.dll" The service 'Tomcat8' has been installed.
To verify, you may check in Computer Management -> Services.

- Get back to the \apache-tomcat-8.0.33\bin folder. Open up tomcat8w.exe.

- Go to the Logging tab. Verify that the Log path is pointing to the correct location, by default, it should point it back to the logs folder of the current Tomcat already.
Select the level of logging you wish for in the level drop-down list.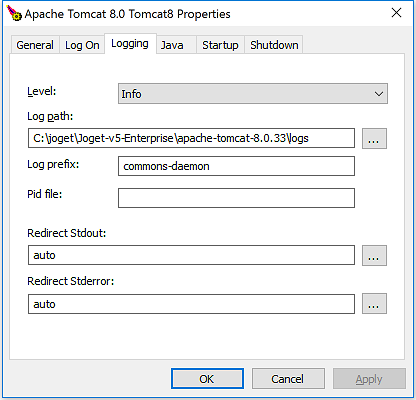
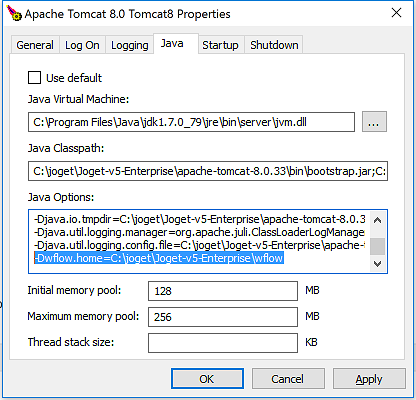
Next, go to the Java tab, append the following lines in the Java Options field. This is to define the wflow home folder from where Joget Workflow will run.
Code Block title Append these lines -Dwflow.home=C:\joget\Joget-v5-Enterprise\wflow -Djavaagentjavaagent:C:\joget\Joget-v5-Enterprise\wflow/aspectjweaver-1.8.5.jar
- Go to startup tab, set the working path to your Joget Workflow's installation folder. Repeat it for shutdown tab too.

- You can now start up Joget as a service.
...