...
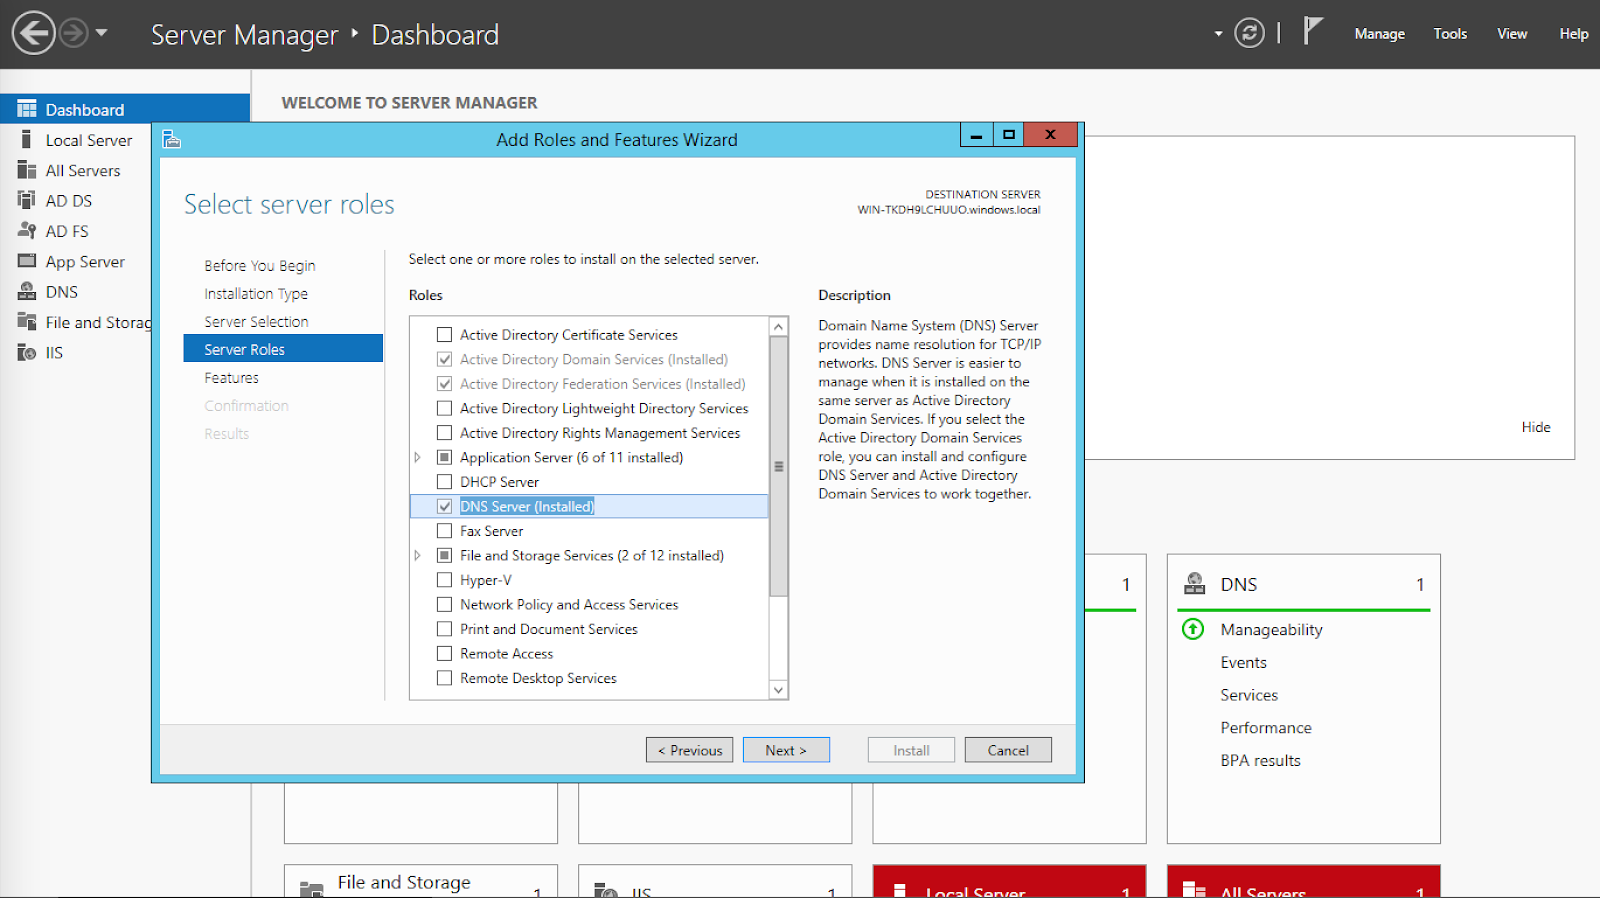
Go to Server Manager > Add roles and features to install the DNS Server.
Thai ไปที่ตัวจัดการเซิร์ฟเวอร์> เพิ่มบทบาทและคุณสมบัติเพื่อติดตั้งเซิร์ฟเวอร์ DNS
In the Network and Sharing Center, configure the network adapter so that the Preferred DNS server is 127.0.0.1.
Thai ในศูนย์เครือข่ายและการใช้ร่วมกันกำหนดค่าการ์ดเชื่อมต่อเครือข่ายเพื่อให้เซิร์ฟเวอร์ DNS ที่ต้องการคือ 127.0.0.1
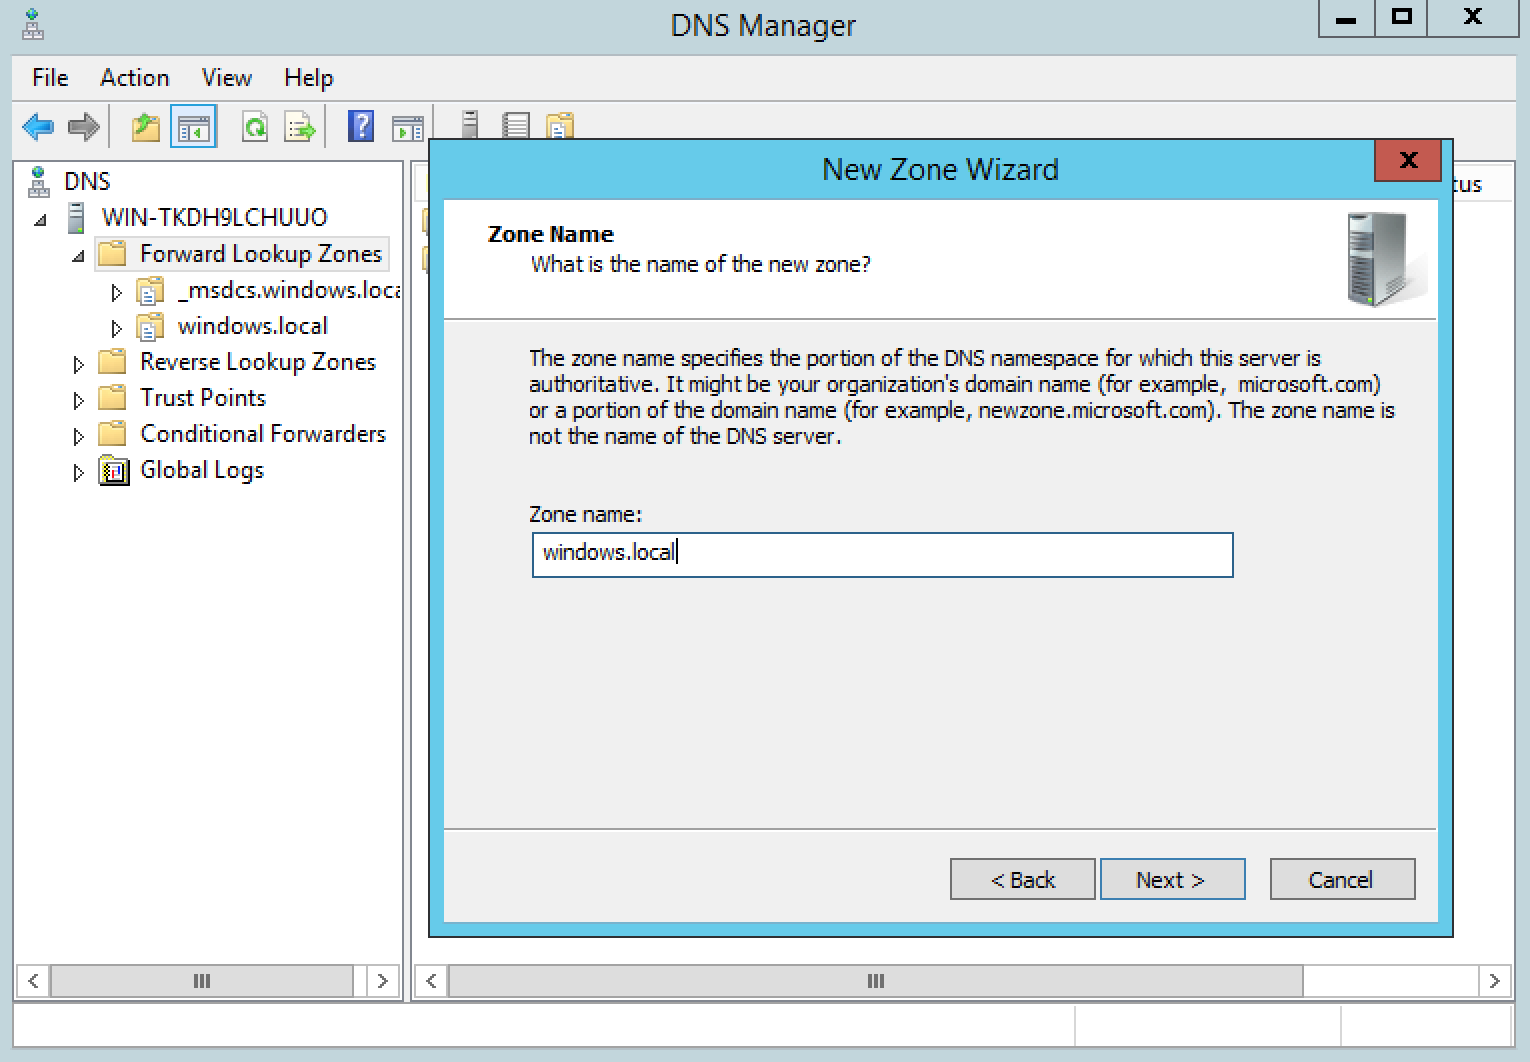
In the DNS Manager, right click on the server name and Configure a DNS Server to create a forward lookup zone for windows.local.
Thai ในตัวจัดการ DNS คลิกขวาที่ชื่อเซิร์ฟเวอร์และกำหนดค่าเซิร์ฟเวอร์ DNS เพื่อสร้างโซนการค้นหาแบบส่งต่อสำหรับ windows.local

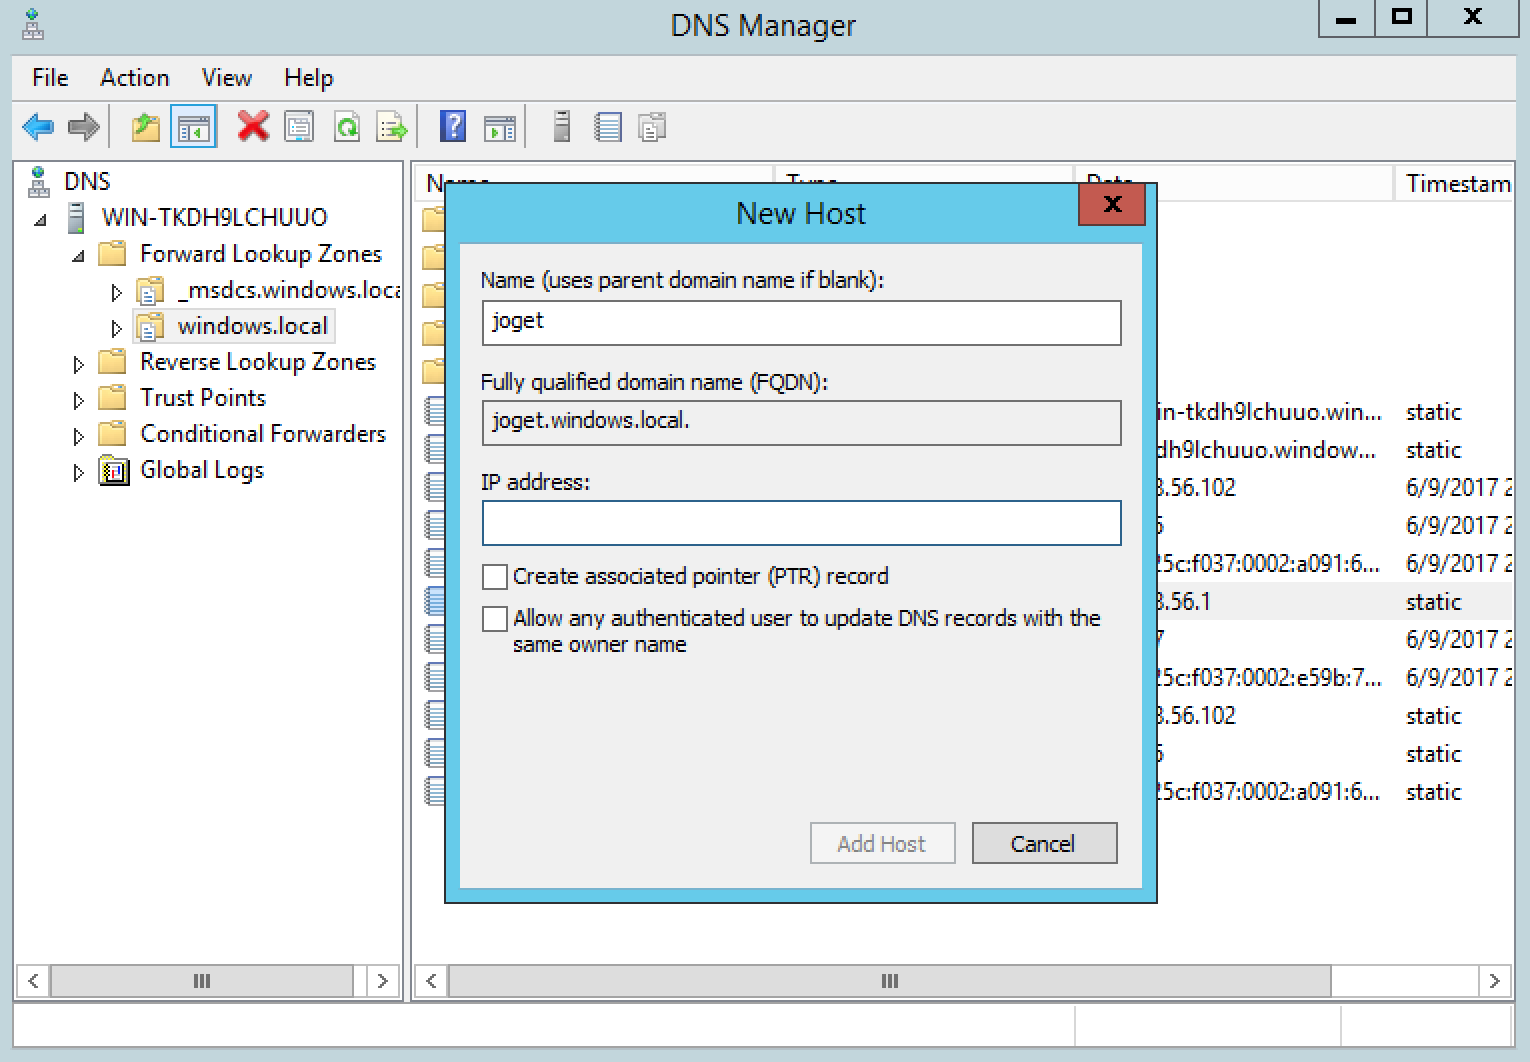
1.2 Add Joget Domain Name into the Windows Server DNS
...
In the windows.local DNS zone, add an A record for joget to point to the Joget server IP.
Thai ในโซน windows.local DNS เพิ่มระเบียน A สำหรับ joget เพื่อชี้ไปที่ IP เซิร์ฟเวอร์ Joget
Test ping to ensure that joget.windows.local resolves to the correct IP.
Thai ทดสอบ ping เพื่อให้แน่ใจว่า joget.windows.local แก้ไขเป็น IP ที่ถูกต้อง

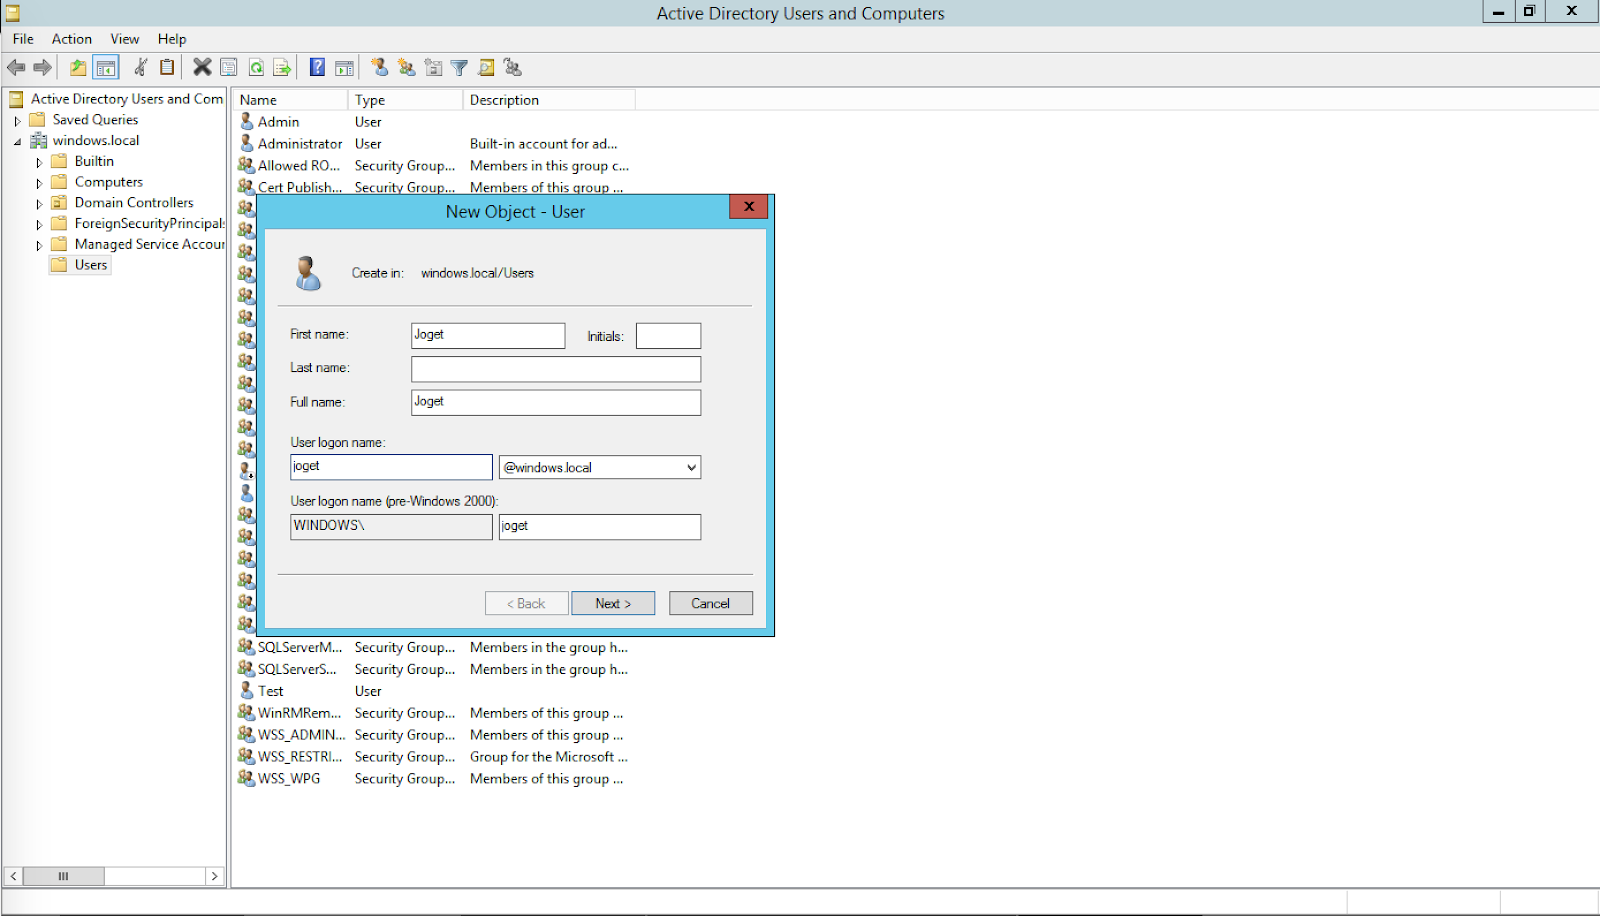
1.3 Create a Windows Domain User for the Service
...
In Active Directory Users and Computers, create a domain user joget. This is the user account to be mapped to the service name used by the Joget server.
Thai ในผู้ใช้ Active Directory และคอมพิวเตอร์สร้าง joget ผู้ใช้โดเมน นี่คือบัญชีผู้ใช้ที่จะแมปกับชื่อบริการที่ใช้โดยเซิร์ฟเวอร์ Joget
1.4 Register Service Principal Name (SPN)
...
In PowerShell, execute: setspn -s HTTP/{JOGET DOMAIN} {DOMAIN USER} e.g.
Thai ใน PowerShell ให้ดำเนินการ: setspn -s HTTP / {JOGET DOMAIN} {DOMAIN USER} เช่น
Code Block setspn -s HTTP/JOGET.WINDOWS.LOCAL joget
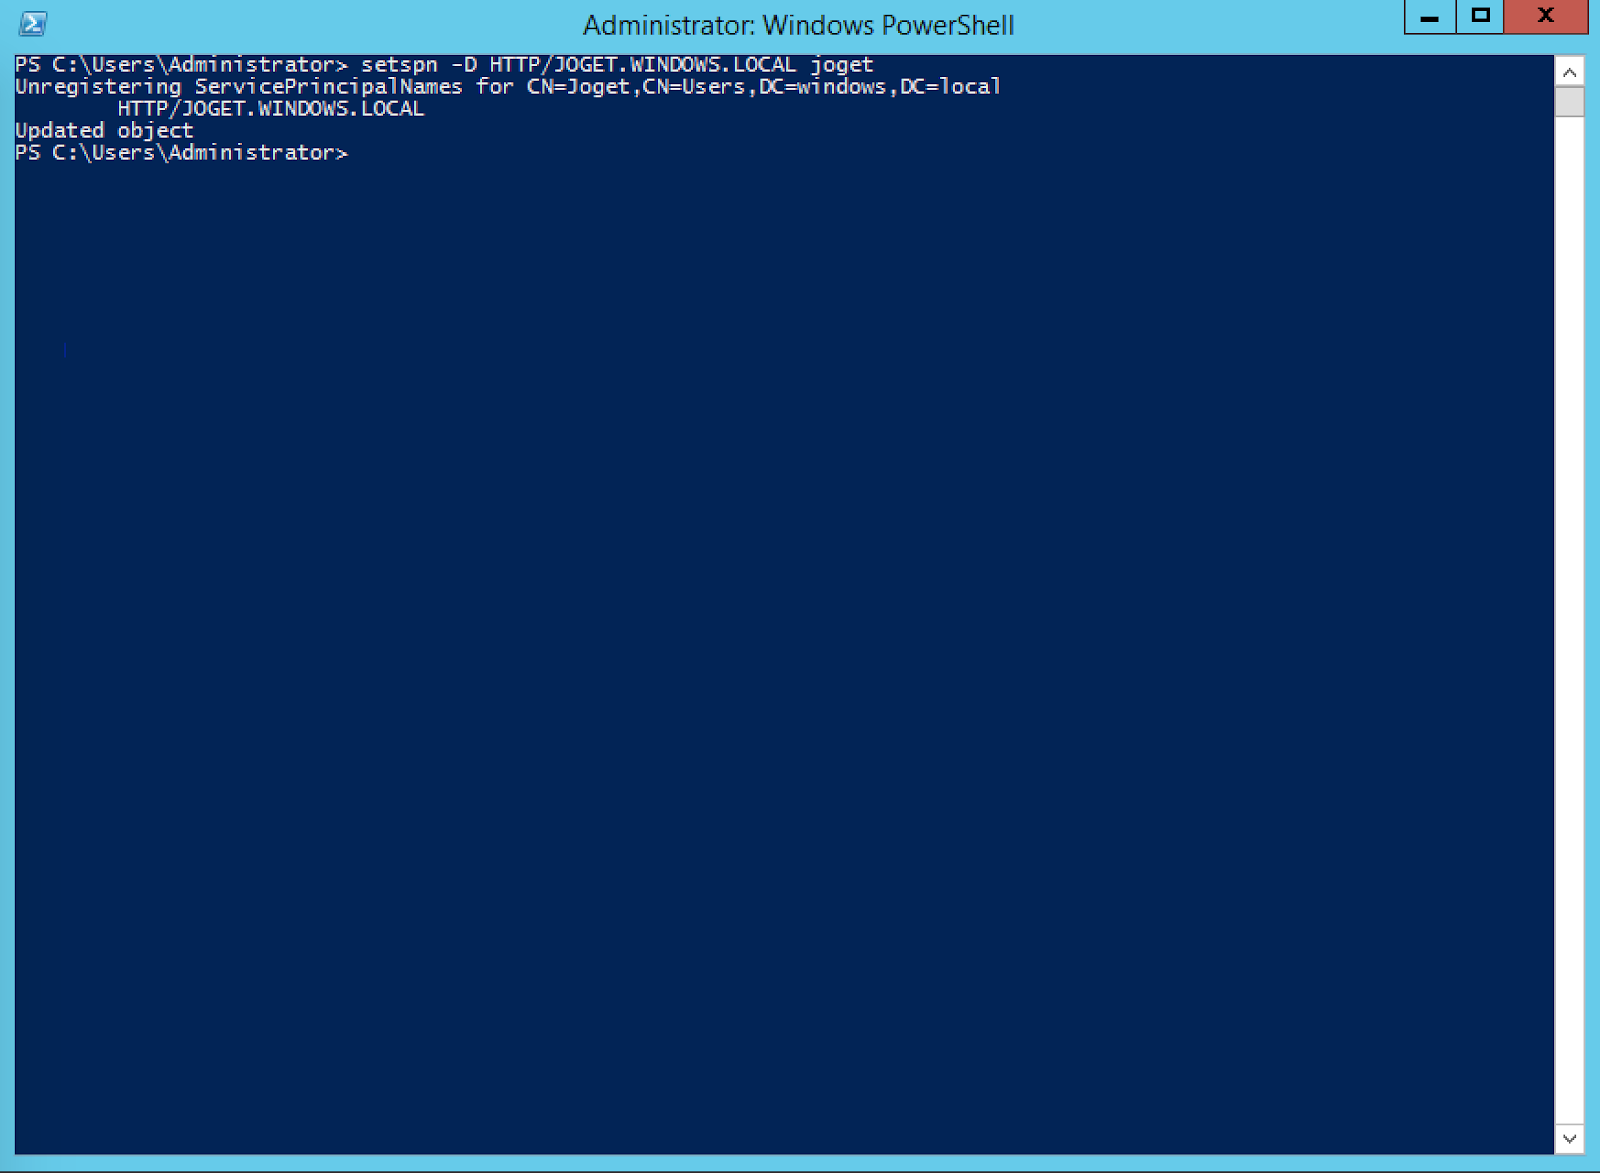
In PowerShell, check that the SPN has been registered
...
In PowerShell on the Windows Server, generate a keytab file using the Ktpass tool:
Thai ใน PowerShell บน Windows Server ให้สร้างไฟล์ตารางคีย์โดยใช้เครื่องมือ Ktpass:
Code Block ktpass -out joget.keytab -mapuser joget@WINDOWS.LOCAL -pass Pass@word1 -crypto all -ptype KRB5_NT_PRINCIPAL -princ HTTP/joget.windows.local@WINDOWS.LOCAL
Copy the generated joget.keytab file into the Joget server e.g. at C:\Joget-v6-Enterprise\wflow\joget.keytab
Thai คัดลอกไฟล์ joget.keytab ที่สร้างไปยังเซิร์ฟเวอร์ Joget เช่น ที่ C: \ Joget-v6-Enterprise \ wflow \ joget.keytab
Java 8 may be required for the Kerberos authentication to work with the ktpass generated keytab. Download and install JDK 8, and edit the tomcat-run.bat startup script to update the JAVA_HOME path accordingly.
Thai อาจจำเป็นต้องใช้ Java 8 สำหรับการพิสูจน์ตัวตน Kerberos เพื่อทำงานกับ ktpass keytab ที่สร้างขึ้น ดาวน์โหลดและติดตั้ง JDK 8 และแก้ไขสคริปต์เริ่มต้น tomcat-run.bat เพื่ออัปเดตพา ธ JAVA_HOME ตามลำดับ
Create a krb5.ini file under C:\Windows folder with these configurations:
Thai สร้างไฟล์ krb5.ini ภายใต้โฟลเดอร์ C: \ Windows ด้วยการกำหนดค่าเหล่านี้:
Code Block [libdefaults] default = WINDOWS.LOCAL default_realm = WINDOWS.LOCAL dns_lookup_realm = true dns_lookup_kdc = true [realms] WINDOWS.LOCAL = { kdc = WIN-TKDH9LCHUUO.WINDOWS.LOCAL:88 default_domain = WINDOWS.LOCAL } [domain_realm] .windows.local = WINDOWS.LOCAL windows.local = WINDOWS.LOCAL

...
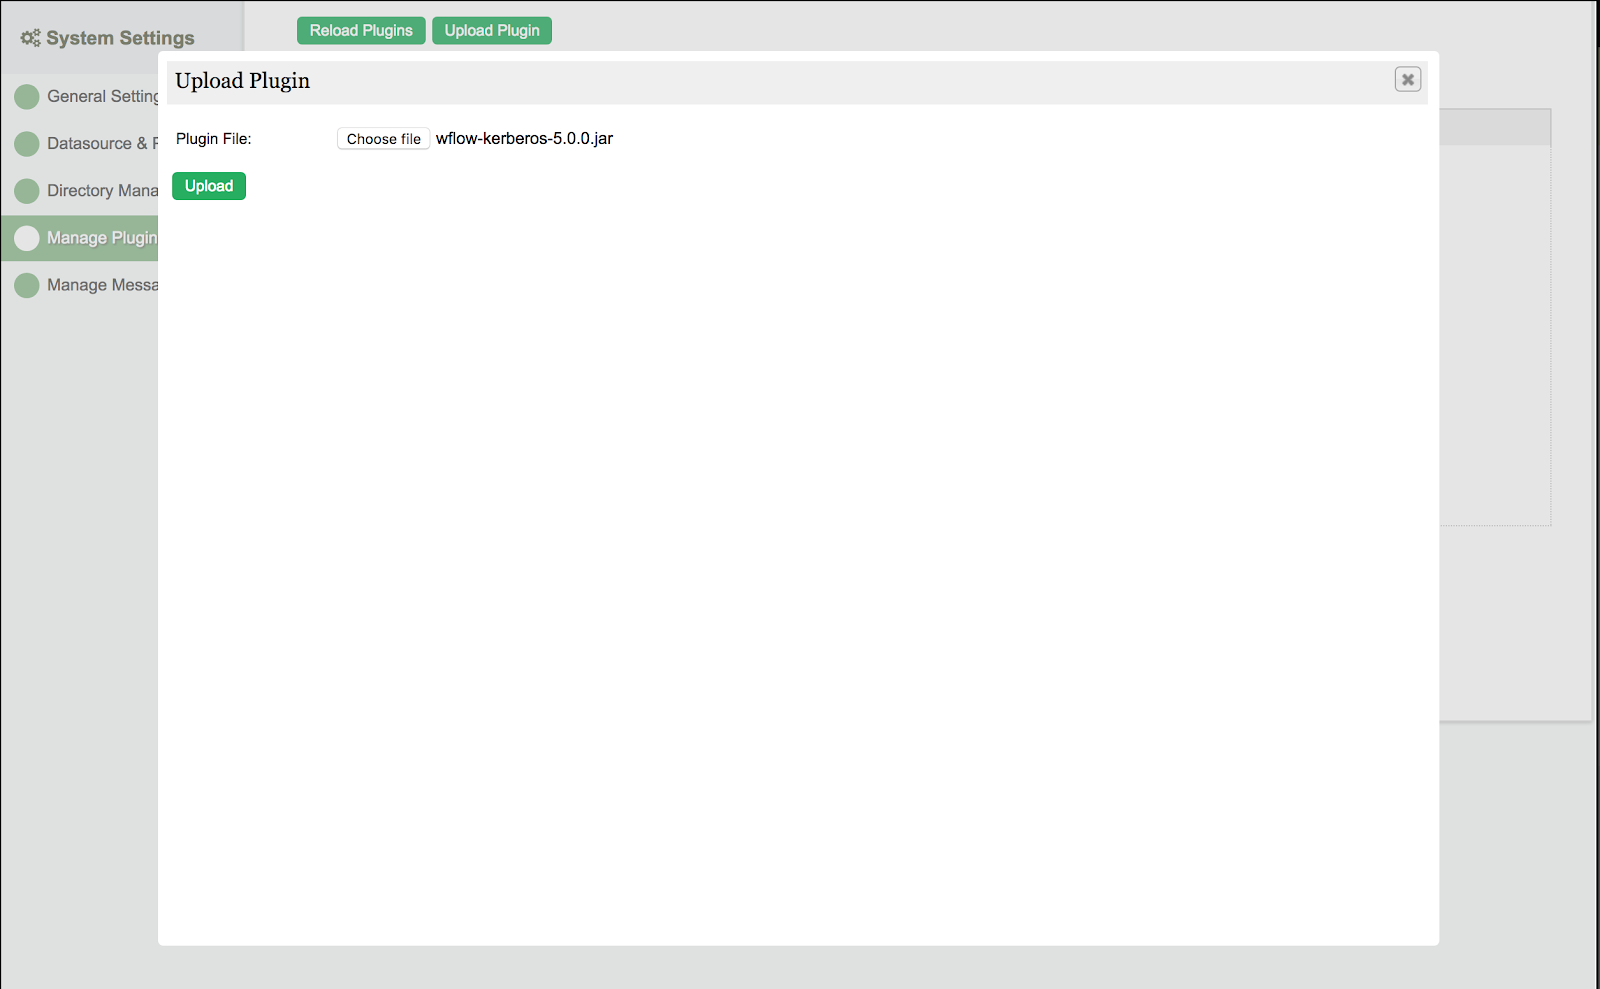
Download the Kerberos Directory Manager plugin from the Joget Marketplace and upload it in Settings > Manage Plugins.
Thai ดาวน์โหลดปลั๊กอิน Kerberos Directory Manager plugin จาก Joget Marketplace และอัปโหลดในการตั้งค่า> จัดการปลั๊กอิน
3.2 Configure Kerberos Directory Manager Plugin
...
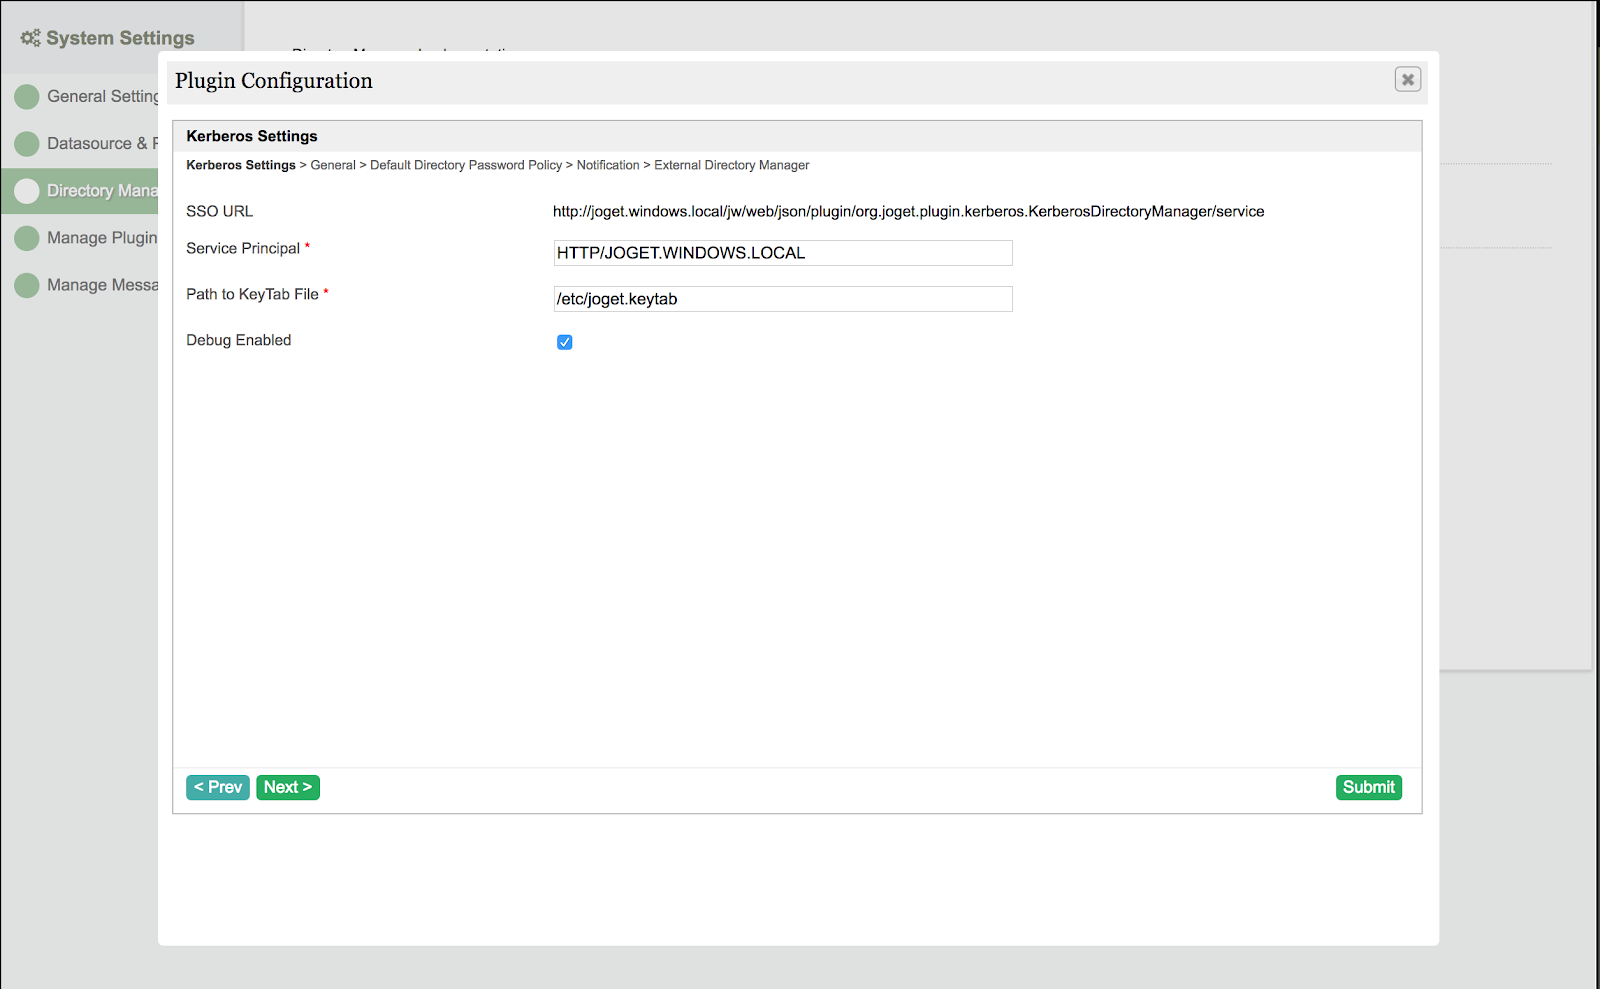
In Settings > Directory Manager, select the Kerberos Directory Manager plugin, and key in the appropriate values in the configuration:
Thai ในการตั้งค่า> ตัวจัดการไดเรกทอรีเลือกปลั๊กอิน Kerberos Directory Manager และป้อนค่าที่เหมาะสมในการกำหนดค่า:
Service Principal: HTTP/JOGET.WINDOWS.LOCAL
Path to Keytab File: /etc/joget.keytab (Linux) or C:/Joget-v6-Enterprise/wflow/joget.keytab (Windows)
Debug Enabled: View debugging messages in the logs
Note Please remember to configure the LDAP Directory Manager as external directory manager to retrieve users from Active Directory.
Thai โปรดจำไว้ว่าให้กำหนดค่าตัวจัดการไดเรกทอรี LDAP เป็นตัวจัดการไดเรกทอรีภายนอกเพื่อดึงผู้ใช้จาก Active Directory
...
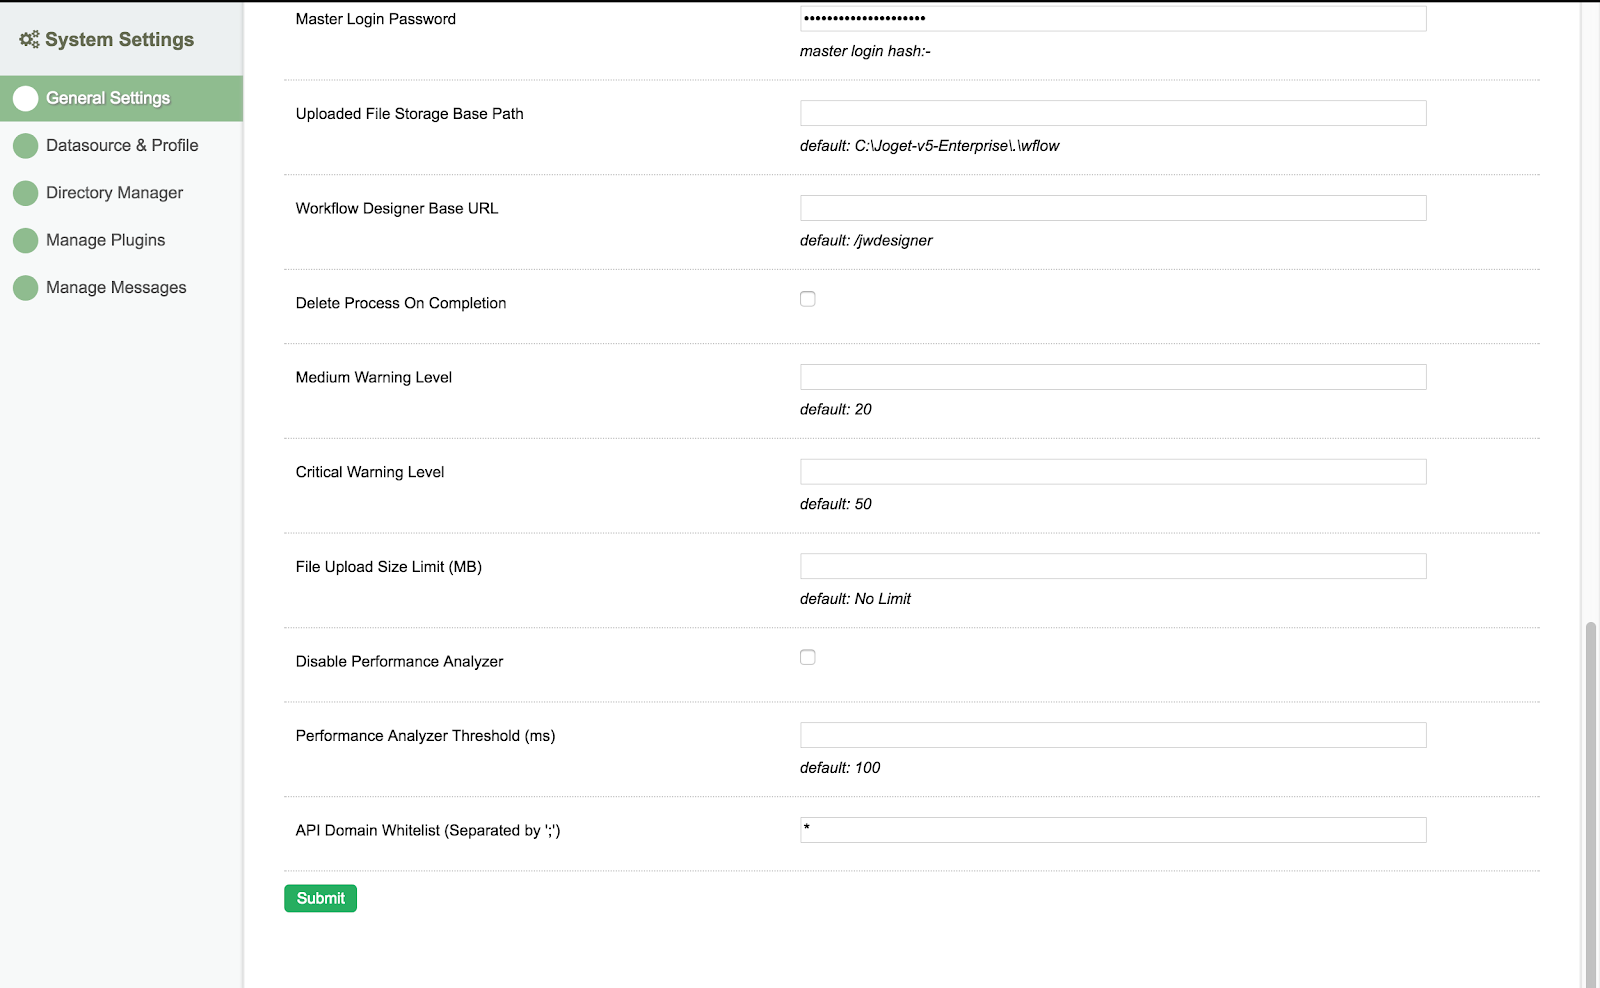
In Settings > General Settings, set the API Domain Whitelist to * to allow SSO requests to the Kerberos Directory Manager.
Thai ในการตั้งค่า> การตั้งค่าทั่วไปให้ตั้งค่ารายการโดเมนที่อนุญาตพิเศษเป็น * เพื่ออนุญาตให้คำขอ SSO เป็น Kerberos Directory Manager
4. Setup Client PC for SSO
...
Ensure that the Windows Server is reachable on the network from the Client PC.
Thai ตรวจสอบให้แน่ใจว่าเซิร์ฟเวอร์ Windows สามารถเข้าถึงได้บนเครือข่ายจากไคลเอนต์พีซี
Set the DNS server to the IP address of the Windows Server.
Thai ตั้งค่าเซิร์ฟเวอร์ DNS เป็นที่อยู่ IP ของ Windows Server
Ping the windows domain name to test.
Thai Ping ชื่อโดเมน windows เพื่อทดสอบ
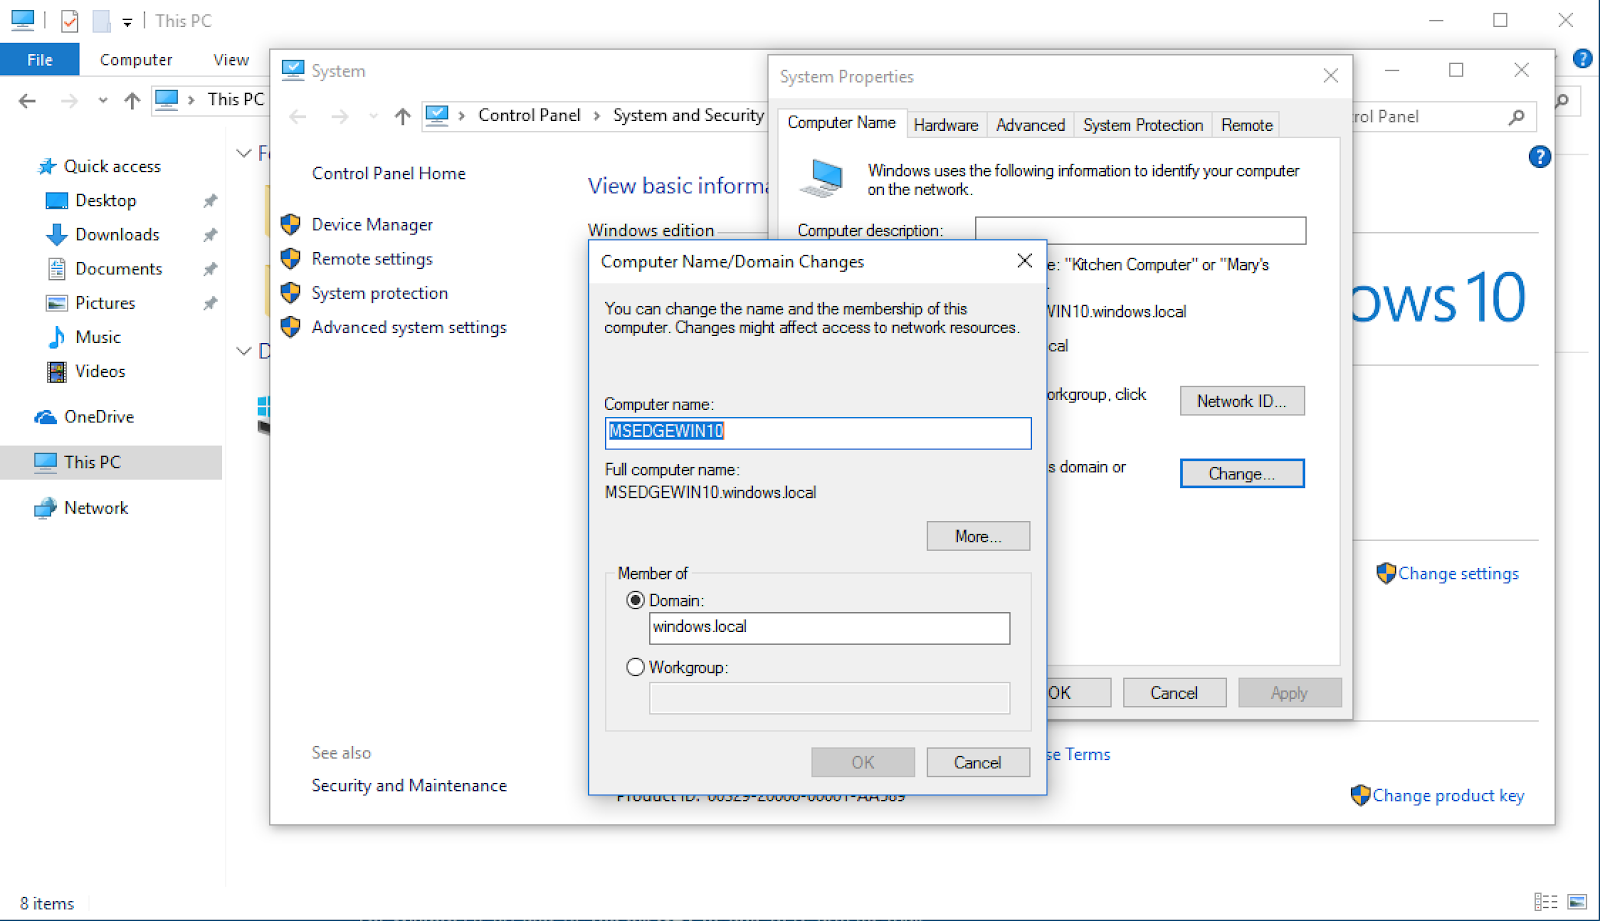
Click on File Explorer, right click on the This PC and choose Properties. Click on Change Settings next to the computer name. Click on Change and set the Domain e.g. windows.local, keying in the domain administrator login when prompted. Restart after joining the domain is successful, and login as a domain user.
Thai คลิกที่ File Explorer คลิกขวาที่พีซีนี้และเลือกคุณสมบัติ คลิกที่เปลี่ยนการตั้งค่าถัดจากชื่อคอมพิวเตอร์ คลิกที่เปลี่ยนและตั้งค่าโดเมนเช่น windows.local โดยพิมพ์ชื่อผู้ดูแลระบบโดเมนเมื่อได้รับแจ้ง รีสตาร์ทหลังจากเข้าร่วมโดเมนสำเร็จแล้วและเข้าสู่ระบบในฐานะผู้ใช้โดเมน


4.2 Setup Browser for Windows Authentication
...
In IE, click on Internet Options > Security > Local intranet site > Advanced and add the Joget domain e.g. http://joget.windows.local
Thai ใน IE คลิกที่ตัวเลือกอินเทอร์เน็ต> ความปลอดภัย> ไซต์อินทราเน็ตเฉพาะที่> ขั้นสูงและเพิ่มโดเมน Joget เช่น http: //joget.windows.local

4.3 Test the SSO
...