| Table of Contents |
|---|
Introduction to Kubernetes
| Thai |
|---|
รู้เบื้องต้นเกี่ยวกับ Kubernetes |
Kubernetes is the leading open source container orchestration platform. Originally created by Google based on their need to support massive scale, Kubernetes is now under the purview of Cloud Native Computing Foundation (CNCF), a vendor-neutral foundation managing popular open source projects.
There are several basic and essential concepts that need to be understood:
| Thai |
|---|
Kubernetes เป็นแพลตฟอร์มโอเพ่นซอร์สคอนเทนเนอร์ เดิมทีสร้างโดย Google ตามความต้องการของพวกเขาในการสนับสนุนขนาดใหญ่ตอนนี้ Kubernetes อยู่ภายใต้ขอบเขตของ Cloud Native Computing Foundation Computing Foundation (CNCF) สำหรับผู้ขายที่จัดการโครงการโอเพ่นซอร์สยอดนิยม มีแนวคิดพื้นฐานและจำเป็นหลายประการที่ต้องเข้าใจ: |
A Kubernetes cluster consists of one or more nodes. Nodes are machines (VMs, physical servers, etc) that run the applications.
Thai คลัสเตอร์ Kubernetes ประกอบด้วยหนึ่งโหนดขึ้นไป Nodes คือเครื่อง (VM, ฟิสิคัลเซิร์ฟเวอร์ ฯลฯ ) ที่รันแอ็พพลิเคชัน
A Pod is the smallest Kubernetes object that contains one or more containers, storage resources, network IP and other configuration.
Thai Pod เป็นวัตถุ Kubernetes ที่เล็กที่สุดที่มีหนึ่งคอนเทนเนอร์ขึ้นไปทรัพยากรหน่วยเก็บข้อมูล IP เครือข่ายและการกำหนดค่าอื่น ๆ
A Service defines a set of Pods and how they are accessed.
Thai ไดรฟ์ข้อมูล Service เป็นที่เก็บข้อมูลที่ใช้ร่วมกันสำหรับตู้คอนเทนเนอร์และรองรับหลายประเภท
A Volume is a shared storage for containers, and many different types are supported.
Thai ไดรฟ์ข้อมูล Volume เป็นที่เก็บข้อมูลที่ใช้ร่วมกันสำหรับตู้คอนเทนเนอร์และรองรับหลายประเภท
These Kubernetes objects are defined in YAML format in .yaml files
Thai วัตถุ Kubernetes เหล่านี้ถูกกำหนดในรูปแบบ YAML ในไฟล์. yaml
A command line interface tool, kubectl, is used to manage these objects via the Kubernetes API.
Thai เครื่องมืออินเตอร์เฟสบรรทัดคำสั่ง kubectl, ใช้เพื่อจัดการวัตถุเหล่านี้ผ่าน Kubernetes API.
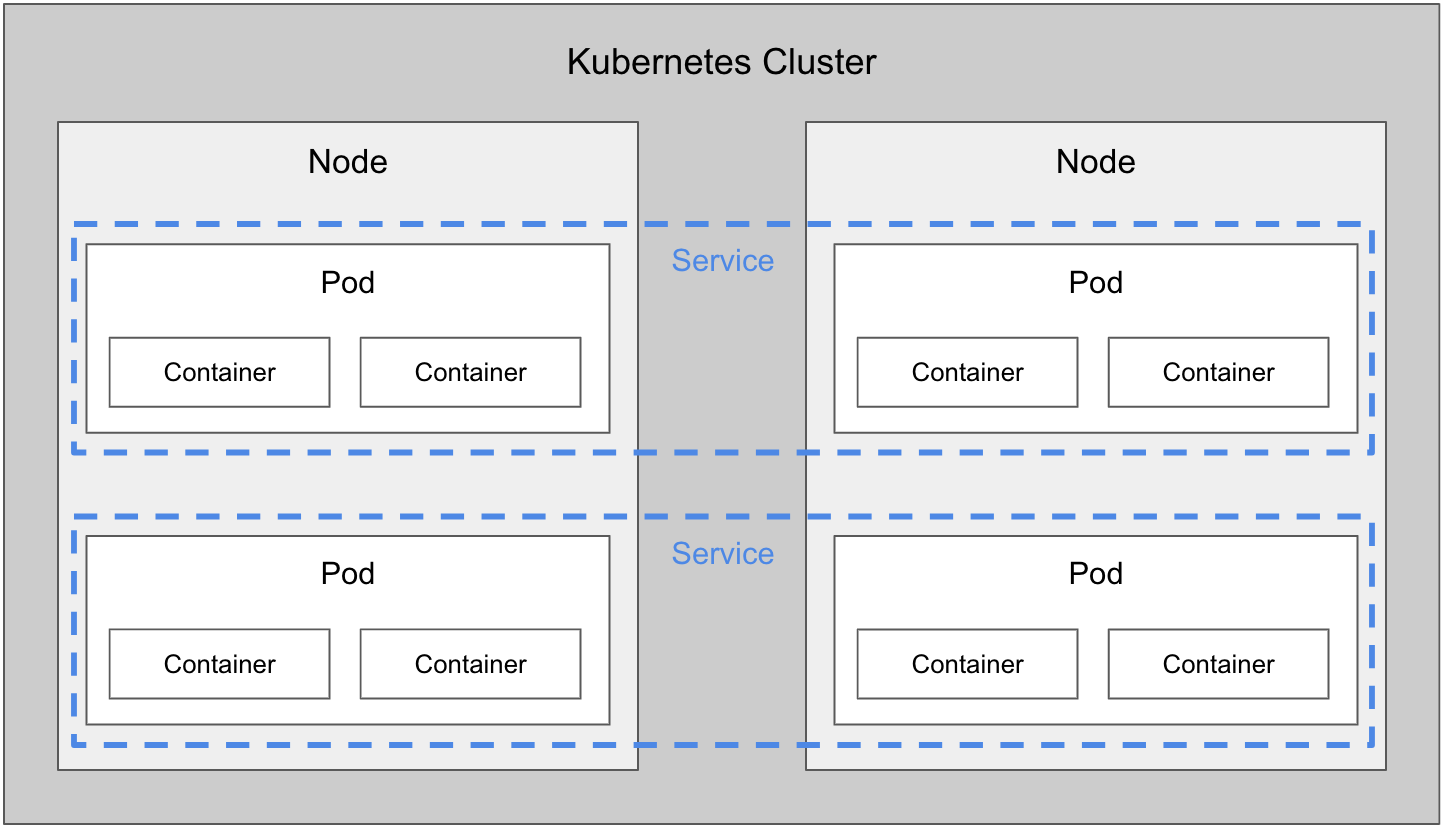
Simplified view of Kubernetes objects
| Thai |
|---|
มุมมองแบบย่อของวัตถุ Kubernetes |
There are many more concepts in Kubernetes, but the basic ones above should suffice to get started with Kubernetes.
There are many Kubernetes solutions available for different requirements from different providers, ranging from community tools for local testing, to production environments from cloud providers and enterprise vendors.
| Thai |
|---|
มีแนวคิดเพิ่มเติม many more concepts แต่แนวคิดพื้นฐานข้างต้นควรจะพอเพียงในการเริ่มต้นกับ Kubernetes มีโซลูชั่น Kubernetes มากมายสำหรับความต้องการที่แตกต่างจาก different providers ตั้งแต่เครื่องมือของชุมชนสำหรับการทดสอบในท้องถิ่นไปจนถึงสภาพแวดล้อมการผลิตจากผู้ให้บริการคลาวด์และผู้ขายขององค์กร |
For the purpose of this tutorial we’ll use Minikube, a tool that runs a single-node Kubernetes cluster in a virtual machine for local development and testing. We’ll be using a Mac running macOS, but you can adapt the instructions for your OS.
| Thai |
|---|
สำหรับจุดประสงค์ของการสอนนี้เราจะใช้ Minikube เป็นเครื่องมือที่รันคลัสเตอร์ Kubernetes แบบโหนดเดียวในเครื่องเสมือนสำหรับการพัฒนาและทดสอบในท้องถิ่น เราจะใช้ Mac ที่ใช้ macOS แต่คุณสามารถปรับคำแนะนำสำหรับระบบปฏิบัติการของคุณได้ |
Install VirtualBox
| Thai |
|---|
ติดตั้ง VirtualBox |
The first step is to install a VM platform. We’ll use the open source VirtualBox as the VM platform. Follow the download and installation instructions at https://www.virtualbox.org/wiki/Downloads
| Thai |
|---|
ขั้นตอนแรกคือการติดตั้งแพลตฟอร์ม VM เราจะใช้ VirtualBox โอเพ่นซอร์สเป็นแพลตฟอร์ม VM ทำตามคำแนะนำในการดาวน์โหลดและติดตั้งที่ https://www.virtualbox.org/wiki/Downloads |
Install kubectl
| Thai |
|---|
ติดตั้ง kubectl |
The next step is to install the Kubernetes command-line tool, kubectl, which allows you to run commands against Kubernetes clusters e.g. deploy applications, inspect resources, view logs, etc.
| Thai |
|---|
ขั้นตอนต่อไปคือการติดตั้งเครื่องมือบรรทัดคำสั่ง Kubernetes, kubectl ซึ่งช่วยให้คุณสามารถเรียกใช้คำสั่งกับกลุ่ม Kubernetes เช่น ปรับใช้แอปพลิเคชันตรวจสอบทรัพยากรดูบันทึก ฯลฯ |
1. Download and set executable:
| Thai |
|---|
ดาวน์โหลดและตั้งค่าปฏิบัติการ: |
| Code Block |
|---|
curl -LO https://storage.googleapis.com/kubernetes-release/release/$(curl -s https://storage.googleapis.com/kubernetes-release/release/stable.txt)/bin/darwin/amd64/kubectl \ && chmod +x ./kubectl |
2. Move the binary to your PATH:
| Thai |
|---|
ย้ายไบนารีไปยัง PATH ของคุณ: |
| Code Block |
|---|
sudo mv ./kubectl /usr/local/bin/kubectl |
3. Test to ensure the version you installed is up-to-date:
| Thai |
|---|
ทดสอบเพื่อให้แน่ใจว่าเวอร์ชั่นที่คุณติดตั้งเป็นปัจจุบัน: |
| Code Block |
|---|
kubectl version |
Full instructions are at https://kubernetes.io/docs/tasks/tools/install-kubectl/
| Thai |
|---|
คำแนะนำแบบเต็มสามารถดูได้ที่ https://kubernetes.io/docs/tasks/tools/install-kubectl/ |
Install Minikube
| Thai |
|---|
ติดตั้ง Minikube |
Now let’s install Minikube, a tool that runs a single-node Kubernetes cluster in a virtual machine on your laptop.
| Thai |
|---|
ตอนนี้ขอติดตั้ง Minikube เครื่องมือที่รันคลัสเตอร์ Kubernetes แบบโหนดเดียวในเครื่องเสมือนบนแล็ปท็อปของคุณ |
1. Download and set executable:
| Thai |
|---|
ดาวน์โหลดและตั้งค่าปฏิบัติการ: |
| Code Block |
|---|
curl -Lo minikube https://storage.googleapis.com/minikube/releases/latest/minikube-darwin-amd64 \ && chmod +x minikube |
2. Move the binary to your PATH:
| Thai |
|---|
ย้ายไบนารีไปยัง PATH ของคุณ: |
| Code Block |
|---|
sudo mv minikube /usr/local/bin |
Full instructions are available at https://kubernetes.io/docs/tasks/tools/install-minikube/
| Thai |
|---|
คำแนะนำแบบเต็มสามารถดูได้ที่ https://kubernetes.io/docs/tasks/tools/install-minikube/ |
Start Minikube
| Thai |
|---|
เริ่ม Minikube |
1. Start Minikube and create a cluster:
| Thai |
|---|
เริ่ม Minikube และสร้างคลัสเตอร์: |
| Code Block |
|---|
minikube start |
The output will be similar to this:
| Thai |
|---|
ผลลัพธ์จะคล้ายกับสิ่งนี้: |
| Code Block |
|---|
minikube v1.8.1 on Darwin 10.14.6 Automatically selected the hyperkit driver Downloading VM boot image ... Creating hyperkit VM (CPUs=2, Memory=3072MB, Disk=20000MB) ... Preparing Kubernetes v1.17.3 on Docker 19.03.6 ... Launching Kubernetes ... Enabling addons: default-storageclass, storage-provisioner Waiting for cluster to come online ... Done! kubectl is now configured to use "minikube" |
2. Install Ingress on Minikube for external access:
| Code Block |
|---|
minikube addons enable ingress |
Test Minikube Installation
| Thai |
|---|
ทดสอบการติดตั้ง Minikube |
1. Run a sample HTTP application
| Thai |
|---|
เรียกใช้แอปพลิเคชัน HTTP ตัวอย่าง |
| Code Block |
|---|
kubectl create deployment hello-minikube --image=k8s.gcr.io/echoserver:1.10 |
2. Expose the service so that external connections can be made
| Thai |
|---|
เปิดเผยบริการเพื่อให้การเชื่อมต่อภายนอกสามารถทำได้ |
| Code Block |
|---|
kubectl expose deployment hello-minikube --type=NodePort --port=8080 |
3. Inspect the pod
| Thai |
|---|
ตรวจสอบพ็อด |
| Code Block |
|---|
kubectl get pod |
4. Once the STATUS is Running, test the service using curl
| Thai |
|---|
เมื่อสถานะกำลังทำงานให้ทดสอบบริการโดยใช้ curl |
| Code Block |
|---|
curl $(minikube service hello-minikube --url) |
5. Delete the service and deployment
| Thai |
|---|
ลบบริการและการปรับใช้ |
| Code Block |
|---|
kubectl delete services hello-minikube kubectl delete deployment hello-minikube |
Full instructions are available at https://kubernetes.io/docs/setup/minikube/#quickstart
| Thai |
|---|
คำแนะนำแบบเต็มสามารถดูได้ที่ https://kubernetes.io/docs/setup/minikube/#quickstart |
Deploy MySQL on Kubernetes
| Thai |
|---|
ใช้งาน MySQL บน Kubernetes |
To deploy a MySQL database image, we’ll use an example YAML file provided in the kubernetes website k8s.io.
| Thai |
|---|
ในการปรับใช้อิมเมจฐานข้อมูล MySQL เราจะใช้ตัวอย่างไฟล์ YAML ที่ให้ไว้ในเว็บไซต์ kubernetes k8s.io |
1. Create persistent storage using PersistentVolume and PersistentVolumeClaim
| Thai |
|---|
สร้างหน่วยเก็บข้อมูลถาวรโดยใช้ PersistentVolume and PersistentVolumeClaim |
| Code Block |
|---|
kubectl apply -f https://k8s.io/examples/application/mysql/mysql-pv.yaml |
2. Deploy the MySQL image
| Thai |
|---|
ปรับใช้อิมเมจ MySQL |
| Code Block |
|---|
kubectl apply -f https://k8s.io/examples/application/mysql/mysql-deployment.yaml |
3. Inspect the deployment
| Thai |
|---|
ตรวจสอบการปรับใช้ |
| Code Block |
|---|
kubectl describe deployment mysql kubectl get pods -l app=mysql kubectl describe pvc mysql-pv-claim |
4. Run MySQL client to test
| Thai |
|---|
เรียกใช้ไคลเอนต์ MySQL เพื่อทดสอบ |
| Code Block |
|---|
kubectl run -it --rm --image=mysql:5.6 --restart=Never mysql-client -- mysql -h mysql -ppassword |
Full instructions are available at https://kubernetes.io/docs/tasks/run-application/run-single-instance-stateful-application/
| Thai |
|---|
คำแนะนำแบบเต็มสามารถดูได้ที่ https://kubernetes.io/docs/tasks/run-application/run-single-instance-stateful-application/ |
Deploy Joget on Kubernetes
| Thai |
|---|
ปรับใช้ Joget บน Kubernetes |
Once the MySQL database is running, let’s run a Docker image for Joget Enterprise that connects to that MySQL service.
1. Deploy joget image using an example YAML file. Download the contents of joget-dx7-tomcat9-deployment.yaml into a file with the same name and run kubectl.
| Thai |
|---|
เมื่อฐานข้อมูล MySQL ทำงานแล้วให้เรียกใช้อิมเมจ Docker image for Joget Enterprise ที่เชื่อมต่อกับบริการ MySQL นั้น 1. ปรับใช้อิมเมจ joget โดยใช้ไฟล์ YAML ตัวอย่าง ดาวน์โหลดเนื้อหาของ joget-dx7-tomcat9-deployment.yaml ลงในไฟล์ที่มีชื่อเดียวกันและรัน kubectl |
| View file | ||||
|---|---|---|---|---|
|
| Code Block |
|---|
kubectl apply -f joget-dx7-tomcat9-deployment.yaml |
2. Inspect the deployment
| Thai |
|---|
ตรวจสอบการปรับใช้ |
| Code Block |
|---|
kubectl describe deployment joget-dx7-tomcat9 kubectl get pods -l app=joget-dx7-tomcat9 |
3. Once the STATUS is Running, get the URL for the service
| Thai |
|---|
เมื่อสถานะกำลังทำงานให้รับ URL สำหรับบริการ |
| Code Block |
|---|
minikube service joget-dx7-tomcat9 --url |
4. Access the URL in a browser in the path to access the Joget App Center e.g. http://192.168.99.100:32496/
| Thai |
|---|
เข้าถึง URL ในเบราว์เซอร์ที่มี / jw เพิ่มเติมในเส้นทางเพื่อเข้าถึง Joget App Center เช่น http://192.168.99.100:32496/ |

You now have a running installation of Joget, and you’ll be able to visually build a full app in 30 minutes without coding.
| Thai |
|---|
ตอนนี้คุณกำลังติดตั้ง Joget และคุณสามารถสร้าง visually build a full app in 30 minutes without coding. |
Scale Joget Deployment
| Thai |
|---|
ปรับใช้ Joget เป็นสเกล |
Now we can demonstrate how Kubernetes can be used to manually increase and decrease the number of Pods running.
| Thai |
|---|
ตอนนี้เราสามารถแสดงให้เห็นว่าคูเบอร์เน็ตสามารถใช้เพิ่มและลดจำนวน Pods ที่ทำงานด้วยตนเองได้อย่างไร |
1. Scale the deployment to 2 pods (called replicas)
| Thai |
|---|
ปรับขนาดการปรับใช้เป็น 2 พ็อด (เรียกว่าแบบจำลอง) |
| Code Block |
|---|
kubectl scale --replicas=2 deployment joget-dx7-tomcat9 |
2. Examine the running pods, and you should see 2 pods running Joget
| Thai |
|---|
ตรวจสอบพ็อดที่กำลังทำงานและคุณจะเห็น 2 พ็อดที่รัน Joget |
| Code Block |
|---|
kubectl get pods NAME READY STATUS RESTARTS AGE joget-dx7-tomcat9-7d879db895-c9sbb 1/1 Running 0 27s joget-dx7-tomcat9-7d879db895-wpnsf 1/1 Running 0 37m mysql-7b9b7999d8-lk9gq 1/1 Running 0 65m |
3. Scale the deployment down to 1 pod
| Thai |
|---|
ลดขนาดการปรับใช้ลงเหลือ 1 พ็อด |
| Code Block |
|---|
kubectl scale --replicas=1 deployment joget-dx7-tomcat9 |
4. Examine the running pods, and you should now see 1 pod running Joget.
| Thai |
|---|
ตรวจสอบพ็อดที่กำลังวิ่งและตอนนี้คุณควรเห็น 1 พ็อดที่ใช้ Joget |
| Code Block |
|---|
kubectl get pods |