Introduction to UiPath
UiPath Overview
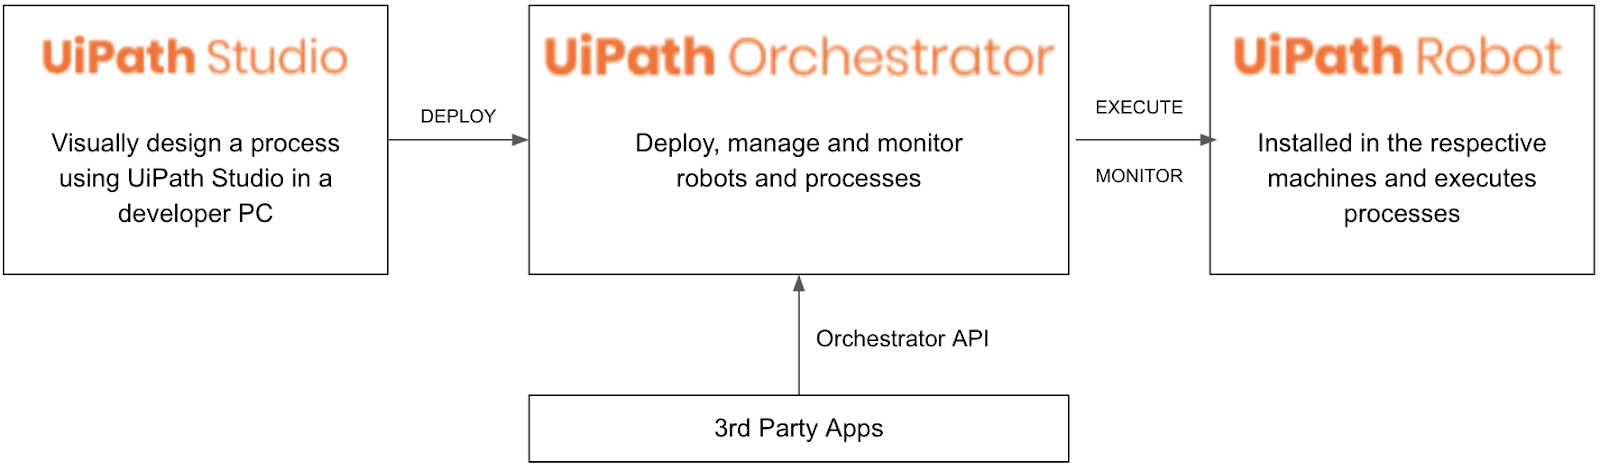
UiPath Component Architecture
UiPath Studio: UI tool to visually design the process to automate
UiPath Orchestrator: Web application that manages the creation, monitoring, and deployment of all robots and processes
UiPath Robot: Runs processes that were built in UiPath Studio. Execution agent that is installed and executed in the actual machine.
UiPath Concepts and Terms
Here are some of the basic concepts and terms in UiPath that you should get familiar with for the tutorial later:Machine: Represents the actual machine the robot executes in
Environment: An environment is a grouping of Robots, that is used to deploy processes
Package: A UiPath Studio project that is published
Process: A process represents the association between a package and an environment. Each time a package is deployed to an environment, it is automatically distributed to all machines that belong to that environment.
Job: A job is the execution of a process on one or multiple Robots.
There are other concepts for more advanced usage that will not be used in the tutorial, such as:
Library: A process library describes a system of activities that are reusable for sharing
Schedule: Enables jobs to be executed in a preplanned manner
Asset: Usually represent shared variables or credentials that can be used in different projects.
Queue: A place to store multiple types of data, such as invoice information or customer details.
Get Started with UiPath
Step 1: Sign Up for UiPath Cloud Platform
Let’s sign up for an account at https://www.uipath.com/platform-trial.
Sign up using a social account or an email, and upon registration you will be taken to a dashboard at https://platform.uipath.com.
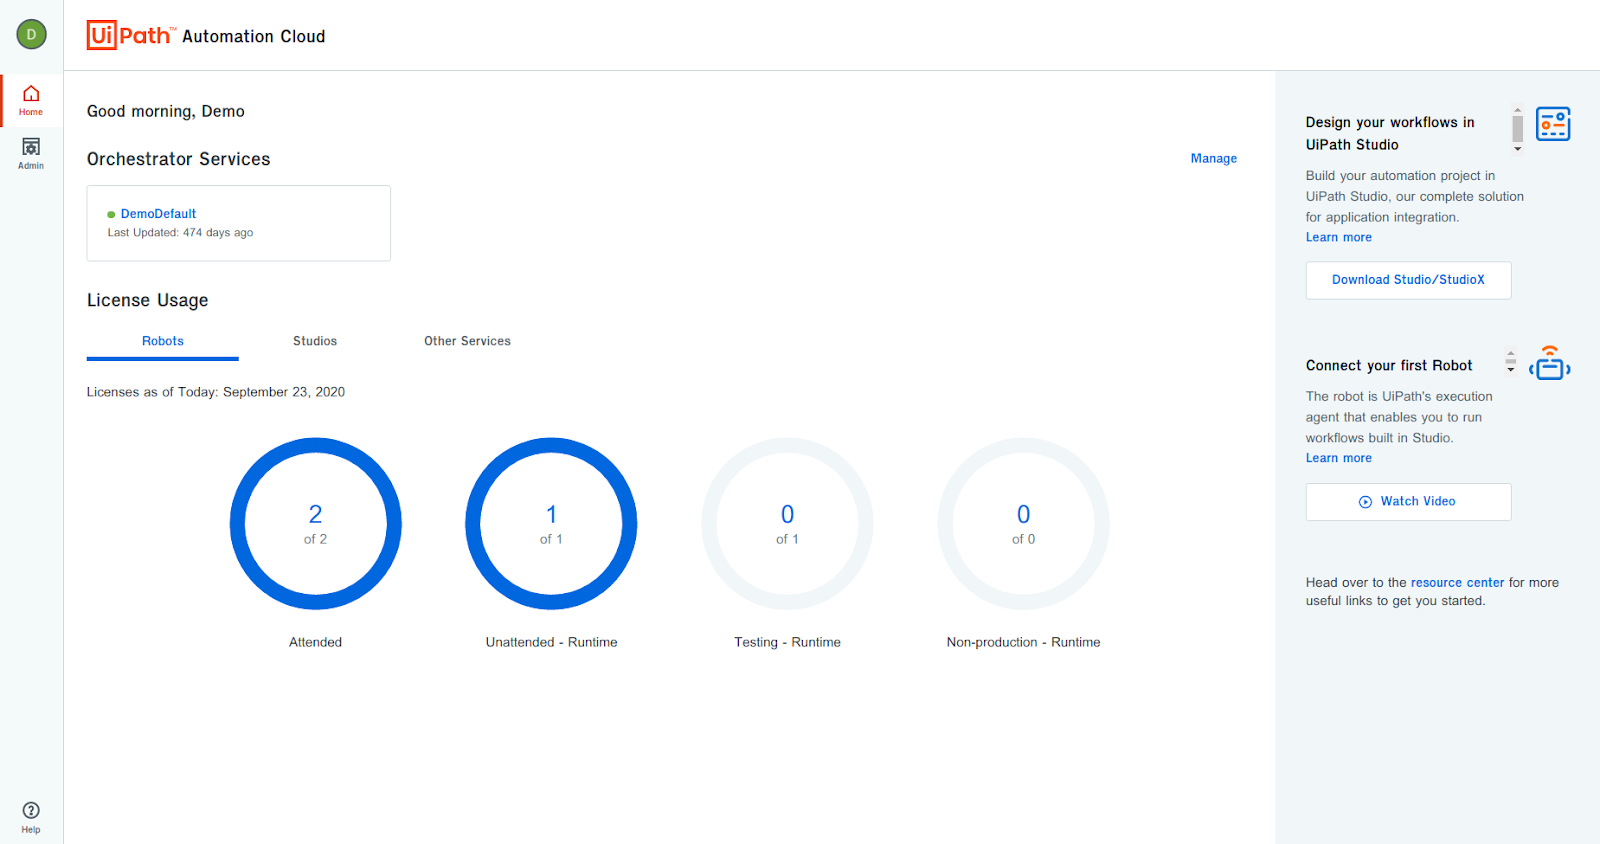
A service represents a deployment in the company. A default service is already created e.g. DemoDefault.
Select the service name to open the UiPath Orchestrator web application.

Step 2: Install UiPath Studio
Download the UiPath Studio installer (UiPathStudioSetup.exe) from the Resource Center, and install it on the target computer. More information on UiPath Studio is available at the UiPath Studio Guide.
After installing UiPathStudioSetup.exe, start UiPath Studio from the Windows Start menu and login using the UiPath account created previously. Choose a profile to use, e.g. UiPath Studio.


Step 3: Launch UiPath Assistant
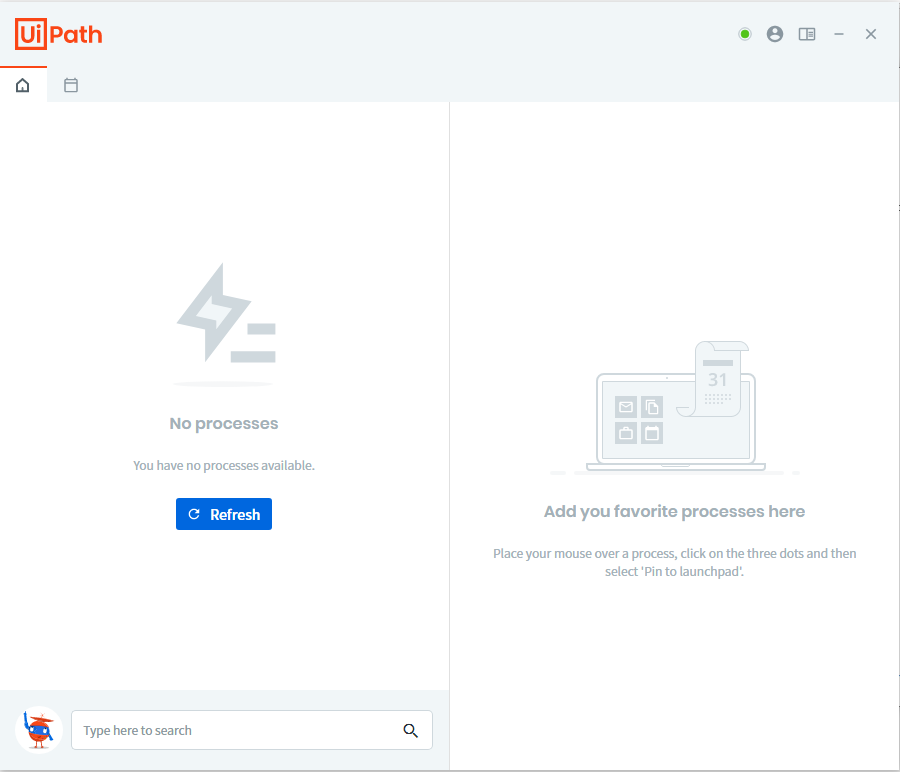
In the Windows Start menu, search for UiPath Assistant and start it.
Choose an image, give the robot a name e.g. DemoRobot and click on Get Started to create the robot.
Once the robot is created, it will automatically connect and register itself to the UiPath Orchestrator.
In the UiPath Orchestrator, browse to Tenant > Robots and you should see the robot created in the listing.

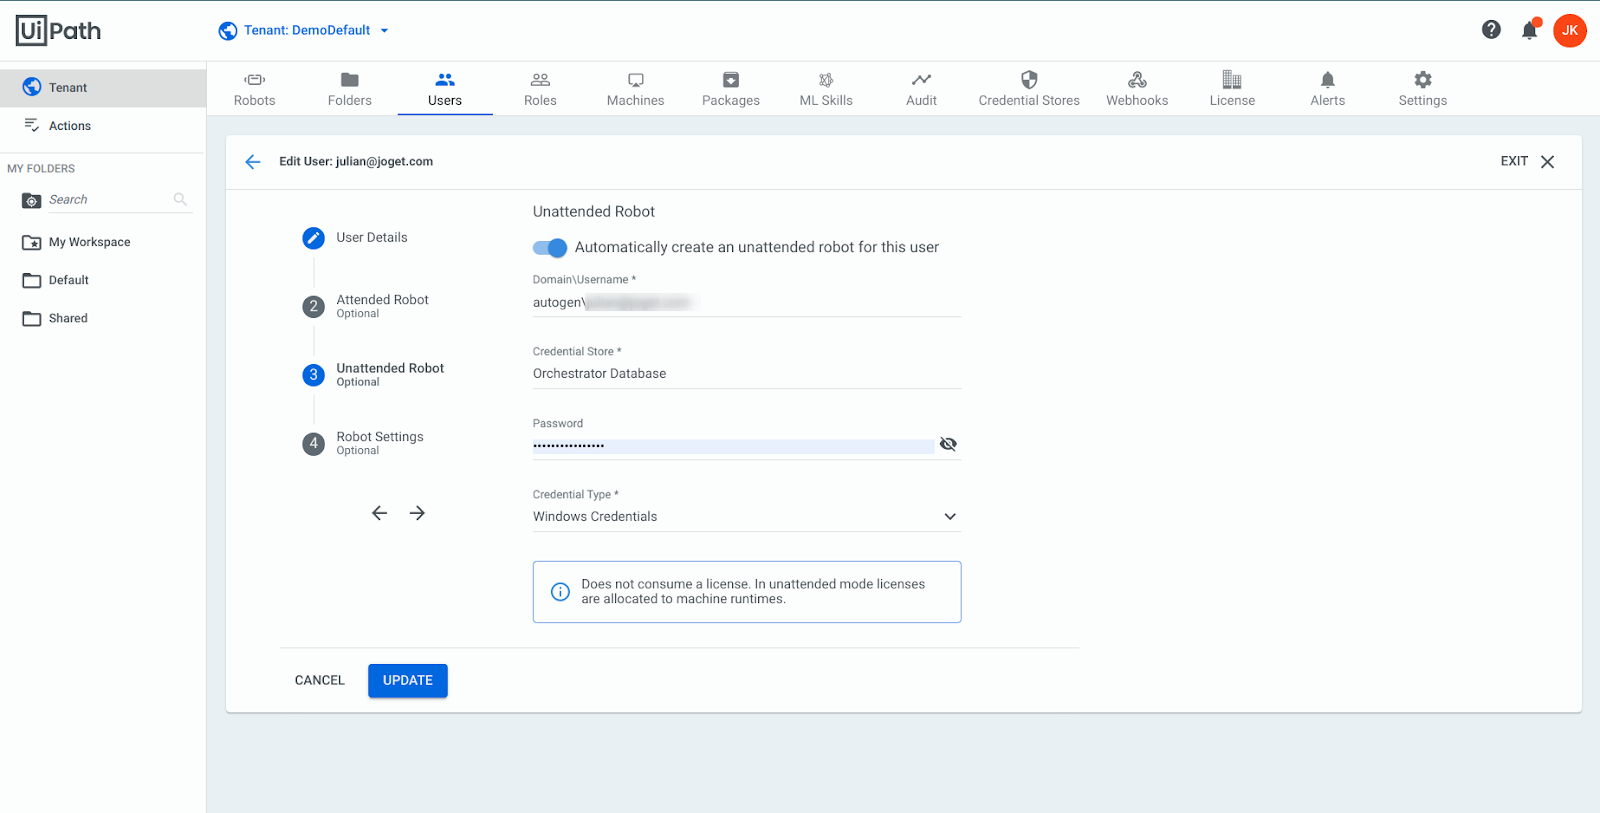
Next, we will create an Unattended Robot that does not require human supervision to execute jobs. In the UiPath Orchestrator, browse to Tenant > Users and select Edit in the menu for your user account.

Click on Unattended Robot, enable the “Automatically create an unattended robot for this user” switch, fill in the Windows user credentials and Update.
Step 4: Create and Publish a Process
Next, let’s create an automation process and publish it. Follow the Creating Your First Automation Project tutorial in the UiPath documentation. In that page, there is also a ZIP file containing the completed sample project that you can download.

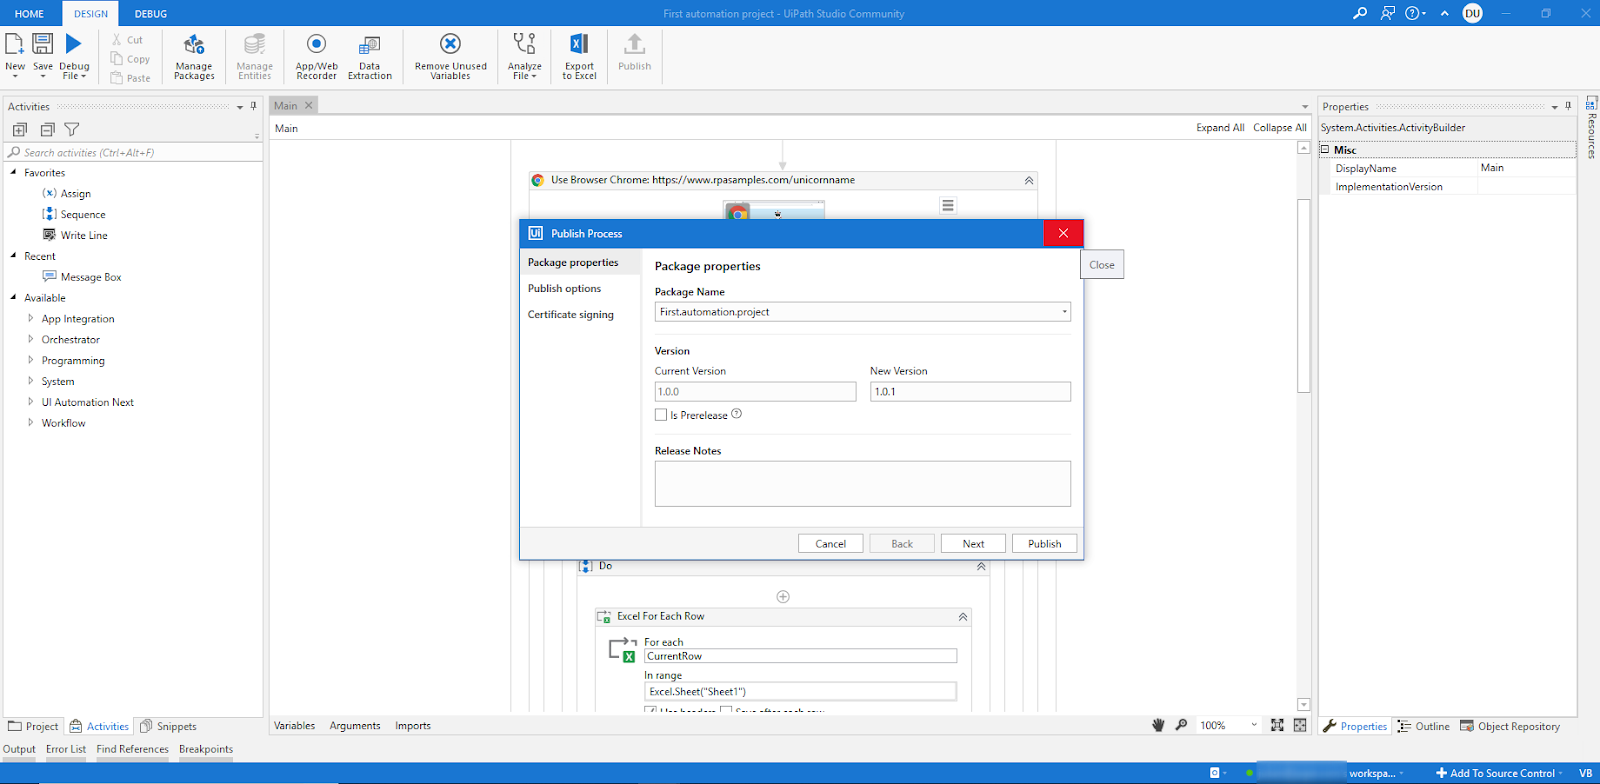
Once you have completed the project, click on the Publish button in the top toolbar.

Fill in the package properties (you can leave the default values) and click on Publish.
Once the project has been published, you will see it in the UiPath Assistant.

In the UiPath Orchestrator, browse to My Workspace > Automations and you will see the process under listed under Processes.

Step 5: Start a Job
Now that the robot is published, it’s time to start a job to test it. In the UiPath Orchestrator click on the Play icon on the right of the process in the Processes list. Click on the Start button.

In the UiPath Assistant, the robot will be installed and executed.

In the UiPath Orchestrator, you can monitor the jobs in the Jobs tab under My Workspace > Automations.

Step 6: Prepare for UiPath Integration
There are a number of steps required to retrieve some required information for integration to start a job using the UiPath Orchestrator API. You can use any API testing tool (e.g. Postman), and the example below uses the linux command line using the curl tool.
6.1 Obtain Client ID, User Key, Account Logical Name and Tenant Logical Name:
Browse to https://cloud.uipath.com, select Admin, select the Tenant, and click on the API Access icon.

Copy the Client ID, Account Logical Name, Tenant Logical Name and User Key values to be used in API calls later.

6.2 Authenticate to Obtain Access Token
Execute the following curl POST request:
export ACCOUNT_NAME=yourAccountName # the Account Logical Name obtained above
export SERVICE_NAME=yourServiceName # the Tenant Logical Name obtained above
export USER_KEY=yourUserKey # the User Key obtained above
export CLIENT_ID=yourClientID # the Client ID obtained above

# get access token
curl -X POST "https://account.uipath.com/oauth/token" \
-H "Content-Type: application/json" \
--data-raw "{
    \"grant_type\": \"refresh_token\",
    \"client_id\": \"$CLIENT_ID\",
    \"refresh_token\": \"$USER_KEY\"
}"
Copy the values for access_token from the response.
{
    "access_token": "eyJ0eX...",
    "id_token": "eyJ0eX...",
    "scope": "openid profile email offline_access",
    "expires_in": 86400,
    "token_type": "Bearer"
}
6.3 Get Process Release Key and Organization Unit ID
Execute the following curl GET request:
export ACCESS_TOKEN=yourAccessToken # set the access token obtained above
export ACCOUNT_NAME=yourAccountName # the Account Logical Name
export SERVICE_NAME=yourServiceName # the Tenant Logical Name
export PROCESS_NAME=First.automation.project # name of your desired process

# get process release key
curl -X GET "https://cloud.uipath.com/$ACCOUNT_NAME/$SERVICE_NAME/orchestrator_/odata/Releases?$filter=ProcessKey%20eq%20%27$PROCESS_NAME%27" \
-H "accept: application/json" \
-H "Authorization: Bearer $ACCESS_TOKEN"
Copy the value for Key from the response as the Process Release Key, and the OrganizationUnitId as the Organization Unit ID (Folder ID):
{
   "@odata.context": "https://cloud.uipath.com/jogetgdunlhs/DemoDefault/orchestrator_/odata/$metadata#Releases",
   "@odata.count": 1,
   "value": [
       {
           "Key": "66945223-98b3-4a0a-8b48-0f60dd7d1c2e",
           "ProcessKey": "First.automation.project",
           "ProcessVersion": "1.0.1",
           "IsLatestVersion": false,
           "IsProcessDeleted": false,
           "Description": "Start with a blank project to design a new task automation",
           "Name": "First.automation.project",
           "EnvironmentId": null,
           "EnvironmentName": "",
           "InputArguments": null,
           "ProcessType": "Process",
           "SupportsMultipleEntryPoints": false,
           "RequiresUserInteraction": true,
           "AutoUpdate": false,
           "FeedId": "1c57a87b-91c4-4310-97b7-986e1d228a26",
           "JobPriority": "Normal",
           "CreationTime": "2020-10-15T04:28:49.7Z",
           "OrganizationUnitId": 123456,
           "OrganizationUnitFullyQualifiedName": "user’s workspace",
           "Id": 173235,
           "Arguments": {
               "Input": null,
               "Output": null
           },
           "ProcessSettings": null
       }
   ]
}
6.4 Test Orchestrator API Call to Start a Job
Let’s try making an API call to start a job for the process.
export ACCESS_TOKEN=yourAccessToken # set the access token obtained above
export ACCOUNT_NAME=yourAccountName # the Account Logical Name
export SERVICE_NAME=yourServiceName # the Tenant Logical Name
export PROCESS_RELEASE_KEY=yourProcessReleaseKey # copy from the process release key above
export ORGANIZATION_UNIT_ID=yourOrganizationUnitId # copy from the Organization Unit ID above

# start job
curl -X POST "https://cloud.uipath.com/$ACCOUNT_NAME/$SERVICE_NAME/orchestrator_/odata/Jobs/UiPath.Server.Configuration.OData.StartJobs" \
-H "accept: application/json" \
-H "Content-Type: application/json;odata.metadata=minimal;odata.streaming=true" \
-H "Authorization: Bearer $ACCESS_TOKEN" \
-H "X-UIPATH-OrganizationUnitId: $ORGANIZATION_UNIT_ID" \
-d "{ \"startInfo\": { \"ReleaseKey\": \"$PROCESS_RELEASE_KEY\", \"Strategy\": \"ModernJobsCount\", \"JobsCount\": \"1\", \"RuntimeType\": \"Studio\" }}"
If successful, the response will be as follows, with the status of the Job shown in the State attribute:
{
   "@odata.context": "https://cloud.uipath.com/jogetgdunlhs/DemoDefault/orchestrator_/odata/$metadata#Jobs",
   "value": [
       {
           "Key": "4c8ba95c-fb66-43fa-81bf-8996b4326c09",
           "StartTime": null,
           "EndTime": null,
           "State": "Pending",
           "JobPriority": "Normal",
           "Source": "Manual",
           "SourceType": "Manual",
           "BatchExecutionKey": "141042d1-20b7-4271-91bb-07aa08087431",
           "Info": null,
           "CreationTime": "2020-10-15T13:36:34.497Z",
           "StartingScheduleId": null,
           "ReleaseName": "First.automation.project",
           "Type": "Unattended",
           "InputArguments": null,
           "OutputArguments": null,
           "HostMachineName": null,
           "HasMediaRecorded": false,
           "PersistenceId": null,
           "ResumeVersion": null,
           "StopStrategy": null,
           "RuntimeType": "Unattended",
           "RequiresUserInteraction": true,
           "ReleaseVersionId": null,
           "EntryPointPath": null,
           "OrganizationUnitId": 611841,
           "OrganizationUnitFullyQualifiedName": null,
           "Reference": "",
           "Id": 18614259
       }
   ]
}
Integrate UiPath with Joget
How to Integrate with UiPath
UiPath provides the Orchestrator API for integration.The most commonly used function is Starting a Job, which should satisfy a majority of use cases. We will use this function in the following integration tutorial.
Design a Process to Start a UiPath Job
Since the UiPath Orchestrator API is a REST API with data in JSON format, we can use the Joget JSON Tool to invoke the API.Before we start, ensure that you have the following critical UiPath information at hand (obtained from the previous Prepare for UiPath Integration tutorial):
- clientId (Client ID)
- userKey (Refresh Token / User Key)
- accountName (Account Logical Name)
- serviceName (Service Name / Tenant Logical Name)
- organizationUnitId (Folder ID or Organization Unit ID)
- processReleaseKey (Process Release Key)
Step 1. Design New App
First, let’s design a new app by clicking on Design New App in the Joget App Center.
Fill in desired values for the App ID and App Name, and click Save.
Step 2. Design New Process
Click on the Processes menu, then on the Design Process button to launch the Process Builder.Design a simple process containing 2 tools, as shown below.

Click on the edit pencil icon after hovering over the process name along the top. Enter a suitable process name and create 3 workflow variables to store the response values from UiPath API call:
status
Id_token
access_token

Click on Deploy.
Step 3. Configure First Tool to Get UiPath Access Token
Once the process has been deployed, close the Process Builder. In the process view page, select the Map Tools to Plugins tab.
Click on Configure Plugin for the first tool and select JSON Tool, then key in the following configuration:
JSON URL | |
Call Type | POST |
POST Method | Custom JSON Payload |
Custom JSON Payload | { "grant_type": "refresh_token", "client_id": "[clientId]", "refresh_token": "[userKey]" } |

Under Store to Workflow Variable, map the variables to store the tokens in the matching workflow variables i.e.
access_token | access_token |
id_token | id_token |
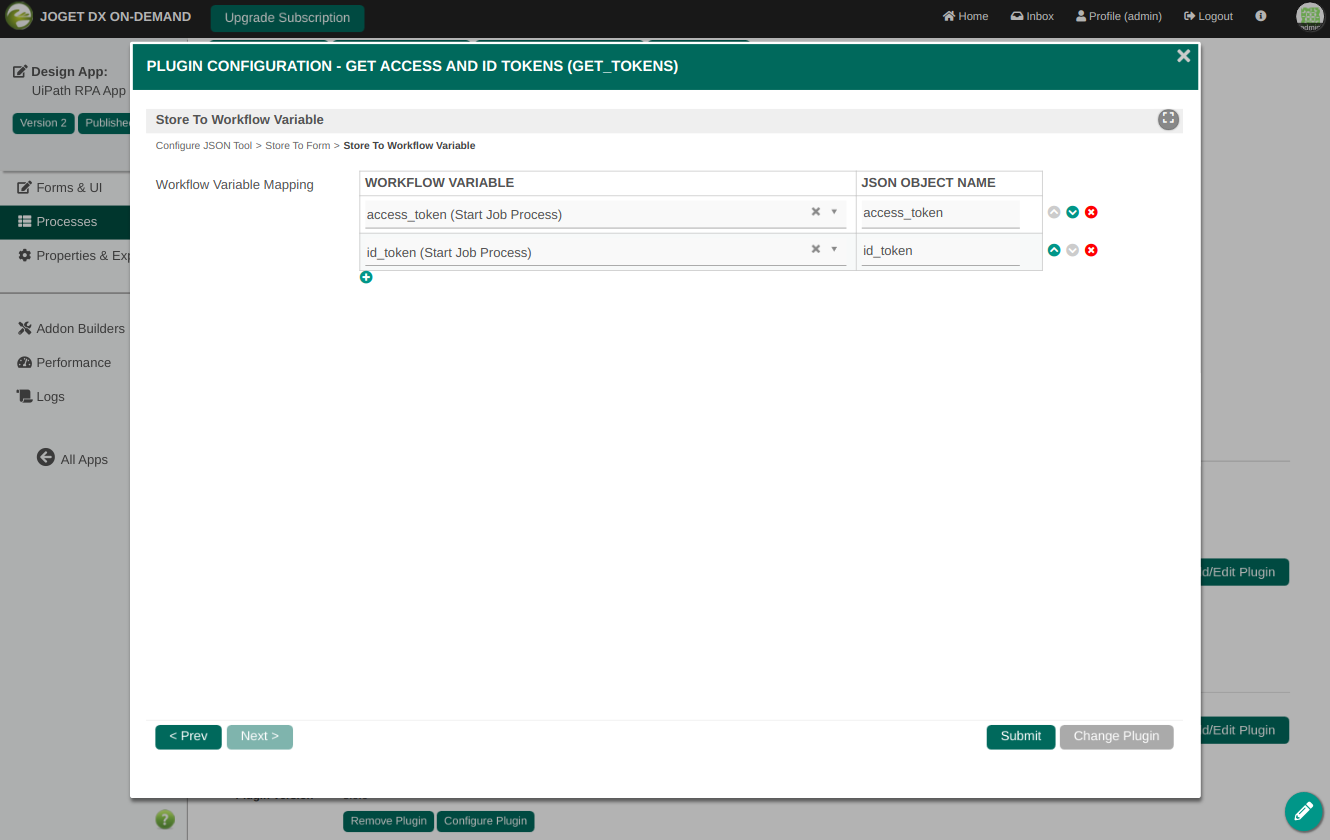
Click on Submit to save.
Step 4. Configure Second Tool to Start Job Using the Access Token
Click on Configure Plugin for the second tool and select JSON Tool, then key in the following configuration:JSON URL | https://cloud.uipath.com/[accountlogicalName]/[tenantLogicalName]/orchestrator_/odata/Jobs/UiPath.Server.Configuration.OData.StartJobs |
Call Type | POST |
POST Method | Custom JSON Payload |
Custom JSON Payload (Replace [processReleaseKey] with the actual Release Key) | { "startInfo": { "ReleaseKey": "[processReleaseKey]", "Strategy": "ModernJobsCount", "JobsCount": 1, "RuntimeType": "Studio" } } |
Request Headers (Replace [organizationUnitId] with the actual Folder ID or Organization Unit ID | Authorization: Bearer #variable.access_token# X-UIPATH-OrganizationUnitId: [organizationUnitId] |

Under Store to Workflow Variable, map the status variable to the State attribute in the response JSON i.e.
status | value[0].State |

That’s it. The Joget process has been configured to invoke the UiPath Orchestrator API to start a job.
Step 5. Run the Process
Now, let’s test the process. Click on the Run Process button at the top, then Run Process again in the confirmation dialog.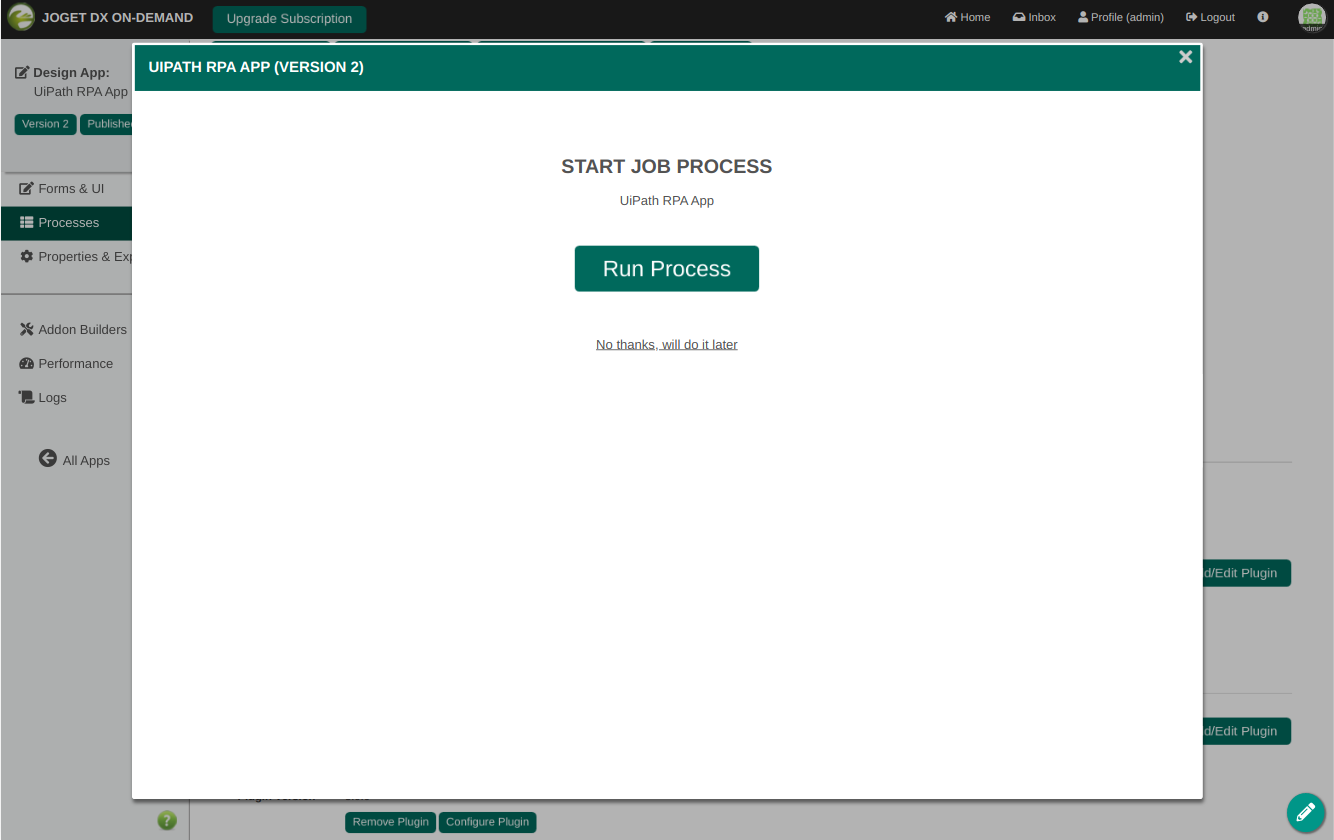
Once the process has started, the 2 tools will execute as configured. To view the results of the process, navigate to Monitor -> Completed Processes.
Select the process instance and you will see the 2 tools executed.
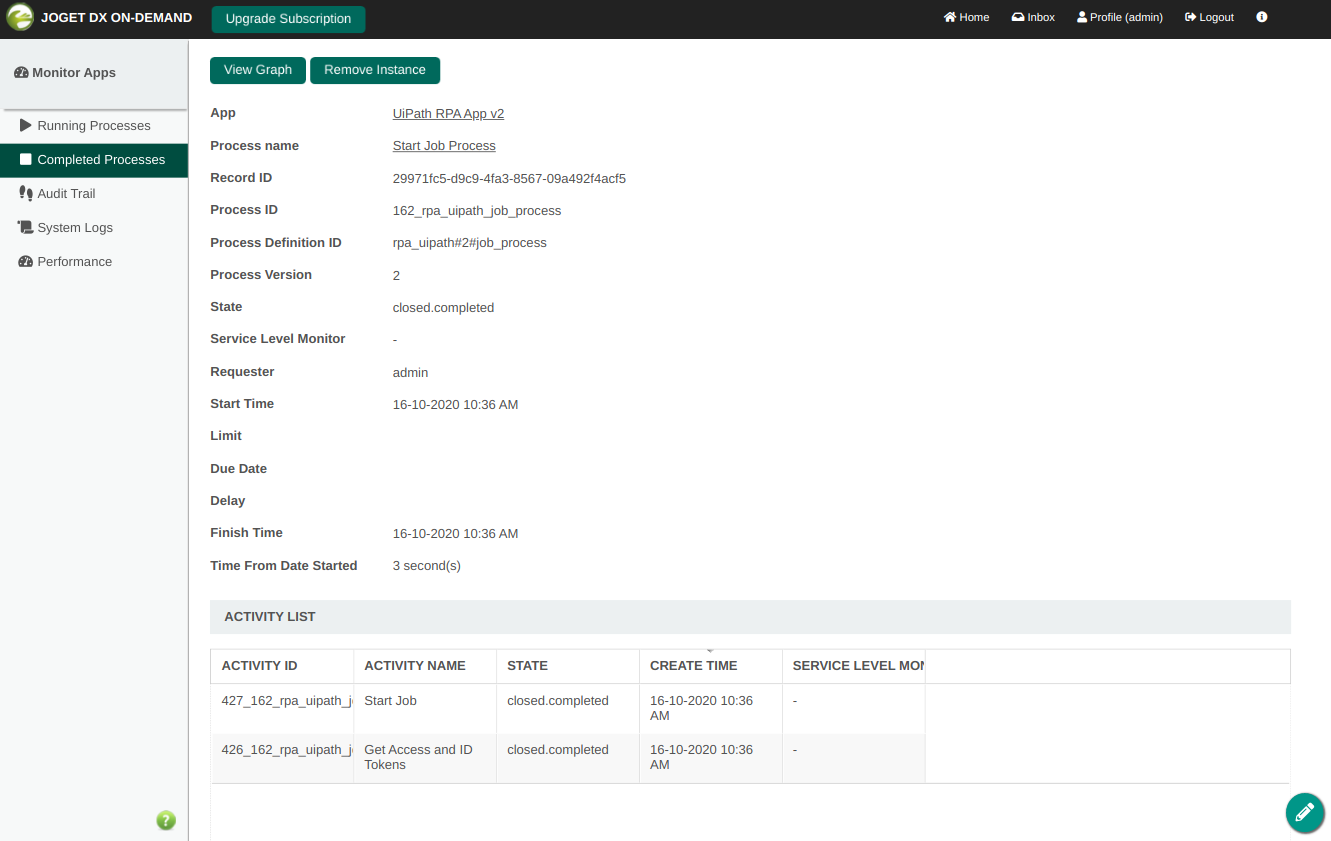
Click on each activity to view the values of the workflow variables which obtained the results of the Orchestrator API calls.

You will be able to see the tool requests and responses in the logs if the debugging option is enabled.
Sample log output:
INFO 16 Oct 2020 00:07:42 org.joget.apps.app.lib.JsonTool - POST : https://account.uipath.com/oauth/token
INFO 16 Oct 2020 00:07:42 org.joget.apps.app.lib.JsonTool - Custom JSON Payload : {_ "grant_type": "refresh_token",_ "client_id": "client_id",_ "refresh_token": "refresh_token"_}_
INFO 16 Oct 2020 00:07:43 org.joget.apps.app.lib.JsonTool - https://account.uipath.com/oauth/token returned with status : 200
INFO 16 Oct 2020 00:07:43 org.joget.apps.app.lib.JsonTool - {"access_token":"access_token","id_token":"id_token","scope":"openid profile email offline_access","expires_in":86400,"token_type":"Bearer"}
INFO 16 Oct 2020 00:07:43 org.joget.apps.app.lib.JsonTool - POST : https://cloud.uipath.com/yourAccountName/DemoDefault/orchestrator_/odata/Jobs/UiPath.Server.Configuration.OData.StartJobs
INFO 16 Oct 2020 00:07:43 org.joget.apps.app.lib.JsonTool - Custom JSON Payload : { "startInfo":_ { "ReleaseKey": "processReleaseKey",_ "Strategy": "ModernJobsCount",_ "RobotIds": [ ],_ "JobsCount": 1,_ "RuntimeType": "Studio" _ } _}_
INFO 16 Oct 2020 00:07:43 org.joget.apps.app.lib.JsonTool - Adding request header Authorization : Bearer access_token
INFO 16 Oct 2020 00:07:43 org.joget.apps.app.lib.JsonTool - Adding request header X-UIPATH-OrganizationUnitId : organizationUnitId
INFO 16 Oct 2020 00:07:44 org.joget.apps.app.lib.JsonTool - https://cloud.uipath.com/yourAccountName/DemoDefault/orchestrator_/odata/Jobs/UiPath.Server.Configuration.OData.StartJobs returned with status : 201
INFO 16 Oct 2020 00:07:44 org.joget.apps.app.lib.JsonTool - {"@odata.context":"https://cloud.uipath.com/yourAccountName/DemoDefault/orchestrator_/odata/$metadata#Jobs","value":[{"Key":"0a53aca6-ad56-40de-bd72-dd757e817a5b","StartTime":null,"EndTime":null,"State":"Pending","JobPriority":"Normal","Source":"Manual","SourceType":"Manual","BatchExecutionKey":"2e1adac4-c4f6-4bb8-b697-c87e33744de9","Info":null,"CreationTime":"2020-10-16T00:07:44.43Z","StartingScheduleId":null,"ReleaseName":"First.automation.project","Type":"Unattended","InputArguments":null,"OutputArguments":null,"HostMachineName":null,"HasMediaRecorded":false,"PersistenceId":null,"ResumeVersion":null,"StopStrategy":null,"RuntimeType":"Development","RequiresUserInteraction":true,"ReleaseVersionId":null,"EntryPointPath":null,"OrganizationUnitId":organizationUnitId,"OrganizationUnitFullyQualifiedName":null,"Reference":"","Id":18675957}]}
Back at the UiPath Orchestrator and UiPath Assistant, you would also be able to monitor the execution of the job.
Sample Joget App
Download the sample app APP_rpa_uipath-3-20201016023843.jwa