In a typical form activity design, the next course of action is often determined using one of the form fields. We can see such example on the screenshot below.

Figure 1: Approval Form Generated Using Generate Process - Approval Process
With the use of some client side scripting, we can change the way decision is being made from a select box into individual buttons as shown in the screenshot below.

Figure 2: Decision Making Buttons
This design may be better tailored to certain user base who have used systems with similar design before.
In order to implement this design, we will need to first obtain the "name" of the select box. Please see the screenshot below.
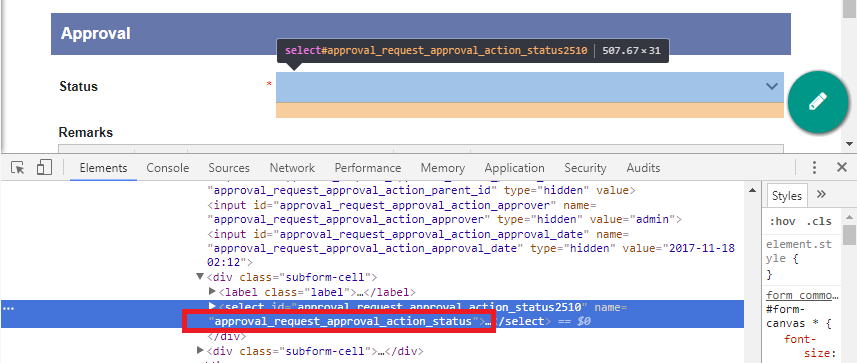
Figure 3: Identifying Element Name
Create a Custom HTML into your intended form, and paste in the code below. Change line 2 with the name of your select box.
<script type="text/javascript">
var selectBoxName = "approval_request_approval_action_status";
$(function(){
	$(FormUtil.getField(selectBoxName)).parent().hide();
	$(FormUtil.getField(selectBoxName)).children().each(function(){
		if($(this).attr("value") != ""){
			var cssClass = $(".form-button:last").attr("class");
			var button = "<div type=\"button\" class=\"form-cell\"><button class=\"" + cssClass + "\" onclick=\"completeWithVariable($(this));return false;\" value=\"" + $(this).attr("value") + "\">" + $(this).attr("value") + "</button></div>";
			$(".form-button:last").after(button);
		}
	});
});
function completeWithVariable(obj){
	$(FormUtil.getField(selectBoxName)).val($(obj).val());
	$("#assignmentComplete").trigger("click");
}
</script>
<style type="text/css">
    input#assignmentComplete{
        display: none;
    }
</style>
Sample app to demonstrate the use of form buttons for approval/rejection on Joget Workflow Enterprise v6: APP_form_buttons_for_approval.jwa