Versions Compared

Key

  • This line was added.
  • This line was removed.
  • Formatting was changed.

...

  1. Start the Joget Server and open the App Center.

  2. Log in as admin and click on the pencil icon on the Expenses Claim to open the Design App. (see Figure 1)

     
    Figure 1

  3. Under FORMS column, click on Expense Claim Form (see Figure 2)
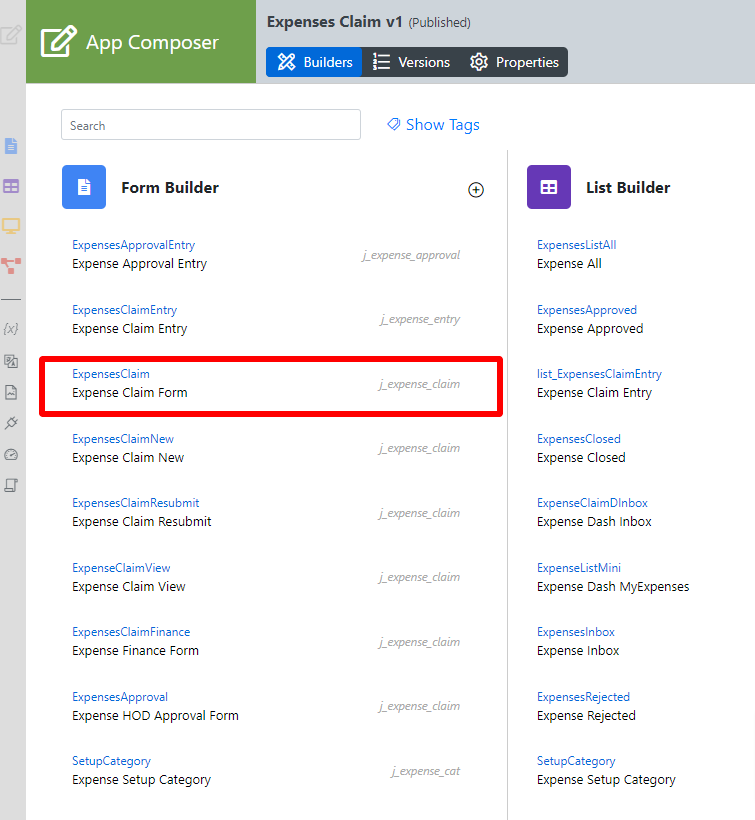

    Figure 2

  4. Drag and drop the  Form Grid element onto the canvas.

  5. Click on the FormGrid element on the canvas to open up the Edit Form Grid properties.

  6. Fill up the Configure Form Grid  properties as follows and click on  OK (see Figure 3):
    1. ID:  entries
    2. Form:  Expense Claim Entry
    3. Columns : 

      Field ID*

      Label

      Format Type

      dateDateDate
      categoryCategory
      purposePurpose
      amountAmountDecimal


    Figure 3

  7. Click on  Preview to open up the Preview tab, click on the plus sign on the Form Grid and it will open up a popup displaying the Form that it was referred to. (see Figure 4)


    Figure 4

  8. Open up Expense Claim Entry and note the Field ID's are the same as written in the Edit Form Grid. This is how the Form Grid displays the data from said target form. (see Figure 5)


    Figure 5

Form Grid Properties

...

Configure Form Grid

NameDescription
Label

Element Label to be displayed to the end-user.

ID

Element ID (By declaring as "entries", a corresponding database table column "c_entries" will be created)

Please see Form Element for more information about defining the ID and the list of reserved IDs.

FormTarget form to refer to.
Columns

The columns defined here must correspond to the Form chosen above.

NameDescription
Field ID*

Field ID of the form element to refer to the target form.

Panel
borderColorblue
borderWidth1
titleBGColor#ddffcc
borderStylesolid

Example:

In "HR Expense Claim Entry" form, there are Form Elements with the ID "date", "category", "purpose", and "formattedAmount".

LabelColumn Label.
Format Type

If you would like to format the returned value, you may make use of the format type.

Default choice: Text.

Available Format Types

  • Text - formats the value as text
  • HTML - outputs data as HTML
  • Multiple lines text - maintains the spacing formatting for multiple lines of text, such as TextArea.
  • Decimal - formats as a decimal. The number of decimals is expected in the "Format" field.
  • Date - formats as a date. Original Date and New Date formats are expected in the "Format" field.

    Panel
    borderColorblue
    borderWidth1
    titleBGColor#ddffcc
    borderStylesolid

    Format: (original format)|(new format)

    Example of usage:
    Original value:
    5/23/2012
    Expected value: 2012/5/23
    Format :
    M/d/y|y/M/d

    Note: Please refer to Java SimpleDateFormat for the date format.

  • File - Show the value as a link to the attachment. Form ID is expected in the "Format" field.

    Info
    titleImportant Infomation
    1. Specify the Form ID that contains the actual File Upload form element.
    2. Make sure that you use Multirow Form Binder as the Load Binder.
    3. The file will be downloaded as an attachment and do NOT actually follow the properties set at the target form's File Upload properties.
  • Image - Show the value as a thumbnail of the attachment. Form ID is expected in the "Format" field.

    Info
    titleExpected Form ID

    Specify the Form ID that contains the actual Image Upload / File Upload form element.

  • Options - Show the label of a multiple-choice element given the value given. Form ID is expected in the "Format" field.

    Info
    titleExpected Form ID

    Specify the Form ID that contains the actual Select Box / Radio / CheckBox form element.

FormatDepending on your chosen Format Type, an additional argument may be entered here.
Width

Column width in characters.

Code Block
titleSample
200px

...