| Table of Contents | ||
|---|---|---|
|
...
Introduction
| Panel | ||||||||||
|---|---|---|---|---|---|---|---|---|---|---|
| ||||||||||
OTP Email MFA is a Multi-factor authentication plugin that sends a one-time password to a user's email providing an additional layer of security. Multi-Factor Authentication (MFA) is a security best practice that adds an extra layer of protection on top of a username and password combination. By requiring an additional authentication code from a trusted device, MFA safeguards access to a user’s account even if the password is compromised. |
Plugin Information
Plugins Available in the Bundle:
OTP Email MFA
This plugin bundle is compatible with Joget DX 8 and Joget DX 7
Get Started
Prerequisites
1. Setup SMTP values in Joget App for the email tool to be working properly.

Figure 1: SMTP Settings
Refer to Sign in with app passwords to generate the password for SMTP Gmail.
For more details, please refer to General Settings > SMTP Settings.
SMTP settings in General settings will enable Joget DX to use these SMTP values as global default values for all your apps.
Joget apps will ignore this global SMTP settings if the respective apps already has the settings configured, either in the Plugin Default Properties or Email Tool - Configure SMTP Settings page.
Steps to Import this Plugin
1. Go to the website https://github.com/jogetoss/otp-email-mfa.
2. Go to the "Releases" page (See Figure 12).

Figure 12:Plugin Releases
3. Click on the .jar file to initiate the download (See Figure 23).

Figure 23: Download .jar file
4. Go to your Joget Workflow localhost or server and log in as admin.
...
9. The Joget Workflow Knowledge Base has more information on managing and developing plugins.
Steps to Use this Plugin
Steps for Administrators
1. Start the Joget server and open the App Center.
2. Log in as admin, click on Settings in the admin bar, and navigate to Directory Manager Settings. (See Figure 34)
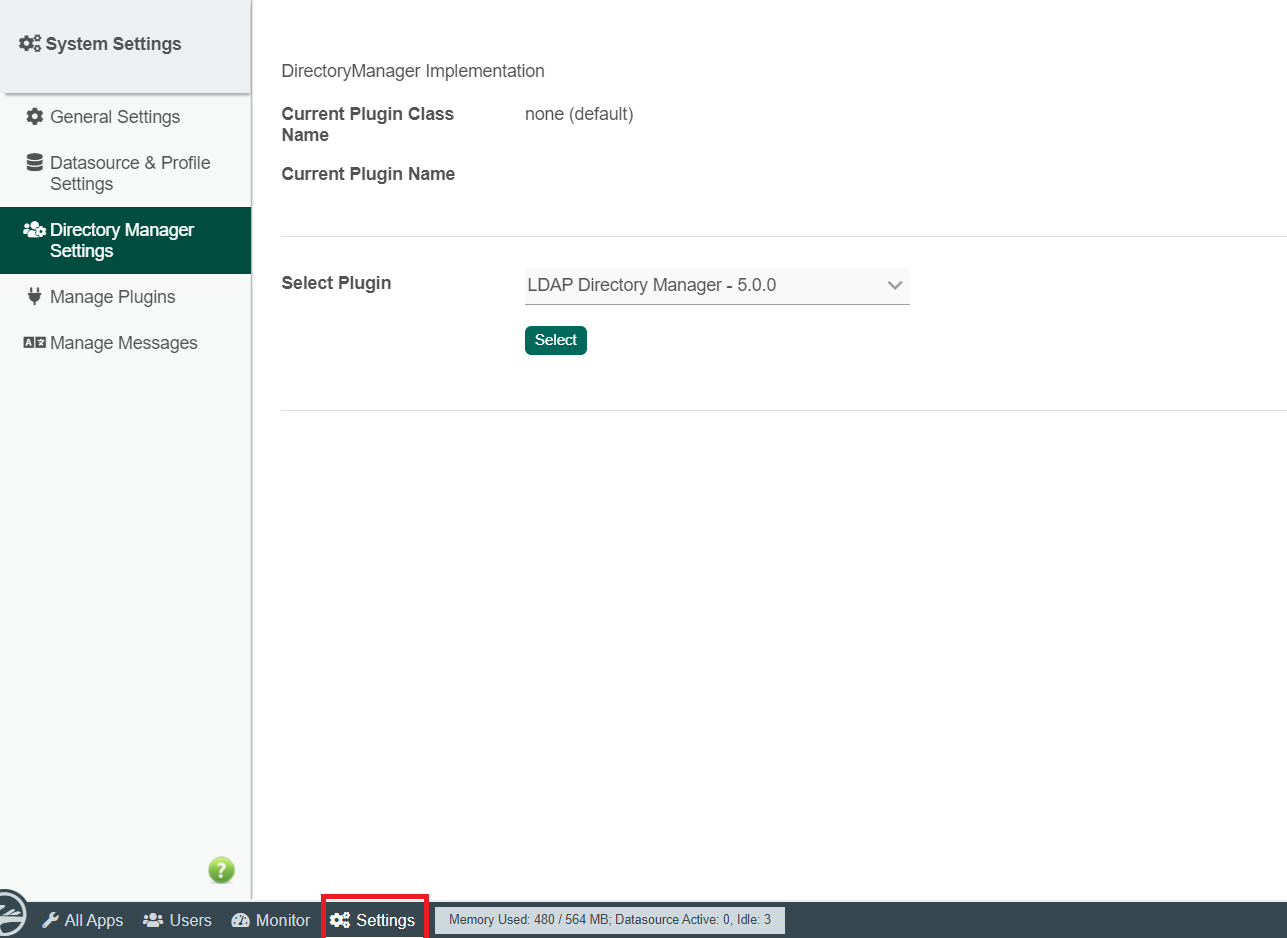

Figure 34 :Directory Manager Settings
3. Choose the Security Enhanced Directory Manager in the Select Plugin field and select OTP Email MFA Authenticator for the Multi-Factor Authenticator property and configure accordingly. (See figure 45)


Figure 45 : Multi Factor Authenticator
One-time Password OTP Email MFA Authenticator Properties
Configure One-time Password OTP Email MFA Authenticator
4. Configure all the plugin configurations accordingly.(See figure 5,6&7)1.This configuration will determine the properties for your OTP Email MFA Authenticator and the outcome of your plugin.
In General > Configure One-time Password Email MFA Authenticator

Figure 56: Configure OTP Password Email MFA Authenticator
| Name | Description |
|---|---|
| Validity Period (minute) | Expiration time for the One Time Password (OTP) sent to the user's email registered in the profile to remain valid in minutes. The default value is 5 minutes. |
| Subject | The subject of the email with the OTP. |
| Message | The message to be displayed in the email. |
2.Then, in General > Configure One-time Password Email MFA Authenticator>Default Directory Password Policy

Figure 6 7 : Default Directory Password Policy

3.In General > Configure One-time Password Email MFA Authenticator>Default Directory Password Policy>Notification
Figure 8 Notification
4.The Notification for the OTP Email MFA Authenticator will be sent according to the SMTP settings in General Settings or in this Notification settings.Figure 7 Notification
| Name | Description |
|---|---|
| Host | Key in your mail server address, either via domain name or IP address. |
| Port | Key in your mail server port number. |
| Security | Key in either TLS or SSL depending on your mail server. |
| Username | Key in the sender email username. |
| Password | Key in the sender email password |
| From Email Address | Key in the sender email address to be shown to the recipient. |
5.The settings here can be left empty if you are using the same values as the SMTP settings in General Settings.
65.Before submitting the OTP Email MFA Authenticator, you may Send Test Email to verify your Email configuration . (See figure 8).
You can also refer the SMTP settings from here :General Settings#SMTPSettings. The SMTP settings in General settings will enable Joget DX to use these SMTP values as global default values for all your apps.Figure 9)

Figure 8 9 : Send Test Email
67. Once all configurations have been inspected and tested, you may submit the OTP Email MFA Authenticator to Enable it. Once enabled, users will be able to enable MFA individually in their User profile.
78. Optionally, you may also activate all user to use OTP Email MFA Authenticator by default by adding their username as entries into the dir_user_meta table.
...
Joget authentication will automatically check if the user exists in this table and prompt them with the "please enter OTP" message.
Steps for Users
1. Users can activate OTP Email MFA Authenticator in their respective user profiles by clicking the "Activate" button. (See Figure 910)

Figure 910 : Activate button
2. Before activating OTP Email MFA Authenticator, users should make sure that a valid and working email has been registered in their profile under the User Details section as the email containing the OTP will be sent to this registered email.
3. A popup dialog will appear showing a Password field to submit the email OTP sent to the user. If the code is valid, OTP Email MFA will be activated (See Figure 1011).

Figure 1011 : Password field to submit the email OTP sent to the user
4. The users should always remember to save their user profile after activating MFA.
5. On subsequent logins, the users will be prompted for an OTP password which will always be sent to the user's email.
Deactivating Multi-Factor Authentication
1. As a user, you can disable OTP Email MFA Authenticator by clicking on the Deactivate button in your user profile. (See Figure 1112)

Figure 1112
2. Administrators can also disable MFA for a specific user by selecting the Setup Users under Users in the admin bar and clicking on the Deactivate MFA button. (See Figure 1213)

Figure 1213