| Info | ||
|---|---|---|
| ||
Make sure that you have first completed the previous tutorial - Designing a Userviewตรวจสอบให้แน่ใจว่าคุณได้ทำบทแนะนำก่อนหน้านี้เสร็จสิ้นแล้ว - การออกแบบยูสเซอร์วิว |
| Table of Contents | ||
|---|---|---|
|
| Widget Connector | ||||
|---|---|---|---|---|
|
Introducing the new Process Builder
บทเริ่มต้นในการสร้างโพรเซสใหม่
- ในหน้าการออกแบบแอปให้คลิกที่เมนู Processes ทางด้านซ้ายแล้วคลิกปุ่ม Design Processes ด้านบนIn the App design page, click on the Processes menu on the left, and then on the Design Processes button along the top.
- The Process Builder is one of the main highlights in Joget Workflow v5 replacing the older Workflow Designer. เป็นหนึ่งในไฮไลต์หลักของ Joget Workflow เวอร์ชัน 5 ที่มาแทนที่การออกแบบเวิร์กโฟลว์แบบเก่า

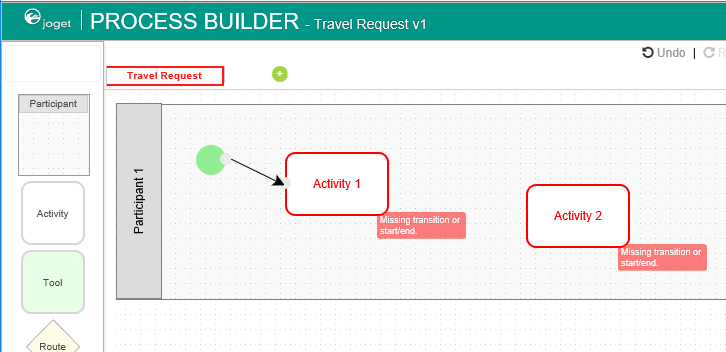
- There are 3 main areas in the Process Builder. On the top (red), the Navigator panel contains a list of processes together with the action buttons on the right. On the left (blue), this is where the element palette is placed by default. One can move it around to suit one's style. The main panel in the middle is the Graph area (green) that contains the actual process diagram.

- มี 3 ส่วนหลักใน Process Builder ด้านบน (สีแดง) เป็นส่วนนาวิเกเตอร์ ประกอบด้วยรายการของโพรเซส และปุ่มทางด้านขวา ปุ่ม Deploy คือปุ่มที่กดเพื่อนำโพรเซสที่ออกแบบไว้ไปใช้งาน ทางด้านซ้าย (สีน้ำเงิน) คือส่วนของเครื่องมือที่สามารถลากสิ่งที่ต้องการไปยังพื้นที่ส่วนตรงกลางได้ (สีเขียว) ซึ่งเป็นพื้นที่การออกแบบโพรเซส
- คลิกไอคอนแก้ไขใต้ชื่อโพรเซสในแถบนาวิเกเตอร์ คุณสามารถแก้ไขรายละเอียดของโพรเซสได้Click on the edit icon under the process name in the Navigator. This brings up the properties dialog where you can edit the process details.
- Add Participants into the process by clicking on the green add button under current Participant. Participants represent users or roles that perform a certain task. Click on the edit button while hovering over the participant name to set its properties.
- เพิ่ม Participants (ผู้เข้าร่วม) ในโพรเซส โดยคลิกที่ปุ่มเพิ่มสีเขียวใต้ผู้เข้าร่วมปัจจุบัน ผู้เข้าร่วมเป็นตัวแทนผู้ใช้หรือบทบาทซึ่งทำหน้าที่บางอย่าง คลิกที่ปุ่มแก้ไขขณะวางเมาส์เหนือชื่อผู้เข้าร่วมเพื่อตั้งค่าคุณสมบัติ
- เพิ่ม activities, tools และ routes ลงในแผนภาพโพรเซส โดย activities เป็นส่วนที่รอการกระทำจากมนุษย์ tools เป็นส่วนที่ระบบทำงานให้โดยอัตโนมัติ และ routes คือจุดตัดสินใจ ใช้ลูกศรในการเชื่อมโยงทุกอย่างเข้าด้วยกันในโฟลว์ คุณอาจขยายการออกแบบของคุณโดยการเชื่อมต่อจากโหนดที่มีอยู่แล้วหรือโดยการลากโหนดที่ต้องการจากทางส่วนด้านซ้ายมือลงในพื้นที่ออกแบบโพรเซสAdd activities, tools and routes into the process diagram. Activities represent forms which require human interaction. Tools represent system or automated tasks, and routes are decision points. Use transitions to link them all together in a flow. You may either expand your design by connecting from existing nodes or by dragging the required nodes from the element palette into the process diagram.

To handle routing (for example approval conditions), use Routes in combination with workflow variables. To create a workflow variable, double click on the process name in the Navigator to bring up the process dialog. Click on the first small icon under the Workflow variable heading, and key in the ID of the variable e.g. status.ในการจัดการเส้นทาง (เช่น เงื่อนไขการอนุมัติ) ให้ใช้ Routes ร่วมกับ workflow variables (ตัวแปรเวิร์กโฟลว์) ให้ดับเบิลคลิกที่ชื่อโพรเซสในแถบนาวิเกเตอร์ คลิกที่ไอคอนขนาดเล็กแรกใต้หัวข้อตัวแปรเวิร์กโฟลว์และป้อนรหัสของตัวแปร เช่น status
Info title Routes Learn more about Process Routes.
- Once a workflow variable has been defined, hover over on a transition and click on the edit icon to open the transition dialog.

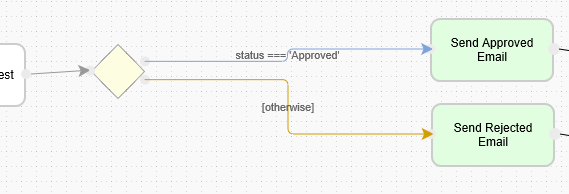
- In the transition dialog, select type Condition, select the variable status in Variable and key in Approved into the Value field*.* This means that this transition will occur if the value of status is "Approved".

- Set the transition type to Otherwise to indicate that it is the default path to take when other conditions are not met. The Otherwise transition is shown in orange. An example of a simple routing process is as shown below:
- Ensure that the process has a proper Start and End. Click on Deploy to deploy the process to the server.
Mapping Participants to Users
- Once a process has been successfully deployed, return to the previous tab/window. The new process diagram will be generated after you click on OK. Joget Workflow will interpret the process diagram and load the process details.
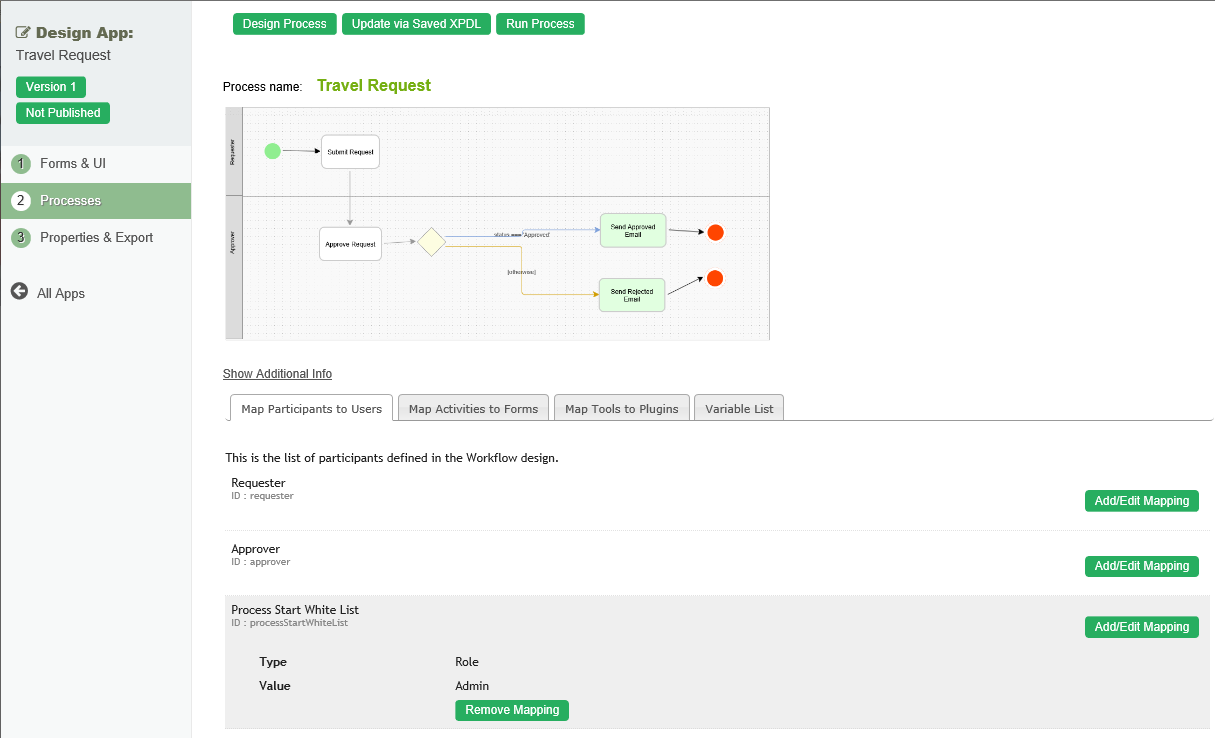
- Participants defined in the process are listed in the Map Participants to Users tab, and you can map each participant to specific people. Click on Add/Edit Mapping to map to specific groups, users, organization chart, etc. If no mapping is done for a participant, any tasks are automatically defaulted to the current user instead.
Mapping Activities to Forms
...
- เมื่อตัวแปรของเวิร์กโฟลว์ได้รับการกำหนดแล้ว ให้วางเมาส์เหนือเส้นลูกศรและคลิกไอคอนแก้ไข
- เมื่อคลิกที่ไอคอนแก้ไขแล้ว ให้เลือกประเภทของ Condition (เงื่อนไข) เลือกตัวแปร status ในหัวข้อ Variable และที่สำคัญคือ ป้อน Approved ลงในฟิลด์ Value ซึ่งหมายความว่าการเปลี่ยนแปลงนี้จะเกิดขึ้นก็ต่อเมื่อค่า status เป็น Approved
- ตั้งค่าที่ลูกศรเป็น Otherwise เพื่อระบุว่าเป็นเส้นทางที่จะใช้เมื่อไม่เป็นไปตามเงื่อนไขอื่นๆ เส้นลูกศร Otherwise จะแสดงเป็นสีส้ม ตัวอย่างของโพรเซสที่กำหนดเส้นทางเป็น Otherwise อย่างง่ายแสดงดังภาพด้านล่าง:
- ตรวจสอบให้แน่ใจว่าโพรเซสมี Start และ End คลิกที่ Deploy เพื่อปรับใช้โพรเซสกับเซิร์ฟเวอร์
การแมปผู้เข้าร่วมกับผู้ใช้
- เมื่อดำเนินการเรียบร้อยแล้วให้กลับไปที่แท็บหรือหน้าต่างก่อนหน้านี้ แผนภาพโพรเซสใหม่จะถูกสร้างขึ้นหลังจากที่คุณคลิก OK กระบวนการทำงานของ Joget จะตีความแผนภาพโพรเซสและโหลดรายละเอียดโพรเซส
- ผู้เข้าร่วมที่กำหนดไว้ในโพรเซสจะแสดงอยู่ในแท็บ Map Participants to Users และแมปแต่ละผู้เข้าร่วมกับบุคคลใดบุคคลหนึ่งแบบระบุเจาะจงได้ คลิกที่ Add/Edit Mapping เพื่อแมปกับกลุ่ม ผู้ใช้ แผนผังองค์กร ฯลฯ หากไม่มีการแมปผู้เข้าร่วม งานต่างๆจะถูกตั้งค่าให้โดยอัตโนมัติให้กับผู้ใช้ปัจจุบัน
การแมปกิจกรรมไปยังฟอร์ม
- ในแท็ป Map Activities to Forms โพรเซสทั้งหมดจะปรากฏในรายการ
- สำหรับแต่ละกิจกรรมให้คลิกที่ Add/Edit Form เพื่อเลือกฟอร์มจากรายการฟอร์มปัจจุบันในแอป
- ตัวอย่าง การจัดการกับโพรเซสการอนุมัติ คลิกที่ Create New Form เพื่อสร้าง Travel Approval Form ใหม่ ในฟอร์มใหม่ เพิ่ม Subform ที่แสดงแบบฟอร์มที่มีการ submit แล้ว และ radio buttons รับค่าสถานะการอนุมัติ

- กำหนดค่า subform นี้เพื่อเลือกแบบฟอร์มคำขอเดิม

- กำหนดค่าสถานะที่ radio button เป็น Approved และ Rejected
- การแมปค่าสถานะกับเวิร์กโฟลว์เป็นส่วนสำคัญที่สุด ทำให้โฟลว์ไปในทิศทางที่ถูกต้อง โดยสามารถตั้งค่าได้ในส่วนของ Advanced Options ในกรณีนี้แมป status ซึ่งหมายความว่าค่าจะถูกเก็บไว้ในตัวแปร status ในเวิร์กโฟลว์
- หลังจากการกำหนดค่าทั้งหมด ฟอร์มการอนุมัติใหม่ควรมีลักษณะคล้ายกับภาพดังต่อไปนี้:

การแมปเครื่องมือไปยังปลั๊กอิน
- ในแท็ป Map Tools to Plugins คุณสามารถแมปเครื่องมือที่กำหนดไว้ในโพรเซสกับปลั๊กอินได้

- สำหรับแต่ละเครื่องมือให้คลิกที่ Add/Edit Plugin เพื่อเลือกและกำหนดค่าปลั๊กอิน
ทดสอบการโฟลว์ของโพรเซส
- หากต้องการทดสอบการทำงานของโพรเซสให้คลิกปุ่ม Run Process ด้านบนของหน้าการออกแบบโพรเซสของแอป
การรวมโพรเซสลงสู่ยูสเซอร์วิว
- ในหน้าการออกแบบแอป คลิกที่ชื่อของยูสเซอร์วิวที่มีอยู่แล้วเพื่อเปิดหน้าสร้างยูสเซอร์วิวขึ้นมา
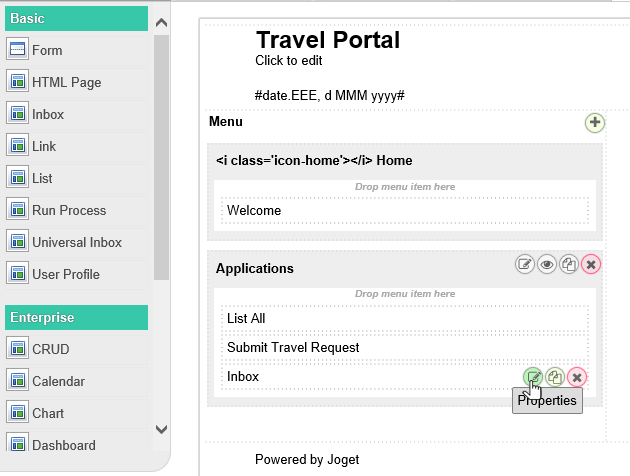
- ลาก Run Process ลงในส่วนการออกแบบ ในหมวดหมู่ที่ต้องการ ซึ่งเมนูนี้อนุญาตให้ผู้ใช้เริ่มต้นโพรเซสจากยูสเซอร์วิว
- คลิกที่ Properties ของ Run Process และเลือกโพรเซสที่จะเรียกใช้

- ลาก Inbox เข้ามาในหมวดหมู่ที่ต้องการ เมนูนี้ทำให้ผู้ใช้เห็นและจัดการกับงานที่เข้ามาได้
- บันทึกยูสเซอร์วิวและคุณจะสามารถเรียกใช้และปฏิบัตงานที่ได้รับมอบหมายในยูสเซอร์วิวที่เผยแพร่
Mapping Tools to Plugins
- In the Map Tools to Plugins tab, you can map tools defined in the process to plugins.
- For each tool, click on Add/Edit Plugin to select and configure a plugin.
Test Driving the Process
- To perform a test run on a process, click on the Run Process button along the top of the App design process page.
Incorporating the Process into the Userview
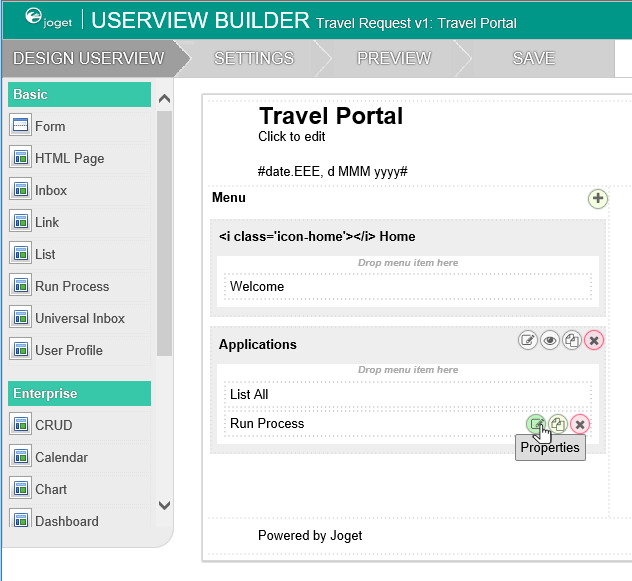
- In the App design page, click on the name of an existing userview to launch the Userview Builder.
Drag a Run Process element into a menu category. This menu element allows the user to start a process from the userview. - Click on Properties of the Run Process element and select the process to run.
- Drag an Inbox element into a menu category. This menu element provides the user with an inbox to manage their assigned workflow tasks.
- Save the userview, and you will be able to run and perform assigned tasks in the published userview.
