The following instructions are for Debian or Ubuntu Linux. For other Linux distributions, please adapt the commands accordingly.
คำแนะนำต่อไปนี้สำหรับ Debian หรือ Ubuntu Linux สำหรับลีนุกซ์รุ่นอื่นกรุณาปรับคำสั่งให้เหมาะสม
1. Install Prerequisites
ติดตั้งข้อกำหนดเบื้องต้น
Install JDK 11 or JDK 17. Please make sure JAVA_HOME is set.
ติดตั้ง JDK 8 โปรดตรวจสอบให้แน่ใจว่าได้ตั้งค่า JAVA_HOME
$ sudo apt-get update
$ sudo apt-get install default-jdk
For more detail, you can refer to https://www.digitalocean.com/community/tutorials/how-to-install-java-on-ubuntu-with-apt-get
สำหรับรายละเอียดเพิ่มเติมสามารถอ้าง https://www.digitalocean.com/community/tutorials/how-to-install-java-on-ubuntu-with-apt-get
Set the JAVA_HOME by editing the file/etc/environmentตั้งค่า JAVA_HOME โดยแก้ไขไฟล์ / etc / environment$ sudo nano /etc/environment
In this file, add the following line :
ในไฟล์นี้เพิ่มบรรทัดต่อไปนี้:
JAVA_HOME="/usr/lib/jvm/java-11-openjdk-amd64"  //For JDK 11

JAVA_HOME="/usr/lib/jvm/java-17-openjdk-amd64"  //For JDK 17
Now reload the file and test:
ตอนนี้ทำการรีโหลดไฟล์และทดสอบ:
$ source /etc/environment
$ echo $JAVA_HOME
Install MySQL 5.5 or above.
ติดตั้ง MySQL 5.5 หรือสูงกว่า
$ sudo apt-get install mysql-server
$ sudo service mysql start
Install Apache Maven 2.2.1 or above. Please make sure "mvn" command is able to execute from command line.
ติดตั้ง Apache Maven 2.2.1 ขึ้นไป โปรดตรวจสอบให้แน่ใจว่าคำสั่ง "mvn" สามารถเรียกใช้จากบรรทัดคำสั่งได้
$ sudo apt-get install maven
$ mvn -version
Install Git.
ติดตั้ง Git
$ sudo apt-get install git
$ git --version
2. Install 3rd Party Libraries
ติดตั้งไลบรารีของบุคคลที่สาม
$ wget https://dev.joget.org/community/download/attachments/19104566/install-libraries.zip
$ unzip -a install-libraries.zip
$ cd install-libraries
$ ./install_linux.sh
$ cd ~
3. Obtain Source
รับแหล่งที่มา
$ mkdir joget_src
$ cd joget_src
$ git clone https://github.com/jogetworkflow/jw-community.git --branch 8.0-SNAPSHOT --depth 1
$ cd ~
4. Configure Datasource for Test Case
กำหนดค่าแหล่งข้อมูลสำหรับกรณีทดสอบ
จัดเตรียมฐานข้อมูลสำหรับการใช้ Joget
$ mysql -uroot
$ create database jwdb;
$ exit
$ mysql -uroot jwdb < joget_src/jw-community/wflow-install/src/main/resources/data/jwdb-empty.sql
Download wflow.zip and extract in your user home.
ดาวน์โหลด wflow.zip และแตกไฟล์ของคุณ
$ wget http://dev.joget.org/community/download/attachments/19104566/wflow.zip
$ unzip -a wflow.zip
$ cd wflow
$ nano app_datasource-default.properties
Make sure the configuration in app_datasource-default.properties is correct.
ตรวจสอบให้แน่ใจว่าการกำหนดค่าใน app_datasource-default.properties ถูกต้อง
workflowDriver=com.mysql.jdbc.Driver
workflowUrl=jdbc\:mysql\://localhost\:3306/jwdb?characterEncoding\=UTF-8
workflowUser=root
profileName=
workflowPassword=
5. Build Project
สร้างโครงการ
It is NOT recommended to skip unit tests in Joget, to ensure build integrity.
ไม่แนะนำให้ข้ามการทดสอบหน่วยใน Joget เพื่อความสมบูรณ์
$ cd ~/joget_src/jw-community/wflow-app/
$ mvn clean install
Note: If a different JDK version is already in use, the JDK version specified in the project's pom.xml file can be overridden during the project build process using the mvn (Maven) command.
For example, if the project needs to be built with JDK 17, Please write the following command :
$ mvn -Dmaven.compiler.source=17 -Dmaven.compiler.target=17 clean install
6. Skipping Build Test
In case project build failures are encountered, and would want to bypass the testing phase, please follow the below steps:
- If for example wflow-commons build has failed, head to the cloned directory of joget_src performed during 3. Obtain Source Code
- Then, browse to jw-community\wflow-commons
- Edit the pom.xml file by opening with a notepad or other similar app that one wish to use
- Find maven-surefire-plugin inside the pom.xml file
- Set <skipTests>false</skipTests> to <skipTests>true</skipTests>
If maven-surefire-plugin is not found, copy and paste from other pom.xml or copy paste the code below under plugin section of the pom
<plugin>

<groupId>org.apache.maven.plugins</groupId>

<artifactId>maven-surefire-plugin</artifactId>

<version>2.4.3</version>

<configuration>

<skipTests>true</skipTests>

</configuration>

</plugin>
If still unsure where to paste, paste under other </plugin>lines as shown in the figure below.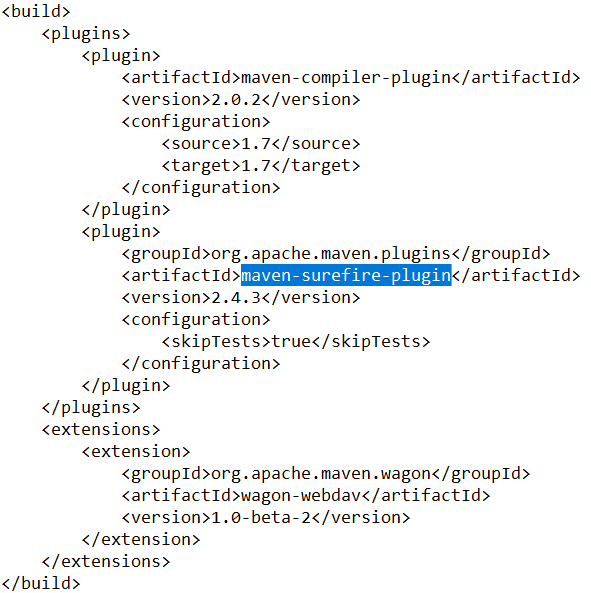
- Repeat for any other build section that has failed
- If the maven-surefire-plugin skipTests has been set to true and still fails
- Set maven-war-plugin <version>x.x.x</version> to the version of maven-compiler-plugin's
7. Fixing Plugin Version
Failed to execute goal "org.apache.maven.plugins:maven-compiler-plugin" 
To fix this issue, please follow the step below:
In the terminal write:
$ mvn wrapper:wrapper
This will automatically download and use the appropriate version of Maven defined in the project's wrapper configuration.