ภาพรวม |
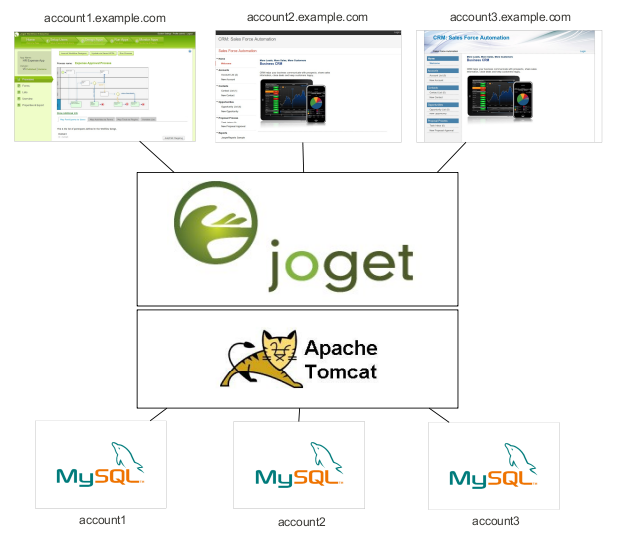
Joget Cloud Edition is an enhanced version of Joget Enterprise that supports multi-tenancy, allowing for multiple accounts (tenants) to be hosted on one webapp. Each account appears to be a separate installation.
Joget Cloud Edition เป็นรุ่นปรับปรุงของ Joget Enterprise ที่รองรับหลายผู้เช่าทำให้สามารถโฮสต์หลายบัญชี (ผู้เช่า) บนเว็บแอปเดียว แต่ละบัญชีดูเหมือนจะเป็นการติดตั้งแยกต่างหาก |
The architecture is based on a shared webapp connecting to separate databases or schemas. This allows for more cost-effective delivery of services, since many accounts can be hosted on a single app server. At the same time, each account has its own separate database and file upload directory to preserve data isolation.
สถาปัตยกรรมนั้นขึ้นอยู่กับ webapp ที่ใช้ร่วมกันเชื่อมต่อกับฐานข้อมูลหรือสคีมาแยกกัน วิธีนี้ช่วยให้สามารถจัดส่งบริการได้อย่างมีประสิทธิภาพมากขึ้นเนื่องจากมีหลายบัญชีที่สามารถโฮสต์บนเซิร์ฟเวอร์แอปเดียว ในเวลาเดียวกันแต่ละบัญชีมีฐานข้อมูลแยกต่างหากและไดเรกทอรีอัปโหลดไฟล์เพื่อรักษาข้อมูลแยก |

การติดตั้ง |
ข้อกำหนดเบื้องต้น |
ขั้นตอนการติดตั้ง |
The installation steps are similar to the installation for the standard Joget Enterprise.
ขั้นตอนการติดตั้งคล้ายกับการติดตั้งสำหรับ Joget Enterprise มาตรฐาน |
Refer to the Knowledge Base at Installation using the Linux Bundle for more detailed instructions.
อ้างถึงฐานความรู้ที่ Installation using the Linux Bundle สำหรับคำแนะนำเพิ่มเติมโดยละเอียด |
องค์ประกอบ |
การกำหนดค่า DNS |
Each account / tenant is identified by a domain name, so the DNS needs to be configured to point desired domains to Joget. For convenience, it is recommended to use a wildcard DNS record (http://en.wikipedia.org/wiki/Wildcard_DNS_record). For example:
บัญชี / ผู้เช่าแต่ละบัญชีจะถูกระบุด้วยชื่อโดเมนดังนั้น DNS จะต้องกำหนดค่าให้ชี้โดเมนที่ต้องการไปที่ Joget เพื่อความสะดวกขอแนะนำให้ใช้เร็กคอร์ด wildcard DNS (http://en.wikipedia.org/wiki/Wildcard_DNS_record) ตัวอย่างเช่น: |
*.example.com |
In this case, requests to all subdomains of example.com (e.g. account1.example.com, account2.example.com, account3.example.com) are directed to Joget.
ในกรณีนี้คำขอไปยังโดเมนย่อยทั้งหมดของ example.com (เช่น account1.example.com, account2.example.com, account3.example.com) จะถูกนำไปยัง Joget |
For local testing purposes, it is possible to just modify the local hosts file http://en.wikipedia.org/wiki/Hosts_(file) . Please note that typically, hosts file configuration does not support wildcards so it will be necessary to add separate entries for each subdomain (e.g., account1.example.com, account2.example.com, etc.).
สำหรับการทดสอบในพื้นที่คุณสามารถแก้ไขไฟล์โฮสต์ในท้องถิ่นได้ที่ http://en.wikipedia.org/wiki/Hosts_(file) โปรดทราบว่าโดยทั่วไปการกำหนดค่าไฟล์โฮสต์ไม่รองรับสัญลักษณ์แทนดังนั้นจำเป็นต้องเพิ่มรายการแยกต่างหากสำหรับแต่ละโดเมนย่อย (เช่น account1.example.com, account2.example.com เป็นต้น) |
การกำหนดค่าโปรไฟล์ |
Each account (tenant) is tied to a datasource profile. More info on profiles can be found at Custom Database Configuration.
In the Community or Enterprise Edition, only 1 profile is selected at a time. In the Cloud Edition, this is enhanced such that all accounts and profiles are enabled concurrently.
Open the file (joget.home)/wflow/app_datasource.properties. Here's an example of the file content:
แต่ละบัญชี (ผู้เช่า) เชื่อมโยงกับโปรไฟล์แหล่งข้อมูล ดูข้อมูลเพิ่มเติมเกี่ยวกับโปรไฟล์ได้ที่ Custom Database Configuration หรือ Enterprise Edition เลือกครั้งละ 1 โปรไฟล์เท่านั้น ใน Cloud Edition สิ่งนี้ได้รับการปรับปรุงเพื่อให้บัญชีและโปรไฟล์ทั้งหมดเปิดใช้งานพร้อมกัน เปิดไฟล์ (joget.home) /wflow/app_datasource.properties นี่คือตัวอย่างของเนื้อหาไฟล์: |
account1.example.com=jwc_account1 account2.example.com=jwc_account2 currentProfile=default |
The key to the left of the equal sign is the domain name, while the value to the right is the profile.
key ทางด้านซ้ายของเครื่องหมายเท่ากับคือชื่อโดเมนในขณะที่ค่าทางด้านขวาคือโปรไฟล์ |
Each profile has a corresponding file app_datasource-(profile).properties which contains the database settings.
แต่ละโปรไฟล์มีไฟล์ app_datasource- (profile) .properties ที่เกี่ยวข้องซึ่งมีการตั้งค่าฐานข้อมูล |
When a request is received, any matching domain name will use the associated profile.
เมื่อได้รับคำขอชื่อโดเมนที่ตรงกันจะใช้โปรไฟล์ที่เกี่ยวข้อง |
currentProfile is a special key to indicate the default profile to use if there are no matching domains.
currentProfile เป็นคีย์พิเศษเพื่อระบุโปรไฟล์เริ่มต้นที่จะใช้หากไม่มีโดเมนที่ตรงกัน |
In terms of file uploads and system generated files, each profile stores its files in the subdirectory (joget.home)/wflow/app_profiles/(profile).
ในแง่ของการอัปโหลดไฟล์และไฟล์ที่สร้างโดยระบบแต่ละโปรไฟล์จะจัดเก็บไฟล์ไว้ในไดเรกทอรีย่อย (joget.home)/wflow/app_profiles/(profile) |
การจัดทำบัญชี |
There are a few approaches to provision (create) an account.
มีสองสามวิธีในการจัดเตรียม (สร้าง) บัญชี |
การจัดเตรียมด้วยตนเอง |
As described in the previous Accounts Configuration section, each account is essentially a datasource profile. So an account can be manually created as follows:
As described in the previous Accounts Configuration section, each account is essentially a datasource profile. So an account can be manually created as follows: |
Create a new Joget database using the script provided in (joget.home)/data/jwdb-cloud.sql, or any other custom scripts.
สร้างฐานข้อมูล Joget ใหม่โดยใช้สคริปต์ที่ให้ไว้ใน (joget.home) /data/jwdb-cloud.sql หรือสคริปต์ที่กำหนดเองอื่น ๆ |
Create a new profile file (joget.home)/wflow/app_datasource-(profile).properties by copying from app_datasource-default.properties and changing the values accordingly.
สร้างไฟล์โปรไฟล์ใหม่ (joget.home) / wflow / app_datasource- (profile) .properties โดยคัดลอกจาก app_datasource-default.properties และเปลี่ยนค่าตามลำดับ |
Add an entry into (joget.home)/wflow/app_datasource.properties. The entry would be (domain name)=(profile).
เพิ่มรายการลงใน (joget.home) /wflow/app_datasource.properties รายการจะเป็น (ชื่อโดเมน) = (โปรไฟล์) |
The profile is active immediately, and no restart is necessary.
โปรไฟล์ใช้งานได้ทันทีและไม่จำเป็นต้องรีสตาร์ท |
การเตรียมสคริปต์ |
There is also an Ant build file and script available that simplifies account creation.
นอกจากนี้ยังมีไฟล์และสคริปต์ Ant build ที่ช่วยให้การสร้างบัญชีง่ายขึ้น |
Execute the file (joget.home)/cloud-provision-account.sh.
ดำเนินการไฟล์ (joget.home) /cloud-provision-account.sh |
When prompted for Account Profile Name, enter the required account name (e.g., demo).
เมื่อได้รับพร้อมท์สำหรับชื่อโปรไฟล์บัญชีให้ป้อนชื่อบัญชีที่ต้องการ (เช่นการสาธิต) |
The next prompt is for the Main Domain Name. Enter the main domain (e.g., example.com).
พรอมต์ถัดไปสำหรับชื่อโดเมนหลัก ป้อนโดเมนหลัก (เช่น example.com) |
Subsequent inputs will have default values that you can just enter and accept, or change before submitting.
อินพุตที่ตามมาจะมีค่าเริ่มต้นที่คุณสามารถป้อนและยอมรับหรือเปลี่ยนแปลงก่อนที่จะส่ง |
Upon submission of all the inputs, the script will create the database and perform the necessary configuration for the account. The inputs are as follows:
เมื่อส่งอินพุตทั้งหมดสคริปต์จะสร้างฐานข้อมูลและดำเนินการกำหนดค่าที่จำเป็นสำหรับบัญชี อินพุตมีดังนี้: |
Account Profile Name | Desired account name (e.g., demo)
| |
Main Domain | Main domain (e.g., example.com)
| |
Account Domain Name | Account domain (e.g., demo.example.com)
| |
Account Database Name | Database name for the account (e.g., jwc_demo)
| |
Account Database User | Database user for the account (e.g., jwc_demo)
| |
Account Database Password | Database password for the account (e.g., jwc_demo)
| |
Home Directory | Joget home directory; defaults to current directory
| |
wflow Directory | Joget configuration directory; defaults to ./wflow
| |
MySQL host name | Database server host name
| |
MySQL port | Database port
| |
MySQL username | Database admin user (with permission to create database)
| |
MySQL password | Database admin password
|
แอป Cloud Admin |
For convenience, a simple Joget app is provided to automate the account request approval and provisioning process.
เพื่อความสะดวกเรามีแอพ Joget ที่เรียบง่ายเพื่อให้การอนุมัติคำขอบัญชีและกระบวนการจัดเตรียมโดยอัตโนมัติ |
Import the app in (joget.home)/lib/APP_cloud-xxxx.zip into Joget.
นำเข้าแอปใน (joget.home) /lib/APP_cloud-xxxx.zip ไปที่ Joget |
Go to Properties & Export and set the “domain” to the appropriate value for the main domain (e.g., example.com).
ไปที่คุณสมบัติ & ส่งออกแล้วตั้งค่า“ โดเมน” เป็นค่าที่เหมาะสมสำหรับโดเมนหลัก (เช่น example.com) |
Publish the app.
เผยแพร่แอพ |
Access the app at http://localhost:8080/jw/web/userview/cloud/admin/.
เข้าถึงแอปได้ที่ http://localhost:8080/jw/web/userview/cloud/admin/ |
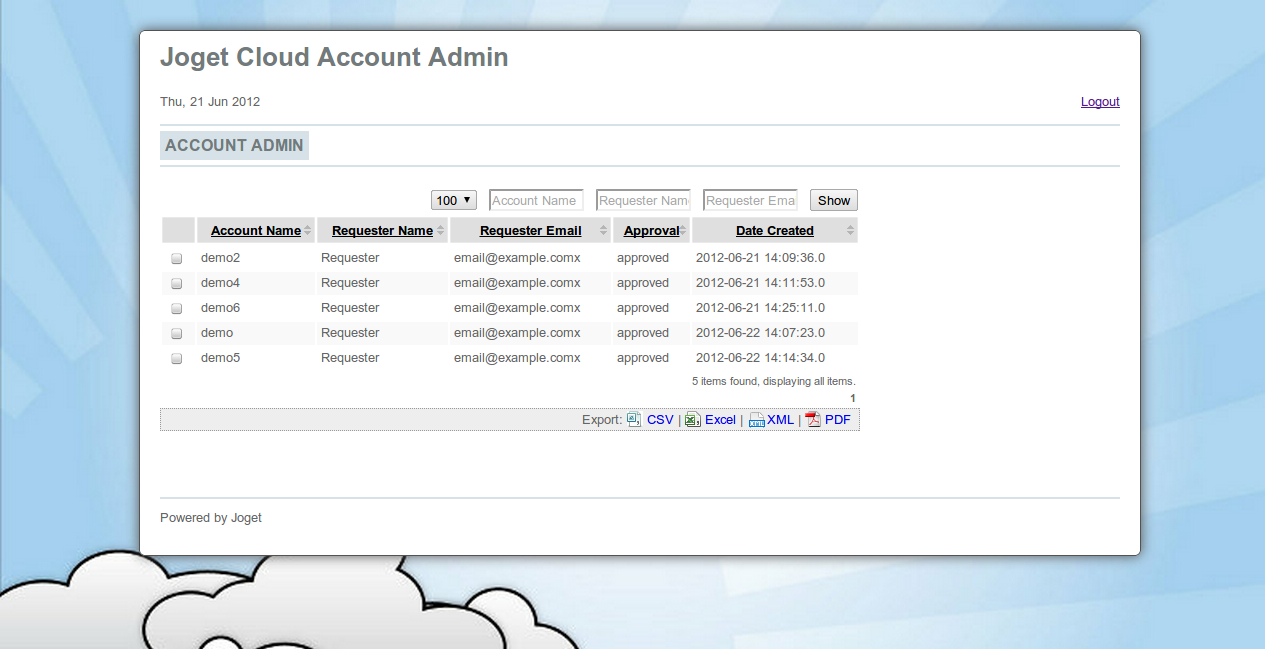
Login to view the Account List.
เข้าสู่ระบบเพื่อดูรายการบัญชี |

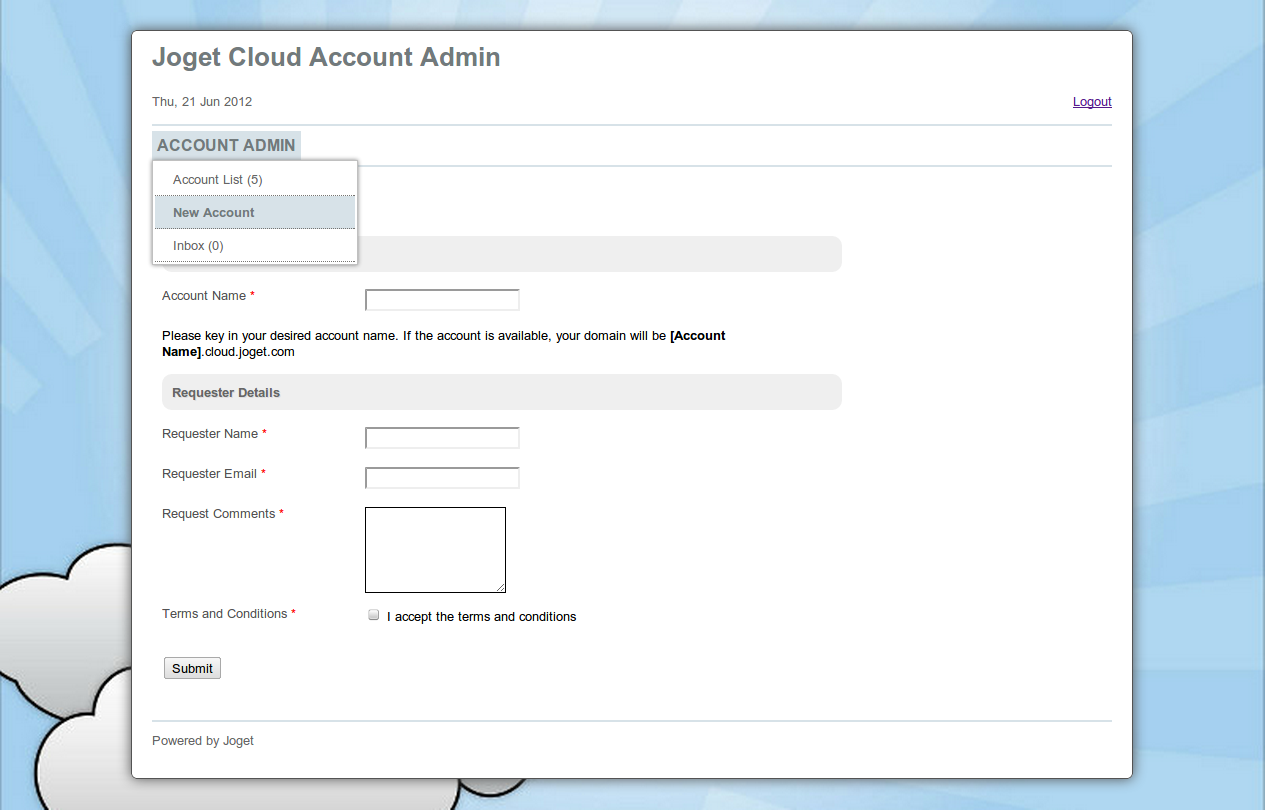
Select New Account from the drop-down menu to request for a new account.
เลือกบัญชีใหม่จากเมนูแบบเลื่อนลงเพื่อขอบัญชีใหม่ |

When a request is submitted, it needs to be approved. Approve the request; a BeanShell tool will be executed to provision the account.
เมื่อส่งคำขอจะต้องได้รับการอนุมัติ อนุมัติคำขอ เครื่องมือ BeanShell จะถูกดำเนินการเพื่อจัดเตรียมบัญชี |
Verify that the account is created at the requested domain (e.g., demo.example.com).
ตรวจสอบว่าบัญชีถูกสร้างที่โดเมนที่ร้องขอ (เช่น demo.example.com) |
Modify the app where necessary:
แก้ไขแอปที่จำเป็น: |
In a production environment, it is recommended for security purposes that this app be installed on a specific profile instead of the default profile.
ในสภาพแวดล้อมการผลิตขอแนะนำให้ใช้เพื่อความปลอดภัยที่ติดตั้งแอปนี้ในโปรไฟล์ที่ระบุแทนโปรไฟล์เริ่มต้น |
การลบบัญชี |
กำจัดด้วยตนเอง |
To disable an account, perform the following:
หากต้องการปิดใช้งานบัญชีให้ทำดังต่อไปนี้: |
Remove the profile entry from (joget.home)/wflow/app_datasource.properties. This effectively disables the account.
ลบรายการโปรไฟล์ออกจาก (joget.home) /wflow/app_datasource.properties ซึ่งจะเป็นการปิดใช้งานบัญชีอย่างมีประสิทธิภาพ |
To fully delete the account:
หากต้องการลบบัญชีทั้งหมด: |
Remove the profile entry from (joget.home)/wflow/app_datasource.properties.
ลบรายการโปรไฟล์ออกจาก (joget.home) /wflow/app_datasource.properties |
Delete the profile properties file (joget.home)/wflow/app_datasource-(profile).properties.
ลบไฟล์คุณสมบัติโปรไฟล์ (joget.home) / wflow / app_datasource- (profile) .properties |
Delete the associated account database.
ลบฐานข้อมูลบัญชีที่เกี่ยวข้อง |
Delete the associated account profile directory (joget.home)/wflow/app_profiles/(profile).
ลบไดเรกทอรีโปรไฟล์บัญชีที่เกี่ยวข้อง (joget.home)/wflow/app_profiles/(profile) |
If the Cloud Admin App is used, delete the record from the db table app_fd_cloud_account.
หากใช้แอป Cloud Admin ให้ลบระเบียนออกจากตาราง db app_fd_cloud_account |
ซ่อมบำรุง |
เข้าสู่ระบบ |
As with a standard Joget installation on Apache Tomcat, the log file is at (joget.home)/apache-tomcat-xxxx/logs/catalina.out.
เช่นเดียวกับการติดตั้ง Joget มาตรฐานบน Apache Tomcat ล็อกไฟล์คือ (joget.home) /apache-tomcat-xxxx/logs/catalina.out |
อัพเดท |
Updates to WAR files are done as per standard Joget installation.
การอัพเดตไฟล์ WAR เสร็จสิ้นตามการติดตั้ง Joget มาตรฐาน |
การสำรองข้อมูล |
Backups should be done for all MySQL databases as well as configuration and data files in (joget.home)/wflow.
การสำรองข้อมูลควรทำสำหรับฐานข้อมูล MySQL ทั้งหมดรวมถึงการกำหนดค่าและไฟล์ข้อมูลใน (joget.home) / wflow |