Introduction
The OpenKM Document Management System (DMS) plugin facilitates the seamless integration of OpenKM and Joget. This integration currently utilises few plugin types:
- Datalist Formatter - Format datalist file upload column to download file from OpenKM directly.
- File Upload Element - Upload files to OpenKM. Bind folder paths from the select box field that uses the Form Options Binder. Able to choose whether to create folder that follows Joget form ID when uploading.
- Form Options Binder - Retrieve folder paths from OpenKM.
The plugin is created with the use of RESTful Guide - OpenKM Documentation to perform RESTful API calls on OpenKM.
Plugin Info
Plugin Available in the Bundle:
OpenKM DMS Datalist Formatter
- OpenKM DMS File Upload
- OpenKM DMS Form Options Binder
This plugin bundle is compatible with Joget DX 8.
Expected Outcome
Upon successful integration, Joget will be able to upload files into OpenKM browser based on the directory set by users.

Figure 1: Example of successful integration
Getting Started
Prerequisites
1. Java 8 Environment
In order to successfully install OpenKM, Java 8 is an essential prerequisite that must be present on the system environment, which can be downloaded from the Oracle Official Website. This version of Java provides the necessary runtime environment for OpenKM to operate effectively and efficiently. Without Java 8, the installation process may encounter errors or fail altogether, rendering OpenKM unusable.
2. OpenKM Community Version
OpenKM Community Version JAR file can be obtained from the Official OpenKM Website OpenKM "Community Version" Download Button. This official source ensures users access the most up-to-date and authentic version of the software, safeguarding against potential security risks and ensuring compatibility with existing systems.
3. OpenKM Database
OpenKM is able to integreate with MySQL, PostgreSQL, Oracle or SQL Server. In this article, we will be using MySQL as the OpenKM database.
Link to MySQL Download:
Installation Guide:
4. OpenKM DMS Plugin
To integrate Joget with OpenKM, we will use the OpenKM DMS Plugin from https://github.com/jogetoss/openkm-dms.
Setting up OpenKM DMS
1. OpenKM Installer Setup
To setup the OpenKM installer, open Command Prompt as Administrator and open the file directory where you stored the OpenKM installer.
In the command prompt, use java -jar OKMInstaller.jar to start installing OpenKM. After entering the command, it will display the output as image below and we can enter the configuration we prefer.

Figure 2: OpenKM Configuration
OpenKM installation will install Tomcat automatically in the current path directory. After successfully installing OpenKM it will display a "SUCCESS: Specified value was saved." with a database query to create the database, user and password based on the information entered in Figure 2.

Figure 3: Successful Installation
Copy & Paste
Copy and paste the query during MySQL setup in Figure 6.
CREATE DATABASE okmdb DEFAULT CHARACTER SET utf8 DEFAULT COLLATE utf8_bin;
CREATE USER openkm@localhost IDENTIFIED BY 'YourPassword';
GRANT ALL ON okmdb.* TO openkm@localhost WITH GRANT OPTION;
As a confirmation of a successful installation, open Services in the computer's system and search for OpenKM:

Figure 4: OpenKM Services
2. MySQL Setup
Access the root database to execute the query in Figure 3 to create "okmdb" database.

Figure 5: Access Root Database

Figure 6: Creating okmdb Database
Go to Server > Users and Privileges and select the newly created User and check all the following boxes to give the User full privilege of the database. Not doing so will create an error when trying to access OpenKM browser.

Figure 7: Set Users Privileges

Figure 8: Select User and Check All the Roles
Create a new connection and enter all the information set in Figure 3.

Figure 9: Create New Connection
3. OpenKM.cfg First Time User Setup
For first time user, an error will occur when accessing OpenKM local browser because there is no existing UUID for the current user. To prevent this error from occurring, we will need to create a UUID when loading the browser. To do so we will make some configuration in the Tomcat folder.
Open Tomcat folder > OpenKM.cfg in IDE(Visual Studio code, Intellij, etc.) and make small changes in a line of code:
# OpenKM Hibernate configuration values
hibernate.dialect=org.hibernate.dialect.MySQL5InnoDBDialect
hibernate.hbm2ddl=none

# Logback configuration file
logback.config=logback.xml

# LibreOffice configuration
system.openoffice.program=D:/Joget/QA/OpenKM/OKM/tomcat-8.5.69/extras/LibreOffice/App/libreoffice/program/soffice.exe
# OpenKM Hibernate configuration values
hibernate.dialect=org.hibernate.dialect.MySQL5InnoDBDialect
hibernate.hbm2ddl=create //change in this line from "none" to "create"

# Logback configuration file
logback.config=logback.xml

# LibreOffice configuration
system.openoffice.program=D:/Joget/QA/OpenKM/OKM/tomcat-8.5.69/extras/LibreOffice/App/libreoffice/program/soffice.exe
4. OpenKM Server and Shutdown Port Changes
OpenKM Server and Shutdown Port needs to be changed since Joget's default ports will populate the same ports which prevents OpenKM from running. Thus, we need to configure the ports in the server.xml file.
Go to Tomcat folder > conf > server.xml
<Connector port="8180" address="0.0.0.0" protocol="HTTP/1.1"
               connectionTimeout="20000" redirectPort="8443"/>
<Server port="8006" shutdown="SHUTDOWN">
  <Listener className="org.apache.catalina.startup.VersionLoggerListener"/>
Tomcat Service
Restarting the Tomcat Service is necessary for changes made in the server.xml file to be reflected before launching the OpenKM browser.
OpenKM in Runtime
To access the OpenKM browser, make sure the service is running as in Figure 4.
Open OpenKM in browser with http://localhost:{Port}/OpenKM.
When you see the following page, it shows that your OpenKM has been successfully hosted. Default login credentials are "okmAdmin" with password "admin".

Figure 10: OpenKM Login Page
After logging in, you will see the homepage of OpenKM.

Figure 11: OpenKM Homepage
Setup OpenKM Plugin
First, drag a select box and use the OpenKM DMS Form Options Binder to load the folder paths from OpenKM. Fill in the required credentials for the plugin to work as intended (Figure 12). The Root Folder UUID can be retrieved on the OpenKM folder that we intend to configure as root folder (Figure 13).

Figure 12: Joget Form Builder (Select Box with OpenKM DMS Form Options Binder)

Figure 13: Retrieve OpenKM Root Folder UUID
Then, the OpenKM DMS File Upload tool can be drag and drop to attach into the form as a form element. Fill in the OpenKM Configurations with necessary details. If the credentials of OpenKM is invalid, "Authentication ERROR" will be shown in the element (Figure 14).
When configuring the Field Mapping, "Field for OpenKM Folder Path Upload" must point to the file path created in Figure 12, if no fields are mapped, the default file path will be "/okm:root".

Figure 14: Joget Form Builder (OpenKM DMS File Upload Element)
In the datalist builder, we can format the file upload column by using the OpenKM DMS Datalist Formatter. Similar configurations can be key in to enable users to download the file directly from datalist. Make sure the "file path" fields are in the datalist (can be configured to be hidden if we do not wish to show, but it must be there). If field mapping is not configured, the default file path will be "/okm:root".

Figure 15: Joget List Builder (OpenKM DMS Datalist Formatter)
If we do not wish to type the credentials multiple times, the credentials can also be easily added into environment variables, and then use a hash variable to refer to the values in environmental variables. For more information, please refer to Environment Variable - Knowledge Base for DX 7 - Joget | COMMUNITY.
OpenKM Plugin Demo
Upload File
After all the configurations has been done, the user can retrieve the folder paths from OpenKM in the select box, then choose a file to upload.

Figure 16: OpenKM DMS UI (Form)
After uploading, we can view the latest file path that the file has been uploaded to, and also download the file retrieved from OpenKM.

Figure 17: OpenKM DMS UI (List)
At OpenKM DMS, we can view the file being uploaded. If we modify the file here, we can also get the modified newest file in Joget.

Figure 18: OpenKM DMS Homepage with Uploaded File
To upload multiple files and other file upload features, please visit File Upload - Knowledge Base for DX 8 - Joget | COMMUNITY for further information.
Delete File
If "Delete Actual File During Overwrite or Removal?" checkbox is checked, when file is overwritten or removed, the actual file in OpenKM will be deleted.

Figure 19: Delete Actual File During Overwrite or Removal? Config
This was the existing record in OpenKM.

Figure 20: Existing file in OpenKM
Edit the existing record.

Figure 21: Edit existing record
Click on remove and save the record.

Figure 22: Remove file and save
The file has been removed from the record. Please note that if you remove the entire record, it does not count as removing the file.

Figure 23: File removed from record
In OpenKM, the file has also been removed.

Figure 24: OpenKM file removed
To remove the folder generated automatically, " checkbox has to be checked.

Figure 25:
Upload a file to OpenKM again to test this. Repeat the steps above similarly to remove the file. Below shows the file uploaded in OpenKM.

Figure 26: File uploaded to OpenKM
Remove the file and save the form.
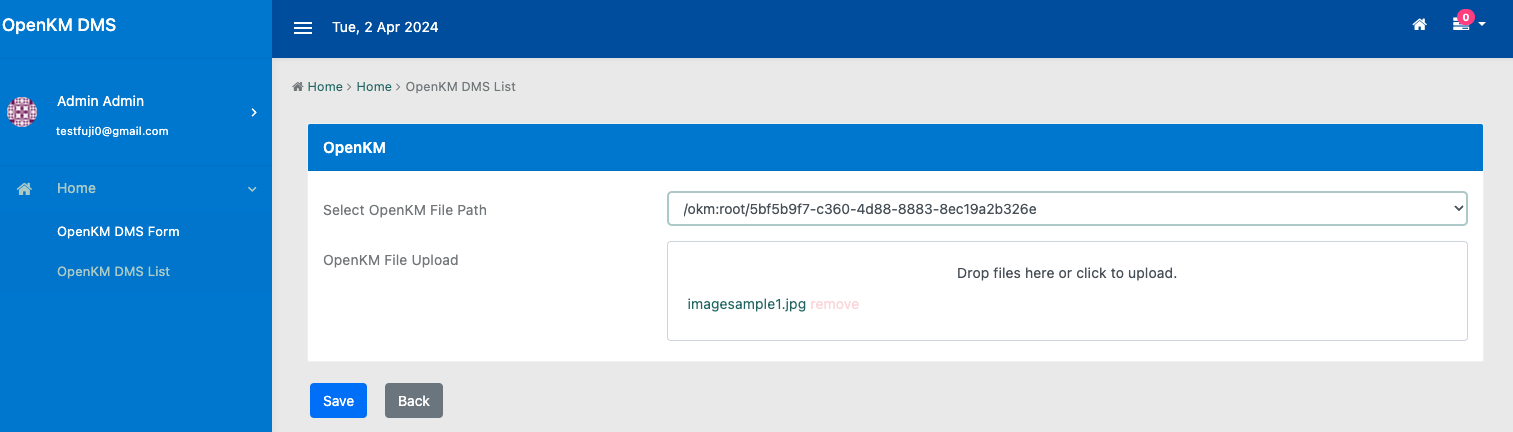
Figure 27: Remove file
The file has been removed together with the folder. Please note that if you have other items under the folder, it will get removed as well.

Figure 28: File and folder removed in OpenKM
Update File Version
If "Create New Version" for Same File Upload Action is selected, a new version of the file will be uploaded to OpenKM instead of replacing the old file.

Figure 29: Create New Version for file
Now we try to upload some files into OpenKM.

Figure 30: Upload some files to OpenKM
The files are uploaded at Version 1.0 each.

Figure 31: Uploaded files at OpenKM
Update one of the files, in the example it is "joget_logo.jpeg".

Figure 32: Replace a file with same name
Now you can see the Version has increased from 1.0 to 1.1.

Figure 33: Replaced file has new version
Lock File
If "Lock File in OpenKM" is checked, the file will be locked when uploading to OpenKM.

Figure 34: Lock File in OpenKM
Go to the same form and upload "joget_logo.jpeg" again.

Figure 35: Replace a file to lock the new uploaded file
The file is now locked in OpenKM.

Figure 36: File Locked at OpenKM
OpenKM Setup Troubleshooting
1. Database Cannot Open Connection
The issue was cause due to the authentication method when setting up MySQL.

Figure 37: Cannot Open Connection Error
Troubleshooting Steps
- Run MySQL installer.
- Click Reconfigure for "MySQL Server".
- In the Authentication Method change the default settings to Use Legacy Authentication Method.
- Restart MySQL80 Service in Computer System Services and retry running OpenKM in browser.

Figure 38: Authentication Method
To read more about the error, please refer to this link https://188.40.247.219/viewtopic.php?t=23368
2. Windows could not start the OpenKM on Local Computer.
The root can't be pinpoint because the issue differs for each machine. Thus, only workarounds can be provided.
Troubleshooting Steps.
- Open Command Prompt.
- Open Tomcat Folder > Bin > type in catalina.bat run > press Enter.
- Wait for the server to startup.
- Access http://localhost:[port]/OpenKM.
- Use netstat -ano | findstr [port] to make sure the service is runnning.
- User should be able to see OpenKM login page when trying to access the browser.
OpenKM DMS Form Options Binder
Name | Description |
|---|---|
Credentials | Header field. |
Username * | OpenKM username. |
Password * | OpenKM password. |
OpenKM URL * | The URL that OpenKM is hosted at. Example: http://localhost:[port]/OpenKM |
Root Folder UUID * | The folder UUID retrieved from OpenKM folder. The UUID can be configured depending on desired folder level to start with. |
OpenKM DMS File Upload Properties
More details on default configurations for file upload: File Upload - Knowledge Base for DX 8 - Joget | COMMUNITY
Below are configurations for section "OpenKM Configurations":
Name | Description |
|---|---|
Credentials | Header field. |
Username * | OpenKM username. |
Password * | OpenKM password. |
OpenKM URL * | The URL that OpenKM is hosted at. Example: http://localhost:[port]/OpenKM |
Field Mappings | Header field. |
Form | The current form to bind the field with. |
Field for OpenKM Folder Path Upload | The selected form field that contains the OpenKM File Path value |
Same File Upload Action | Action to perform when a file with the same name is uploaded
|
Delete or Update Actual File During Overwrite or Removal? | Checkbox field. If true, actual file in OpenKM will be deleted or updated when the file is overwritten or removed in Joget. If false, when a file is removed, all the file links to OpenKM will be removed. |
Automatically Create Folder by Form ID | Checkbox field. If true, file will be uploaded inside a newly created folder using submitted form ID in OpenKM. If false, file will be directly uploaded into the OpenKM File Path. Uncheck the field if you are not configuring "Field Mapping" which is using the default path("/okm:root"). Checking the field will create a different path in OpenKM and Joget. OpenKM will store it in a Unique ID path, while Joget will store the file path as '/okm:root'. The difference in paths may result in an HTTP Status 500 Error when attempting to download the file from Joget. |
Checkbox field. If true, the folder that was created automatically by form ID when Automatically Create Folder by Form ID checkbox is checked will be deleted when file is removed. This action will delete all items under the folder. If false, the folder will not get deleted when file is removed. |
OpenKM DMS Datalist Formatter
Name | Description |
|---|---|
Credentials | Header field. |
Username * | OpenKM username. |
Password * | OpenKM password. |
OpenKM URL * | The URL that OpenKM is hosted at. Example: http://localhost:[port]/OpenKM |
Field Mappings | Header field. |
Form | The current form to bind the field with. |
OpenKM Path for File Upload | The current column field that contains the OpenKM File Path value. |
OpenKM on Cloud
To utilize the OpenKM DMS Plugin on Joget Cloud, it's essential to deploy OpenKM on the cloud as well to ensure online accessibility.
If the OpenKM DMS Plugin is hosted on the cloud while OpenKM remains on a local server, Joget won't be able to access OpenKM, resulting in an "Authentication Error" being displayed.
File Delete
In OpenKM DMS File Upload > Advanced Settings > "Delete Actual File During Overwrite or Removal?" Checkbox.
This feature will not affect OpenKM file when an existing file is deleted in Joget, thus, deleting the same file from OpenKM and Joget has to be done manually.
Related Links
- File Upload Documentation: https://dev.joget.org/community/display/DX8/File+Upload
- OpenKM Download Website: https://www.openkm.com/en/download.html
- Refer to https://www.openkm.com/wiki/index.php/RESTful_Guide if you wish to learn more about OpenKM' RESTful API.
- Refer to https://dev.joget.org/community/display/DX7/Environment+Variable to know more about Environment Variable.