ในบทเรียนนี้ เราติดตามได้ที่ guideline for developing a plugin เพื่อพัฒนาปลั๊กอิน JDBC Options Binder ของเรา. โปรดอ้างอิงถึงบทเรียน How to develop a Bean Shell Hash Variable สำหรับรายละเอียดเพิ่มเติม
1. ปัญหาคืออะไร?
บางครั้งเราต้องการเขียนกำหนด query เพื่อเพิ่มตัวเลือกสำหรับฟิลด์ตัวเลือกของเรา
2.ความคิดของคุณในการแก้ปัญหาคืออะไร?
Joget Workflow ได้จัดเตรียมประเภทปลั๊กอินที่เรียกว่า Form Options Binder Plugin. เราจะพัฒนาปลั๊กอินเพื่อสนับสนุนการเชื่อมต่อ JDBC และการกำหนด query.
3. อินพุตที่จำเป็นสำหรับปลั๊กอินของคุณคืออะไร?
เพื่อการพัฒนาปลั๊กอิน JDBC Options binder เราจะต้องตั้งค่าการเชื่อต่อ JDBC และนอกจากนี้ต้องกำหนด query เพื่อเพิ่มตัวเลือก
- Datasource: การใช้แหล่งข้อมูลที่กำหนดเองหรือแหล่งข้อมูลเริ่มต้นของ Joget
- Custom JDBC Driver: ไดรเวอร์ JDBC สำหรับแหล่งข้อมูลที่กำหนดเอง
- Custom JDBC URL: URL การเชื่อมต่อ JDBC สำหรับแหล่งข้อมูลที่กำหนดเอง
- Custom JDBC Username: ชื่อผู้ใช้สำหรับแหล่งข้อมูลที่กำหนดเอง
- Custom JDBC Password: รหัสผ่านสำหรับแหล่งข้อมูลที่กำหนดเอง
- SQL Query: The query เพื่อเพิ่มตัวเลือก
- Use Ajax: ช่องทำเครื่องหมายเพื่อตัดสินใจว่าจะใช้ AJAX เพื่อโหลดตัวเลือกหรือไม่ (สำหรับ AJAX Cascading Drop-Down List)
The query ควรสนับสนุนค่าอ้างอิงเมื่อใช้ AJAX.
ตัวอย่าง:
- SELECT id, name from app_fd_sample where group = ?
- SELECT id, name from app_fd_sample where group in (?)
4. ผลลัพธ์และผลลัพธ์ที่คาดหวังจากปลั๊กอินของคุณคืออะไร?
คอลัมน์แรกของผลลัพธ์ JDBC ที่ส่งคืนจะเป็นค่าของตัวเลือกและคอลัมน์ที่สองคือป้ายกำกับของตัวเลือก จะมีอีกคอลัมน์ที่สามที่เป็นทางเลือกสำหรับการจัดกลุ่มเมื่อไม่ได้ใช้ AJAX สำหรับ drop-down list.
5. มีทรัพยากร / API ที่สามารถนำกลับมาใช้ใหม่ได้หรือไม่?
เราสามารถอ้างถึงการดำเนินการของอื่น ๆ ที่มีอยู่ Form Options Binder plugins. แหล่งข้อมูลเริ่มต้นของ Joget สามารถเรียกดูได้ AppUtil.getApplicationContext().getBean("setupDataSource").
6. เตรียม environment ของคุณเพื่อการพัฒนา
เราจำเป็นต้องให้ซอร์สโค้ด Joget Workflow ของเราพร้อมและสร้างโดยทำตาม this guideline.
บทช่วยสอนต่อไปนี้จัดทำขึ้นด้วย Macbook Pro และ Joget Source Code version 5.0.0. โปรดดูที่ Guideline for developing a plugin บทความสำหรับคำสั่งแพลตฟอร์มอื่น ๆ
สมมติว่าไดเรกทอรีโฟลเดอร์ของเรามีดังนี้
- Home
  - joget
    - plugins
    - jw-community
      -5.0.0
ไดเรกทอรี "ปลั๊กอิน" คือโฟลเดอร์ที่เราจะสร้างและจัดเก็บปลั๊กอินของเราทั้งหมดและไดเรกทอรี "jw-community" เป็นที่เก็บซอร์สโค้ด Joget Workflow
เรียกใช้คำสั่งต่อไปนี้เพื่อสร้างโครงการ maven ในไดเรกทอรี "ปลั๊กอิน"
cd joget/plugins/
~/joget/jw-community/5.0.0/wflow-plugin-archetype/create-plugin.sh org.joget.tutorial jdbc_options_binder 5.0.0
จากนั้น the shell script จะขอให้เราใส่หมายเลขเวอร์ชันสำหรับปลั๊กอินและขอการยืนยันก่อนที่จะสร้างโครงการ maven
Define value for property 'version':  1.0-SNAPSHOT: : 5.0.0
[INFO] Using property: package = org.joget.tutorial
Confirm properties configuration:
groupId: org.joget.tutorial
artifactId: jdbc_options_binder
version: 5.0.0
package: org.joget.tutorial
Y: : y
เปิดโครงการ maven ด้วย IDE ที่คุณโปรดปราน เราแนะนำให้ใช้ NetBeans.
7. เริ่มโค้ด!
a. การขยาย abstract class ของประเภทปลั๊กอิน
สร้างคลาส "JdbcOptionsBinder" ภายใต้ "org.joget.tutorial" package. จากนั้น extend the class with org.joget.apps.form.model.FormBinder abstract class.
เพื่อให้ Form Options Binder ทำงาน เราจะต้องติดต่อกับ org.joget.apps.form.model.FormLoadOptionsBinder interface. เราต้องการสนันสนุน AJAX Cascading Drop-Down List เป็นอย่างดี ดังนั้เราต้องติดต่อกับ org.joget.apps.form.model.FormAjaxOptionsBinder interface ด้วย
โปรดอ้างอิงถึง Form Options Binder Plugin.
b. การดำเนินการของ abstract methods ทั้งหมด
เช่นเคยเราจะต้องใช้ abstract methods ทั้งหมด เราจะใช้ AppPluginUtil.getMessage method ในการสนับสนุน i18n และใช้ตัวแปรคงที่ MESSAGE_PATH สำหรับ message resource bundle directory.
จากนั้นเราจะต้องสร้าง UI สำหรับผู้ใช้ผู้ดูแลระบบเพื่อใส่อินพุตสำหรับปลั๊กอินของเรา ใน getPropertyOptions method, เราได้กำหนดไว้แล้วว่าไฟล์คุณสมบัติของ Plugin Properties Options ตั้งอยู่ที่ "/properties/jdbcOptionsBinder.json". ให้เราสร้าง directory "resources/properties" ภายใต้ "jdbc_options_binder/src/main" หลังจากนั้นให้สร้างไฟล์ชื่อ "jdbcOptionsBinder.json" ในโฟลเดอร์ "properties"
ในไฟล์คุณสมบัติเราจะต้องใส่ตัวเลือกดังต่อไปนี้. โปรดทราบว่าเราจะใช้ syntax "@@message.key@@" ในการสนับสนุนตัวเลือกคุณสมบัติ i18n ของเรา
[{
    title : '@@form.jdbcOptionsBinder.config@@',
    properties : [{
        name : 'jdbcDatasource',
        label : '@@form.jdbcOptionsBinder.datasource@@',
        type : 'selectbox',
        options : [{
            value : 'custom',
            label : '@@form.jdbcOptionsBinder.customDatasource@@'
        },{
            value : 'default',
            label : '@@form.jdbcOptionsBinder.defaultDatasource@@'
        }],
        value : 'default'
    },{
        name : 'jdbcDriver',
        label : '@@form.jdbcOptionsBinder.driver@@',
        description : '@@form.jdbcOptionsBinder.driver.desc@@',
        type : 'textfield',
        value : 'com.mysql.jdbc.Driver',
        control_field: 'jdbcDatasource',
        control_value: 'custom',
        control_use_regex: 'false',
        required : 'true'
    },{
        name : 'jdbcUrl',
        label : '@@form.jdbcOptionsBinder.url@@',
        type : 'textfield',
        value : 'jdbc:mysql://localhost/jwdb?characterEncoding=UTF8',
        control_field: 'jdbcDatasource',
        control_value: 'custom',
        control_use_regex: 'false',
        required : 'true'
    },{
        name : 'jdbcUser',
        label : '@@form.jdbcOptionsBinder.username@@',
        type : 'textfield',
        control_field: 'jdbcDatasource',
        control_value: 'custom',
        control_use_regex: 'false',
        value : 'root',
        required : 'true'
    },{
        name : 'jdbcPassword',
        label : '@@form.jdbcOptionsBinder.password@@',
        type : 'password',
        control_field: 'jdbcDatasource',
        control_value: 'custom',
        control_use_regex: 'false',
        value : ''
    },{
        name : 'useAjax',
        label : '@@form.jdbcOptionsBinder.useAjax@@',
        type : 'checkbox',
        options : [{
            value : 'true',
            label : ''
        }]
    },{
        name : 'addEmpty',
        label : '@@form.jdbcOptionsBinder.addEmpty@@',
        type : 'checkbox',
        options : [{
            value : 'true',
            label : ''
        }]
    },{
        name : 'emptyLabel',
        label : '@@form.jdbcOptionsBinder.emptyLabel@@',
        type : 'textfield',
        control_field: 'addEmpty',
        control_value: 'true',
        control_use_regex: 'false',
        value : ''
    },{
        name : 'sql',
        label : '@@form.jdbcOptionsBinder.sql@@',
        description : '@@form.jdbcOptionsBinder.sql.desc@@',
        type : 'codeeditor',
        mode : 'sql',
        required : 'true'
    }],
    buttons : [{
        name : 'testConnection',
        label : '@@form.jdbcOptionsBinder.testConnection@@',
        ajax_url : '[CONTEXT_PATH]/web/json/app[APP_PATH]/plugin/org.joget.tutorial.JdbcOptionsBinder/service?action=testConnection',
        fields : ['jdbcDriver', 'jdbcUrl', 'jdbcUser', 'jdbcPassword'],
        control_field: 'jdbcDatasource',
        control_value: 'custom',
        control_use_regex: 'false'
    }]
}]
ในตัวเลือกคุณสมบัติ, เราจะเพิ่มปุ่มเพื่อทดสอบการเชื่อมต่อ เมื่อเราใช้ datasource แบบกำหนดเอง ปุ่มนี้จะเรียก JSON API เพื่อทำการทดสอบ. ดังนั้นปลั๊กอินของเราจะต้องติดต่อกับ org.joget.plugin.base.PluginWebSupport เพื่อให้เป็น Web Service Plugin และใช้ webService method เพื่อทำการทดสอบ JDBC connection.
    /**
     * JSON API for test connection button
     * @param request
     * @param response
     * @throws ServletException
     * @throws IOException
     */
    public void webService(HttpServletRequest request, HttpServletResponse response) throws ServletException, IOException {
        //Limit the API for admin usage only
        boolean isAdmin = WorkflowUtil.isCurrentUserInRole(WorkflowUserManager.ROLE_ADMIN);
        if (!isAdmin) {
            response.sendError(HttpServletResponse.SC_UNAUTHORIZED);
            return;
        }

        String action = request.getParameter("action");
        if ("testConnection".equals(action)) {
            String message = "";
            Connection conn = null;
            try {
                AppDefinition appDef = AppUtil.getCurrentAppDefinition();

                String jdbcDriver = AppUtil.processHashVariable(request.getParameter("jdbcDriver"), null, null, null, appDef);
                String jdbcUrl = AppUtil.processHashVariable(request.getParameter("jdbcUrl"), null, null, null, appDef);
                String jdbcUser = AppUtil.processHashVariable(request.getParameter("jdbcUser"), null, null, null, appDef);
                String jdbcPassword = AppUtil.processHashVariable(SecurityUtil.decrypt(request.getParameter("jdbcPassword")), null, null, null, appDef);

                Properties dsProps = new Properties();
                dsProps.put("driverClassName", jdbcDriver);
                dsProps.put("url", jdbcUrl);
                dsProps.put("username", jdbcUser);
                dsProps.put("password", jdbcPassword);
                DataSource ds = BasicDataSourceFactory.createDataSource(dsProps);

                conn = ds.getConnection();

                message = AppPluginUtil.getMessage("form.jdbcOptionsBinder.connectionOk", getClassName(), MESSAGE_PATH);
            } catch (Exception e) {
                LogUtil.error(getClassName(), e, "Test Connection error");
                message = AppPluginUtil.getMessage("form.jdbcOptionsBinder.connectionFail", getClassName(), MESSAGE_PATH) + "\n"  + e.getMessage();
            } finally {
                try {
                    if (conn != null && !conn.isClosed()) {
                        conn.close();
                    }
                } catch (Exception e) {
                    LogUtil.error(DynamicDataSourceManager.class.getName(), e, "");
                }
            }
            try {
                JSONObject jsonObject = new JSONObject();
                jsonObject.accumulate("message", message);
                jsonObject.write(response.getWriter());
            } catch (Exception e) {
                //ignore
            }
        } else {
            response.setStatus(HttpServletResponse.SC_NO_CONTENT);
        }
    }
เมื่อเราเสร็จสิ้นด้วยตัวเลือกคุณสมบัติเพื่อรวบรวมอินพุตและบริการเว็บเพื่อทดสอบการเชื่อมต่อ เราสามารถทำงานกับวิธีการหลักของปลั๊กอินซึ่งเป็นวิธีการ loadAjaxOptions
    public FormRowSet loadAjaxOptions(String[] dependencyValues) {
        FormRowSet rows = new FormRowSet();
        rows.setMultiRow(true);

        //add empty option based on setting
        if ("true".equals(getPropertyString("addEmpty"))) {
            FormRow empty = new FormRow();
            empty.setProperty(FormUtil.PROPERTY_LABEL, getPropertyString("emptyLabel"));
            empty.setProperty(FormUtil.PROPERTY_VALUE, "");
            rows.add(empty);
        }

        //Check the sql. If require dependency value and dependency value is not exist, return empty result.
        String sql = getPropertyString("sql");
        if ((dependencyValues == null || dependencyValues.length == 0) && sql.contains("?")) {
            return rows;
        }

        Connection con = null;
        PreparedStatement pstmt = null;
        ResultSet rs = null;

        try {
            DataSource ds = createDataSource();
            con = ds.getConnection();

            //support for multiple dependency values
            if (sql.contains("?") && dependencyValues != null && dependencyValues.length > 1) {
                String mark = "?";
                for (int i = 1; i < dependencyValues.length; i++) {
                    mark += ", ?";
                }
                sql = sql.replace("?", mark);
            }

            pstmt = con.prepareStatement(sql);

            //set query parameters
            if (sql.contains("?") && dependencyValues != null && dependencyValues.length > 0) {
                for (int i = 0; i < dependencyValues.length; i++) {
                    pstmt.setObject(i + 1, dependencyValues[i]);
                }
            }

            rs = pstmt.executeQuery();
            ResultSetMetaData rsmd = rs.getMetaData();
            int columnsNumber = rsmd.getColumnCount();

            // Set retrieved result to Form Row Set
            while (rs.next()) {
                FormRow row = new FormRow();

                String value = rs.getString(1);
                String label = rs.getString(2);

                row.setProperty(FormUtil.PROPERTY_VALUE, (value != null)?value:"");
                row.setProperty(FormUtil.PROPERTY_LABEL, (label != null)?label:"");

                if (columnsNumber > 2) {
                    String grouping = rs.getString(3);
                    row.setProperty(FormUtil.PROPERTY_GROUPING, grouping);
                }

                rows.add(row);
            }
        } catch (Exception e) {
            LogUtil.error(getClassName(), e, "");
        } finally {
            try {
                if (rs != null) {
                    rs.close();
                }
                if (pstmt != null) {
                    pstmt.close();
                }
                if (con != null) {
                    con.close();
                }
            } catch (Exception e) {
                LogUtil.error(getClassName(), e, "");
            }
        }

        return rows;
    }

    /**
     * To creates data source based on setting
     * @return
     * @throws Exception
     */
    protected DataSource createDataSource() throws Exception {
        DataSource ds = null;
        String datasource = getPropertyString("jdbcDatasource");
        if ("default".equals(datasource)) {
            // use current datasource
             ds = (DataSource)AppUtil.getApplicationContext().getBean("setupDataSource");
        } else {
            // use custom datasource
            Properties dsProps = new Properties();
            dsProps.put("driverClassName", getPropertyString("jdbcDriver"));
            dsProps.put("url", getPropertyString("jdbcUrl"));
            dsProps.put("username", getPropertyString("jdbcUser"));
            dsProps.put("password", getPropertyString("jdbcPassword"));
            ds = BasicDataSourceFactory.createDataSource(dsProps);
        }
        return ds;
    }
c. สร้าง dependency libraries ของปลั๊กอินของคุณ
ปลั๊กอินของเราใช้ dbcp, javax.servlet.http.HttpServletRequest และใช้คลาส javax.servlet.http.HttpServletResponse , ดังนั้นเราจะต้องเพิ่ม jsp-api and commons-dbcp ในไฟล์ POM ของเรา
<!-- Change plugin specific dependencies here -->
<dependency>
    <groupId>javax.servlet</groupId>
    <artifactId>jsp-api</artifactId>
    <version>2.0</version>
</dependency>
<dependency>
    <groupId>commons-dbcp</groupId>
    <artifactId>commons-dbcp</artifactId>
    <version>1.3</version>
</dependency>
<!-- End change plugin specific dependencies here -->
d. สร้างปลั๊กอิน internationalization (i18n) ของคุณให้พร้อม
เรากำลังใช้ i18n message key ในการ getLabel และ getDescription method. และเรายังใช้ i18n message key ในการตั้งค่า properties options ของเรา ดังนั้นเราจะต้องสร้างไฟล์ message resource bundle properties ให้กับปลั๊กอินของเรา
สร้าง directory "resources/messages" ภายใต้ "jdbc_options_binder/src/main" directory. จากนั้นสร้างไฟล์ "JdbcOptionsBinder.properties" ในโฟลเดอร์ ในไฟล์ properties, ให้เราเพิ่ม message keys และ labels ตามด้านล่าง
org.joget.tutorial.JdbcOptionsBinder.pluginLabel=JDBC Binder
org.joget.tutorial.JdbcOptionsBinder.pluginDesc=Used to load field's options using JDBC
form.jdbcOptionsBinder.config=Configure JDBC Binder
form.jdbcOptionsBinder.datasource=Datasource
form.jdbcOptionsBinder.customDatasource=Custom Datasource
form.jdbcOptionsBinder.defaultDatasource=Default Datasource
form.jdbcOptionsBinder.driver=Custom JDBC Driver
form.jdbcOptionsBinder.driver.desc=Eg. com.mysql.jdbc.Driver (MySQL), oracle.jdbc.driver.OracleDriver (Oracle), com.microsoft.sqlserver.jdbc.SQLServerDriver (Microsoft SQL Server)
form.jdbcOptionsBinder.url=Custom JDBC URL
form.jdbcOptionsBinder.username=Custom JDBC Username
form.jdbcOptionsBinder.password=Custom JDBC Password
form.jdbcOptionsBinder.useAjax=Use AJAX for cascade options?
form.jdbcOptionsBinder.addEmpty=Add Empty Option?
form.jdbcOptionsBinder.emptyLabel=Empty Option Label
form.jdbcOptionsBinder.sql=SQL SELECT Query
form.jdbcOptionsBinder.sql.desc=Use question mark (?) in your query to represent dependency values when using AJAX
form.jdbcOptionsBinder.testConnection=Test Connection
form.jdbcOptionsBinder.connectionOk=Database connected
form.jdbcOptionsBinder.connectionFail=Not able to establish connection.
e. ลงทะเบียนปลั๊กอินของคุณไปที่ Felix Framework
เราจะต้องลงทะเบียนคลาสปลั๊กอินของเราในคลาส Activator (สร้างอัตโนมัติในแพ็คเกจคลาสเดียวกัน) เพื่อบอก Felix Framework ว่านี่เป็นปลั๊กอิน
    public void start(BundleContext context) {
        registrationList = new ArrayList<ServiceRegistration>();
        //Register plugin here
        registrationList.add(context.registerService(JdbcOptionsBinder.class.getName(), new JdbcOptionsBinder(), null));
    }
f. สร้างและทดสอบ
สร้างปลั๊กอินของเรา เมื่อเราสร้างสำเร็จ เราจะพบว่าไฟล์ "jdbc_options_binder-5.0.0.jar" สร้างขึ้นภาตใต้ "jdbc_options_binder/target".
จากนั้น ให้เราอัพโหลดปลั๊กอิน Manage Plugins. หลังจากอัพโหลดไฟล์ jar เสร็จสิ้น , ให้เราตรวจสอบอีกครั้งว่าปลั๊กอินนั้นถูกอัปโหลดและเปิดใช้งานอย่างถูกต้อง
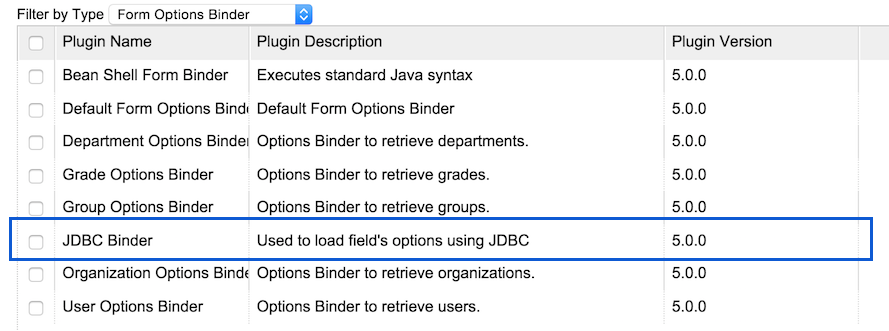
จากนั้น ให้เราสร้าง AJAX Cascading Drop-Down List ในฟอร์มเพื่อทดสอบมัน สร้างแบบทดสอบของเราตามนี้

จากนั้นกำหนดค่าใน Select Box ของเราและเลือก JDBC binder


In the query, we will use the following query to get the user list based on group id.
select distinct username, firstName, groupId from dir_user u
join dir_user_group g on u.username=g.userId
where groupId in (?) group by username;

กำหนดค่าการพึ่งพา "กลุ่ม" จากนั้นทดสอบผลลัพธ์


ตัวเลือกกล่องที่ผู้ใช้เลือกเปลี่ยนไปตามค่าที่เลือกของกล่องเลือกกลุ่ม
ทีนี้เรามาเปลี่ยน query ต่อไปนี้เพื่อทดสอบรายการดร็อปดาวน์แบบเรียงซ้อนโดยไม่ต้องใช้ AJAX
select distinct username, firstName, groupId from dir_user u
join dir_user_group g on u.username=g.userId
group by username;
อย่าลืมยกเลิกการเลือก "ใช้ AJAX สำหรับตัวเลือกการเรียงซ้อนหรือไม่" ตัวเลือกเพื่อให้ไม่ใช้ AJAX

ใช่ มันทำงานได้ดี จากนั้นเราสามารถทดสอบการกำหนดค่าที่กำหนดเองและปุ่มทดสอบการเชื่อมต่อ

8. ขั้นต่อไป แชร์หรือขาย
คุณสามารถดาวน์โหลด source code จาก jdbc_options_binder_src.zip.
หากต้องการดาวน์โหลด jar ปลั๊กอินที่พร้อมใช้งานโปรดค้นหาที่ http://marketplace.joget.org/.